fixing

610 readers
1 users here now

Celebrating/talking about repairing stuff, the right to repair stuff, and the intersection of tech and solarpunk ideals.

What does it mean to use what we have, including technology, to try to build a better, more environmentally just world?

founded 2 years ago
MODERATORS
1


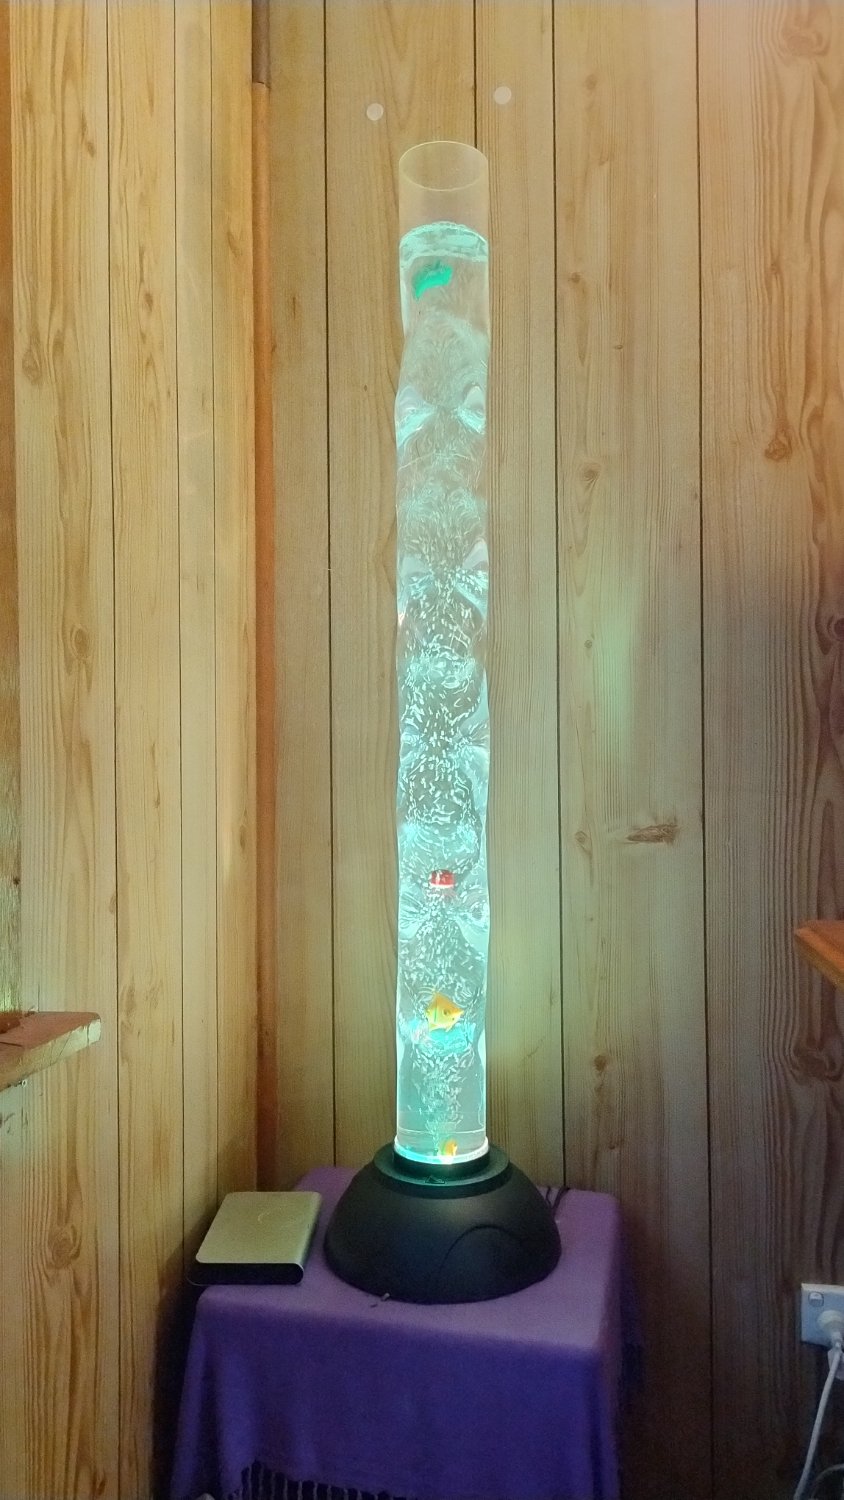
Decided to restore this old thing from out in the shed. It was in the weather for a couple of years, and I think it's 20+ years old.

Replaced the pump with a USB powered 5 watt silent one.

Replaced the halogen lamp with an LED one.

Cleaned as much as I could.

Seems to be working well. How long the $12 ebay pump lasts remains to be seen.

2
11
Compressor Repair (www.splitbrain.org)
submitted 4 days ago by poVoq to c/fixing
3
31
1990s CNC Vertical Mill Revival (salvagedcircuitry.com)
submitted 3 weeks ago by poVoq to c/fixing
4


Hi,

Is there good literature on how to repair stuff? Just general things, not specific appliances. How to repair wood, how to properly sand wood and metal, how to replace a tile, how to read and analyze circuits, identify faulty parts and correct replacements, etc. I just want to become better at repairing stuff.

5
24
submitted 1 month ago* (last edited 1 month ago) by poVoq to c/fixing
6
12
Vehicle Repair (self.fixing)
submitted 1 month ago by Blair to c/fixing


I do not know if these have been posted yet, but I thought I would share them just in case

7
63
Caliper Fixup (slrpnk.net)
submitted 2 months ago by JacobCoffinWrites to c/fixing


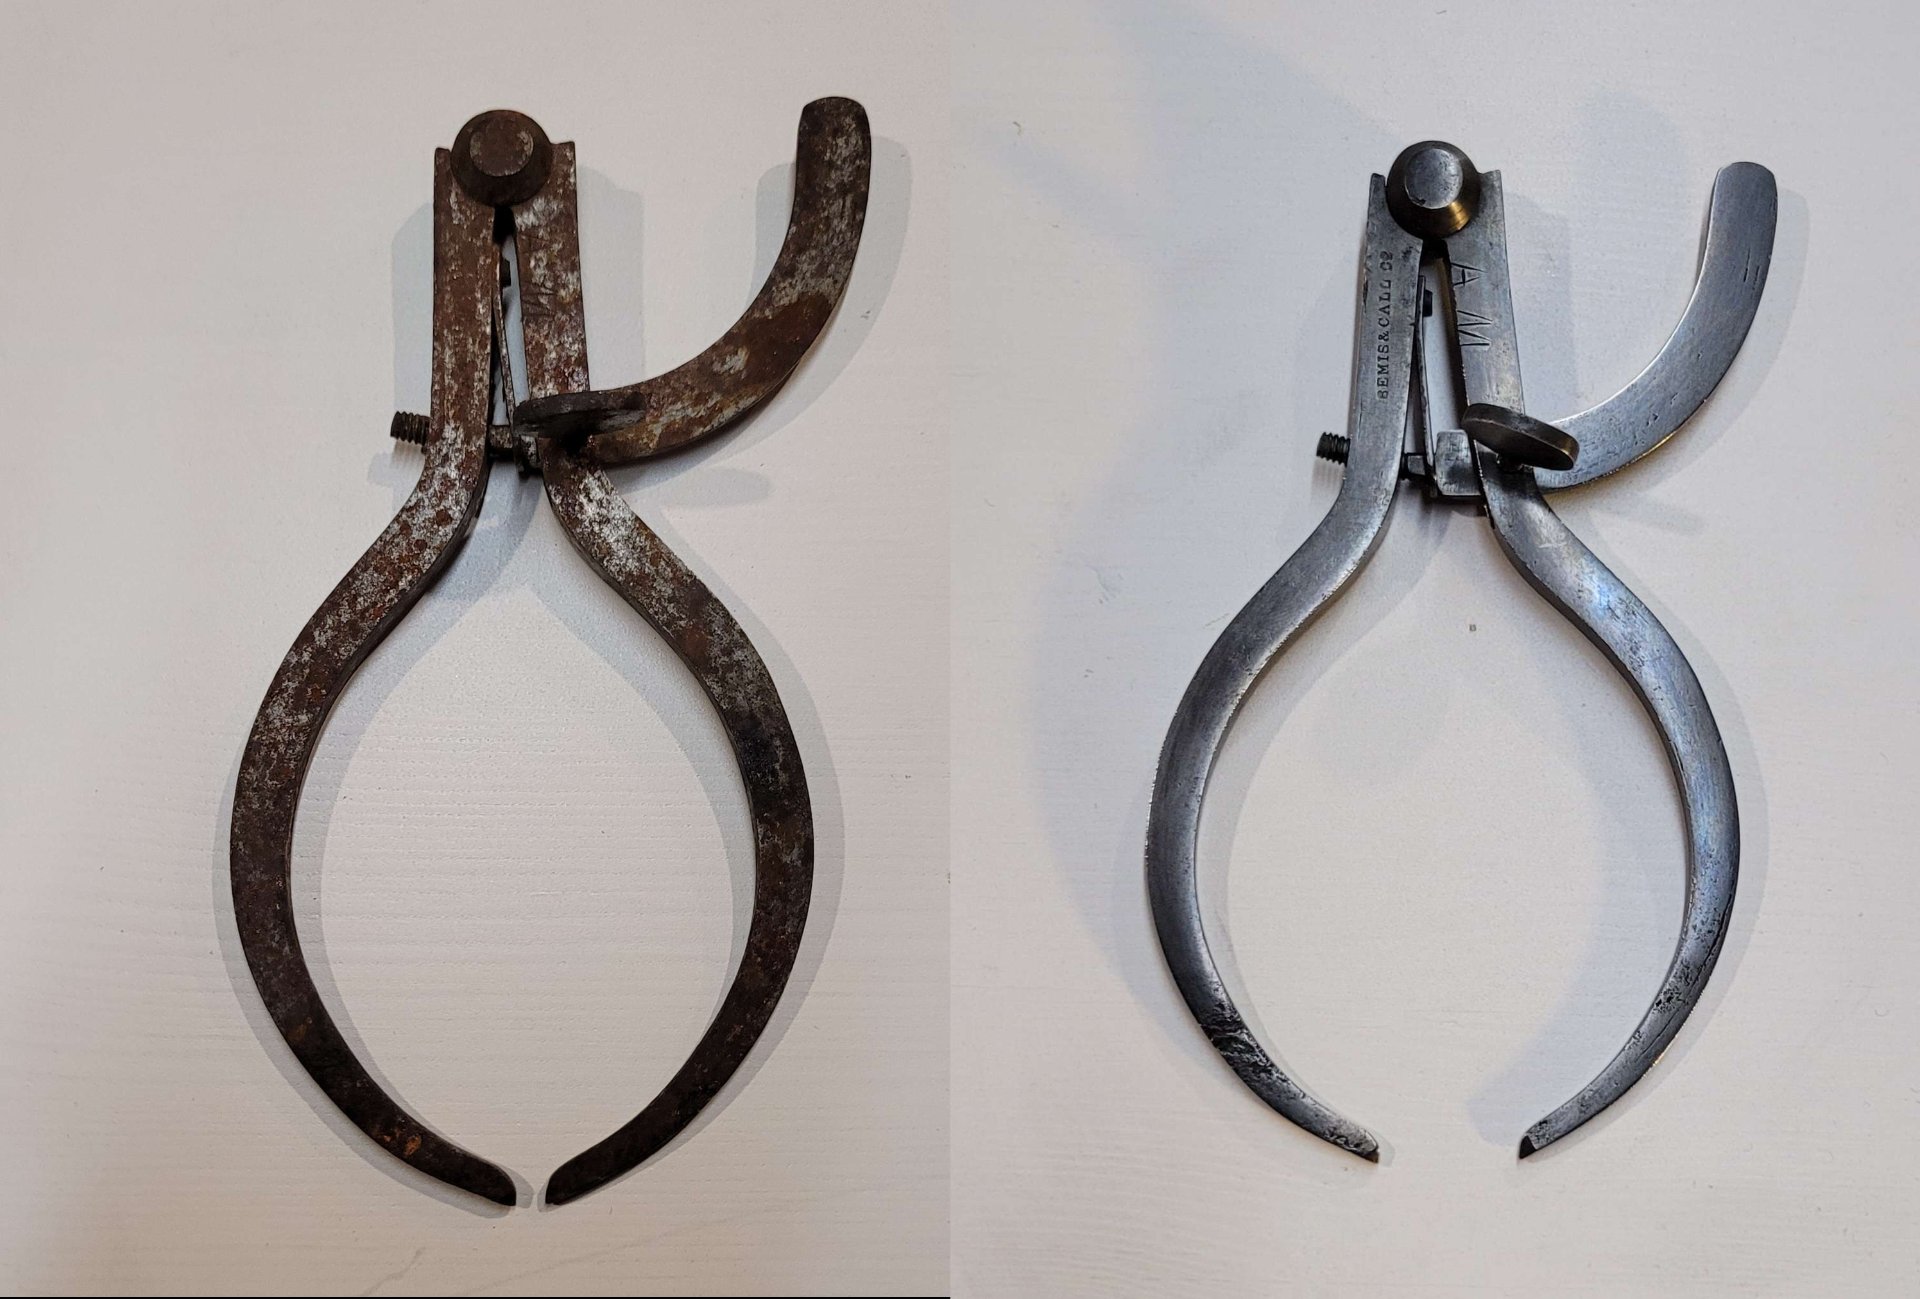
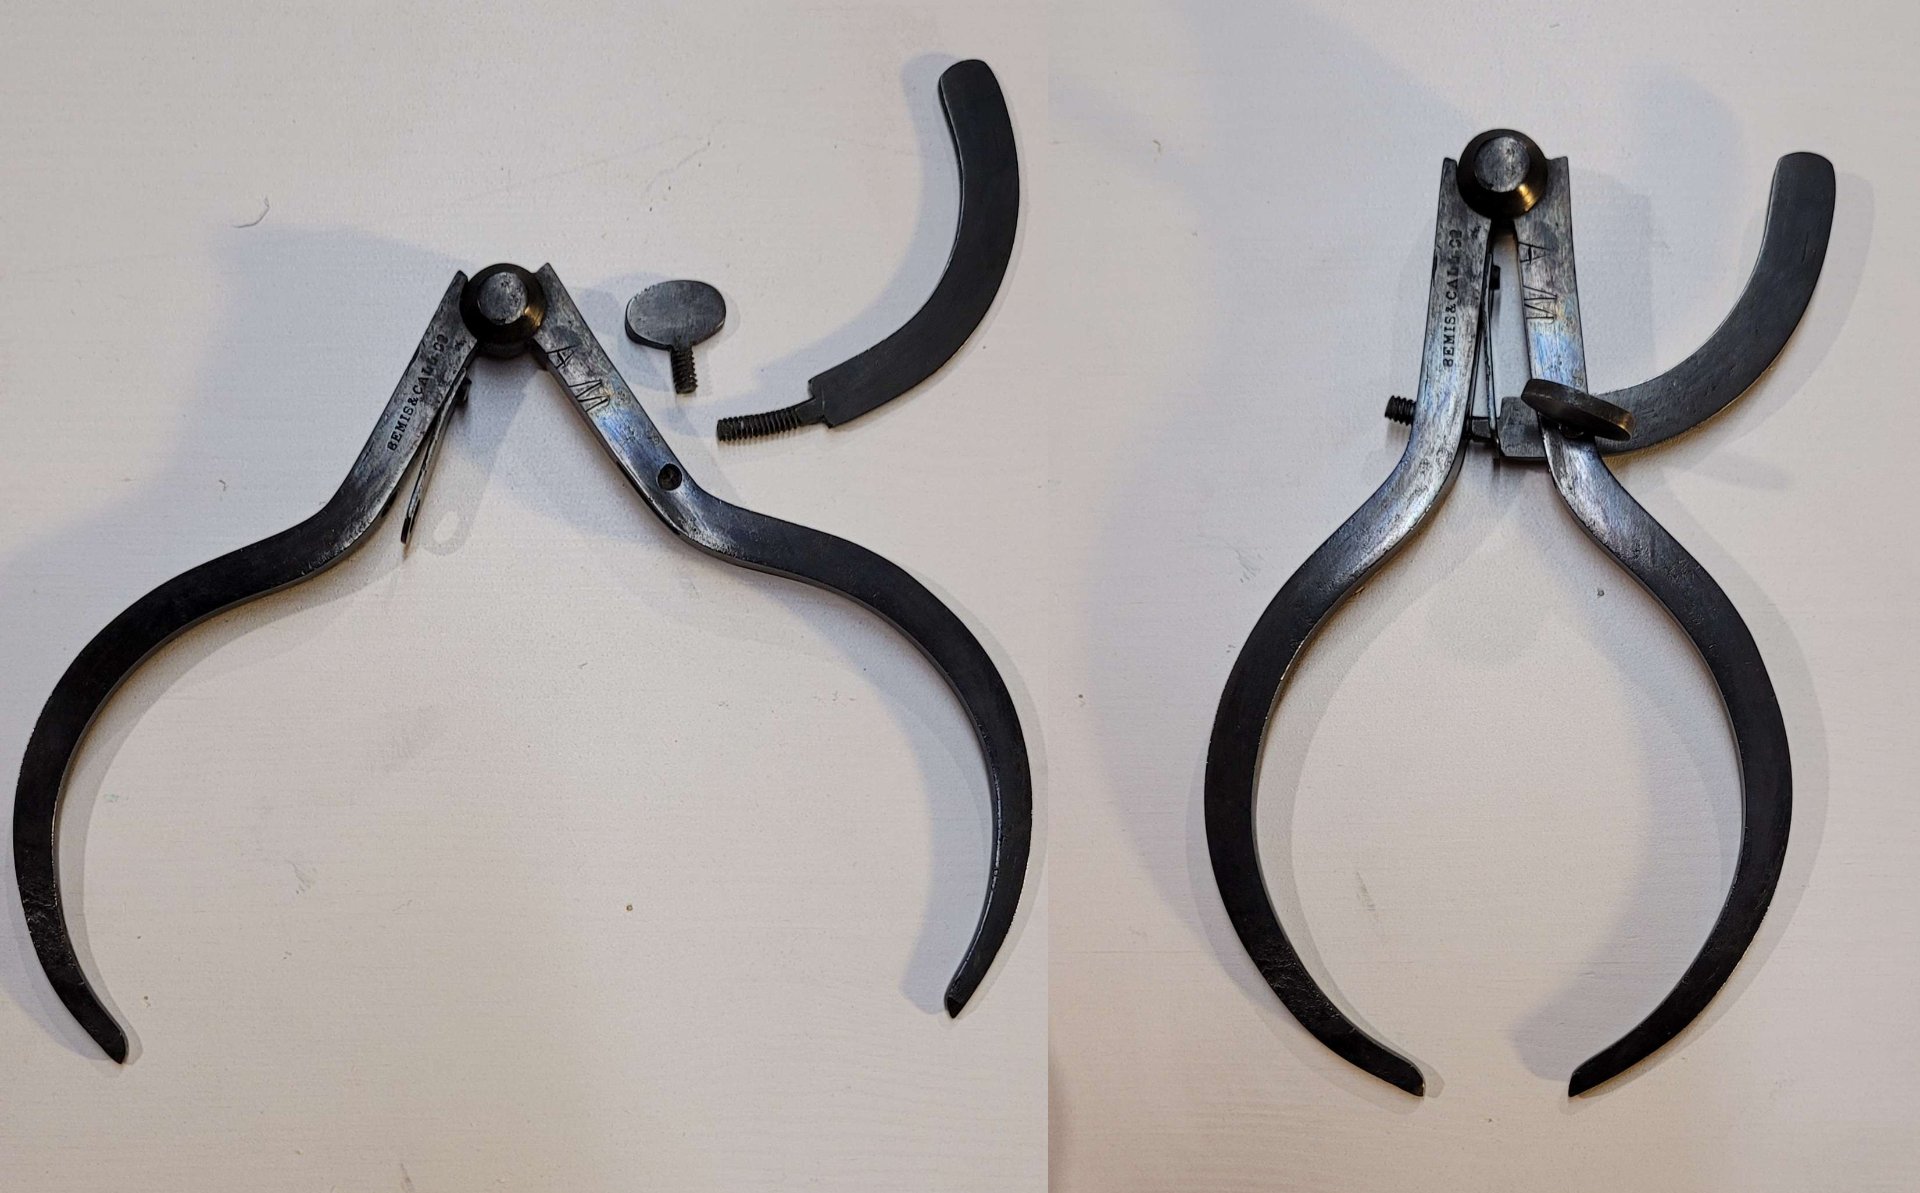
I bought this set of outside calipers at a junk store in my hometown (sort of a consignment, thrift store deal, with lots of old furniture, and the contents of like half a dozen garages right down to the old jars of mismatched screws. I sort of use it like a hardware store).

I like this design a lot, I like the lack of a spring on the jaws, and that you can fasten the little distance measuring arm to the side it measures on, so you can close the calipers around something, tighten that wing screw, then open the calipers to get them back.

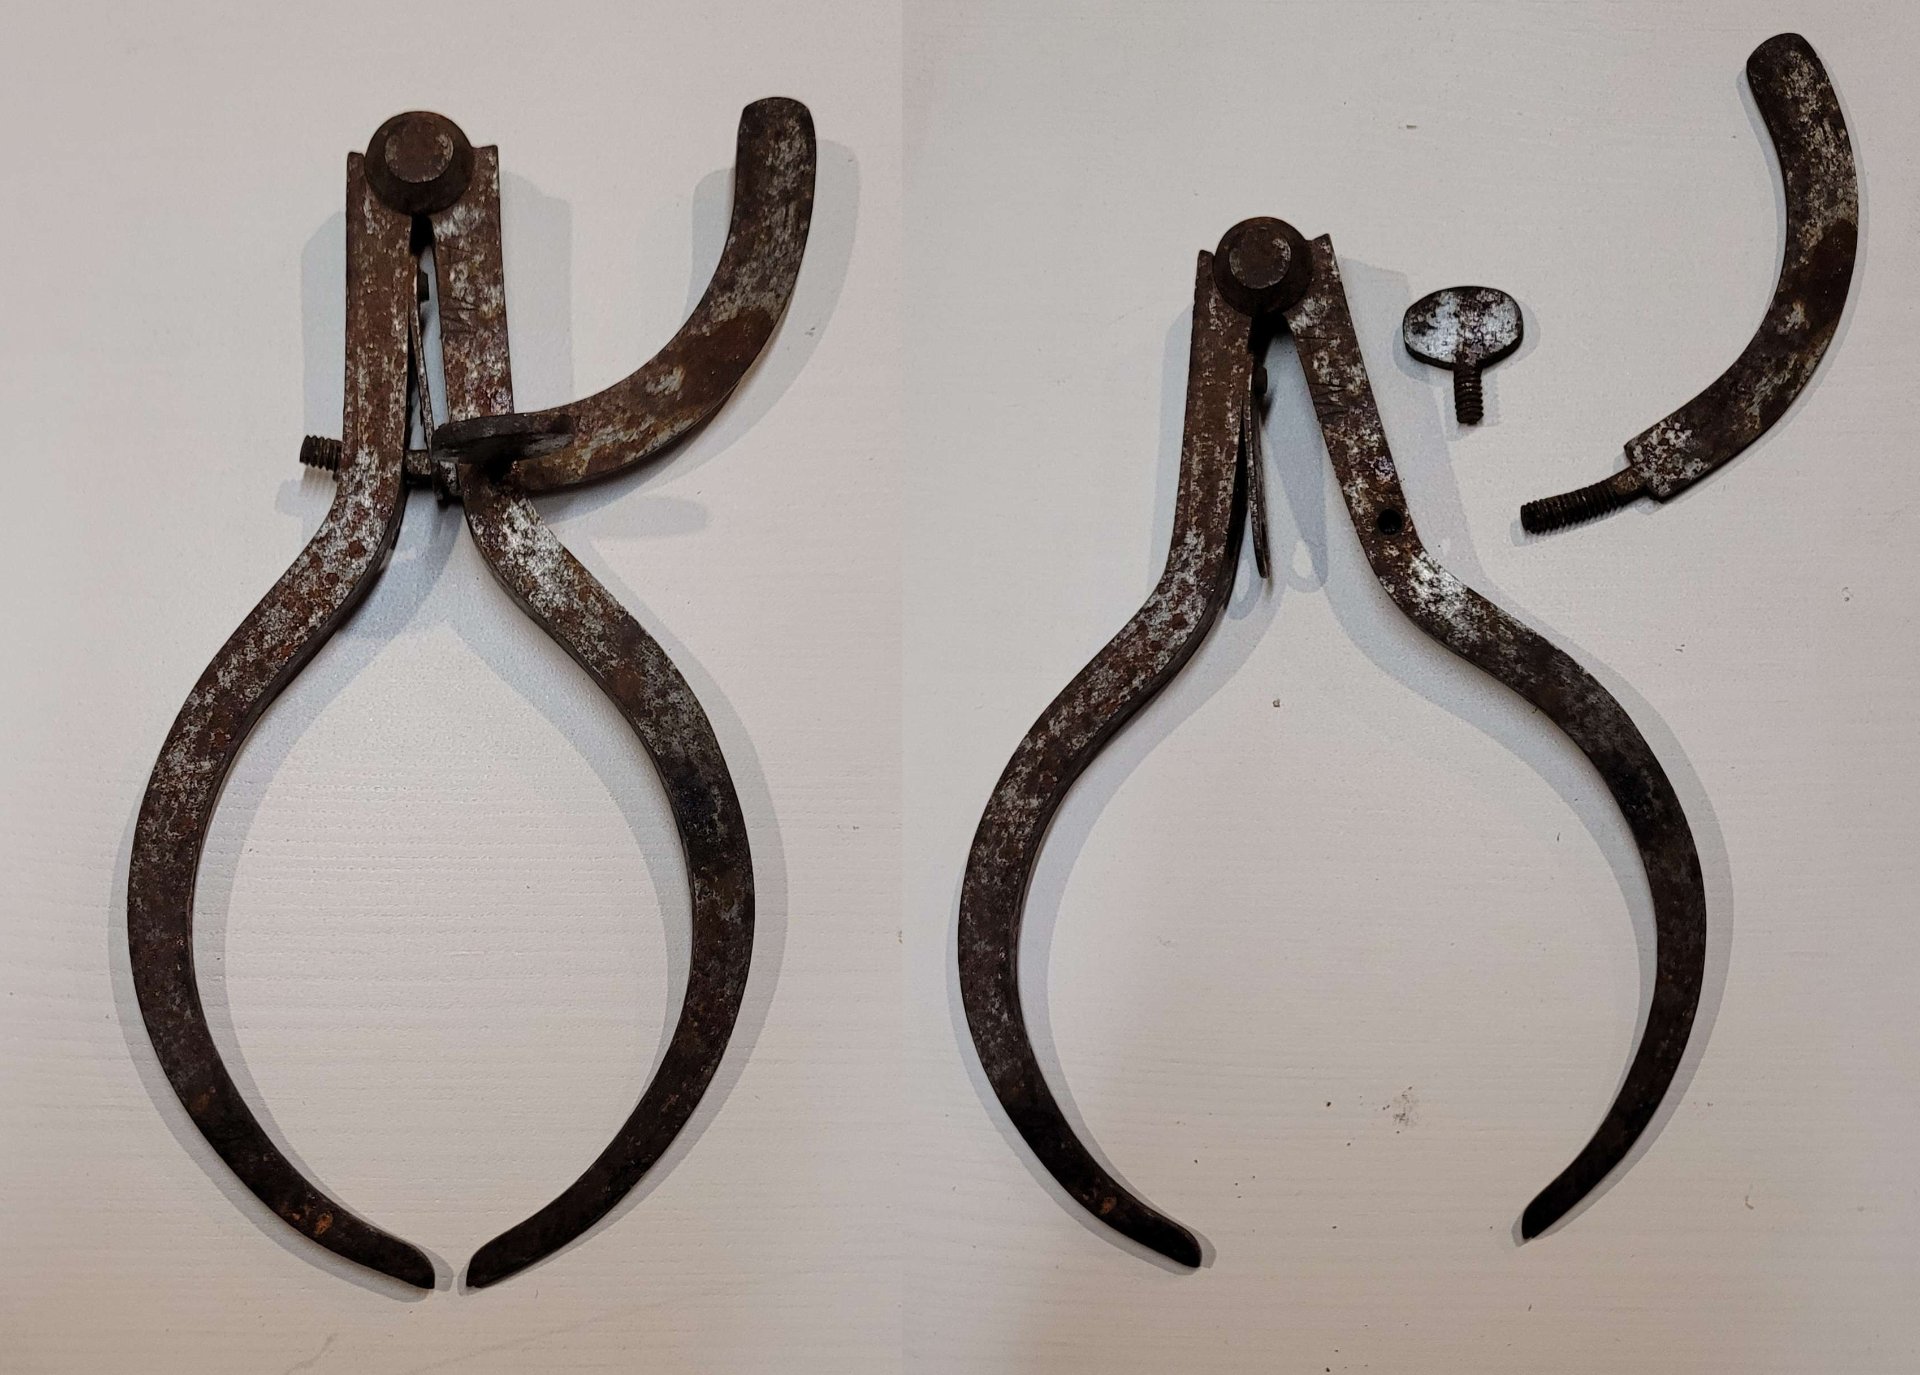
They had some surface rust, so I decided to clean them up. The first step was to disassemble them. Not difficult when there's only three pieces involved.

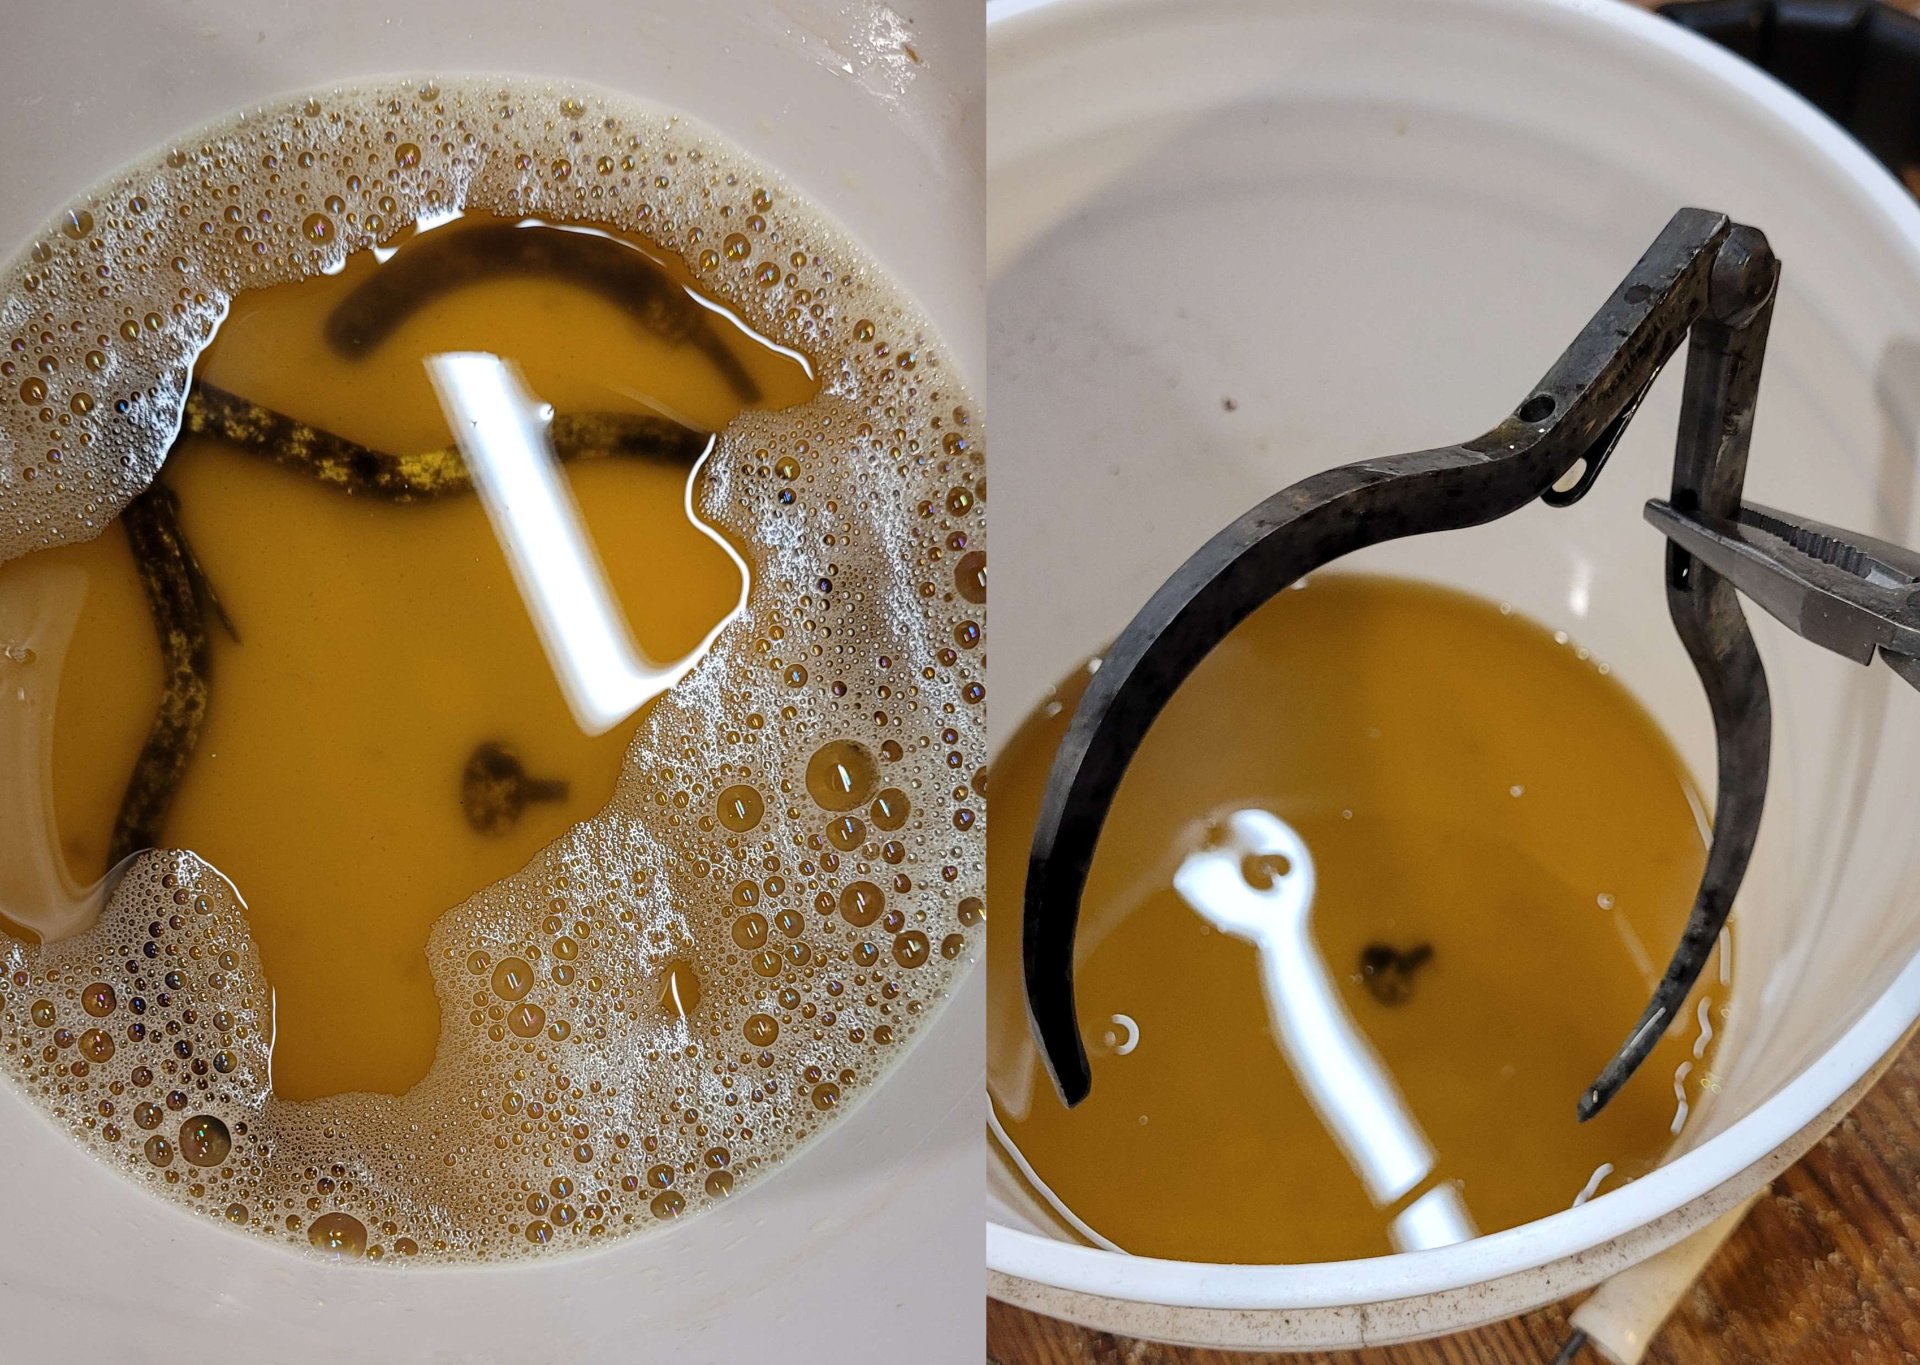
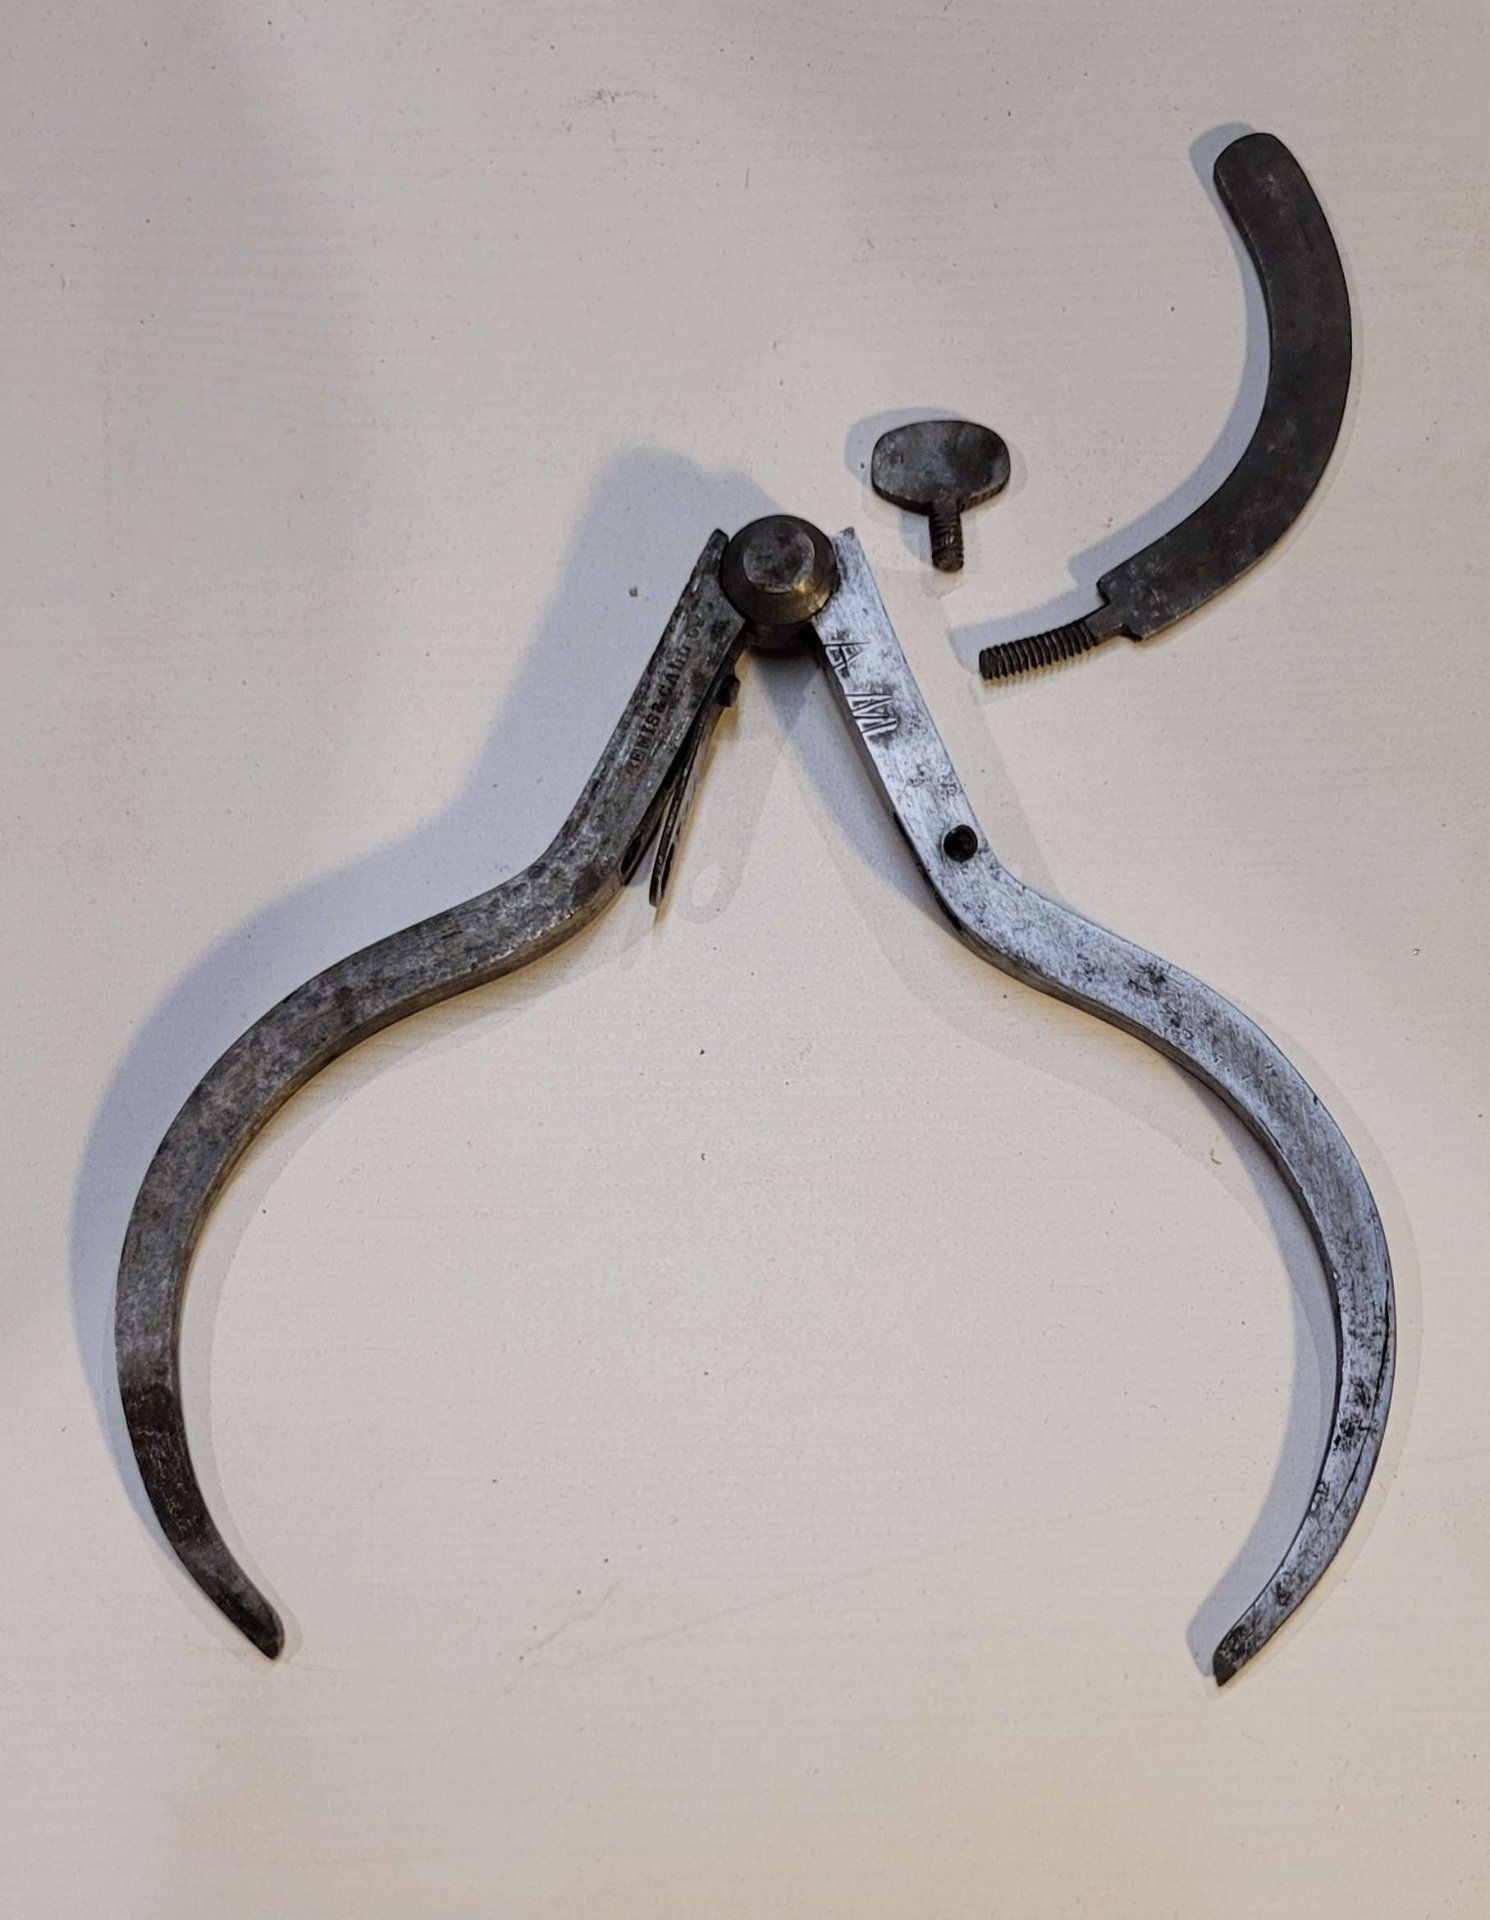
I let them soak in some evaporust for about 8 hours. I really like this stuff, it hits the sweet spot between very effective and not especially dangerous, and it's reusable! They do overestimate how effective it is in their instructions though, so it often takes longer.

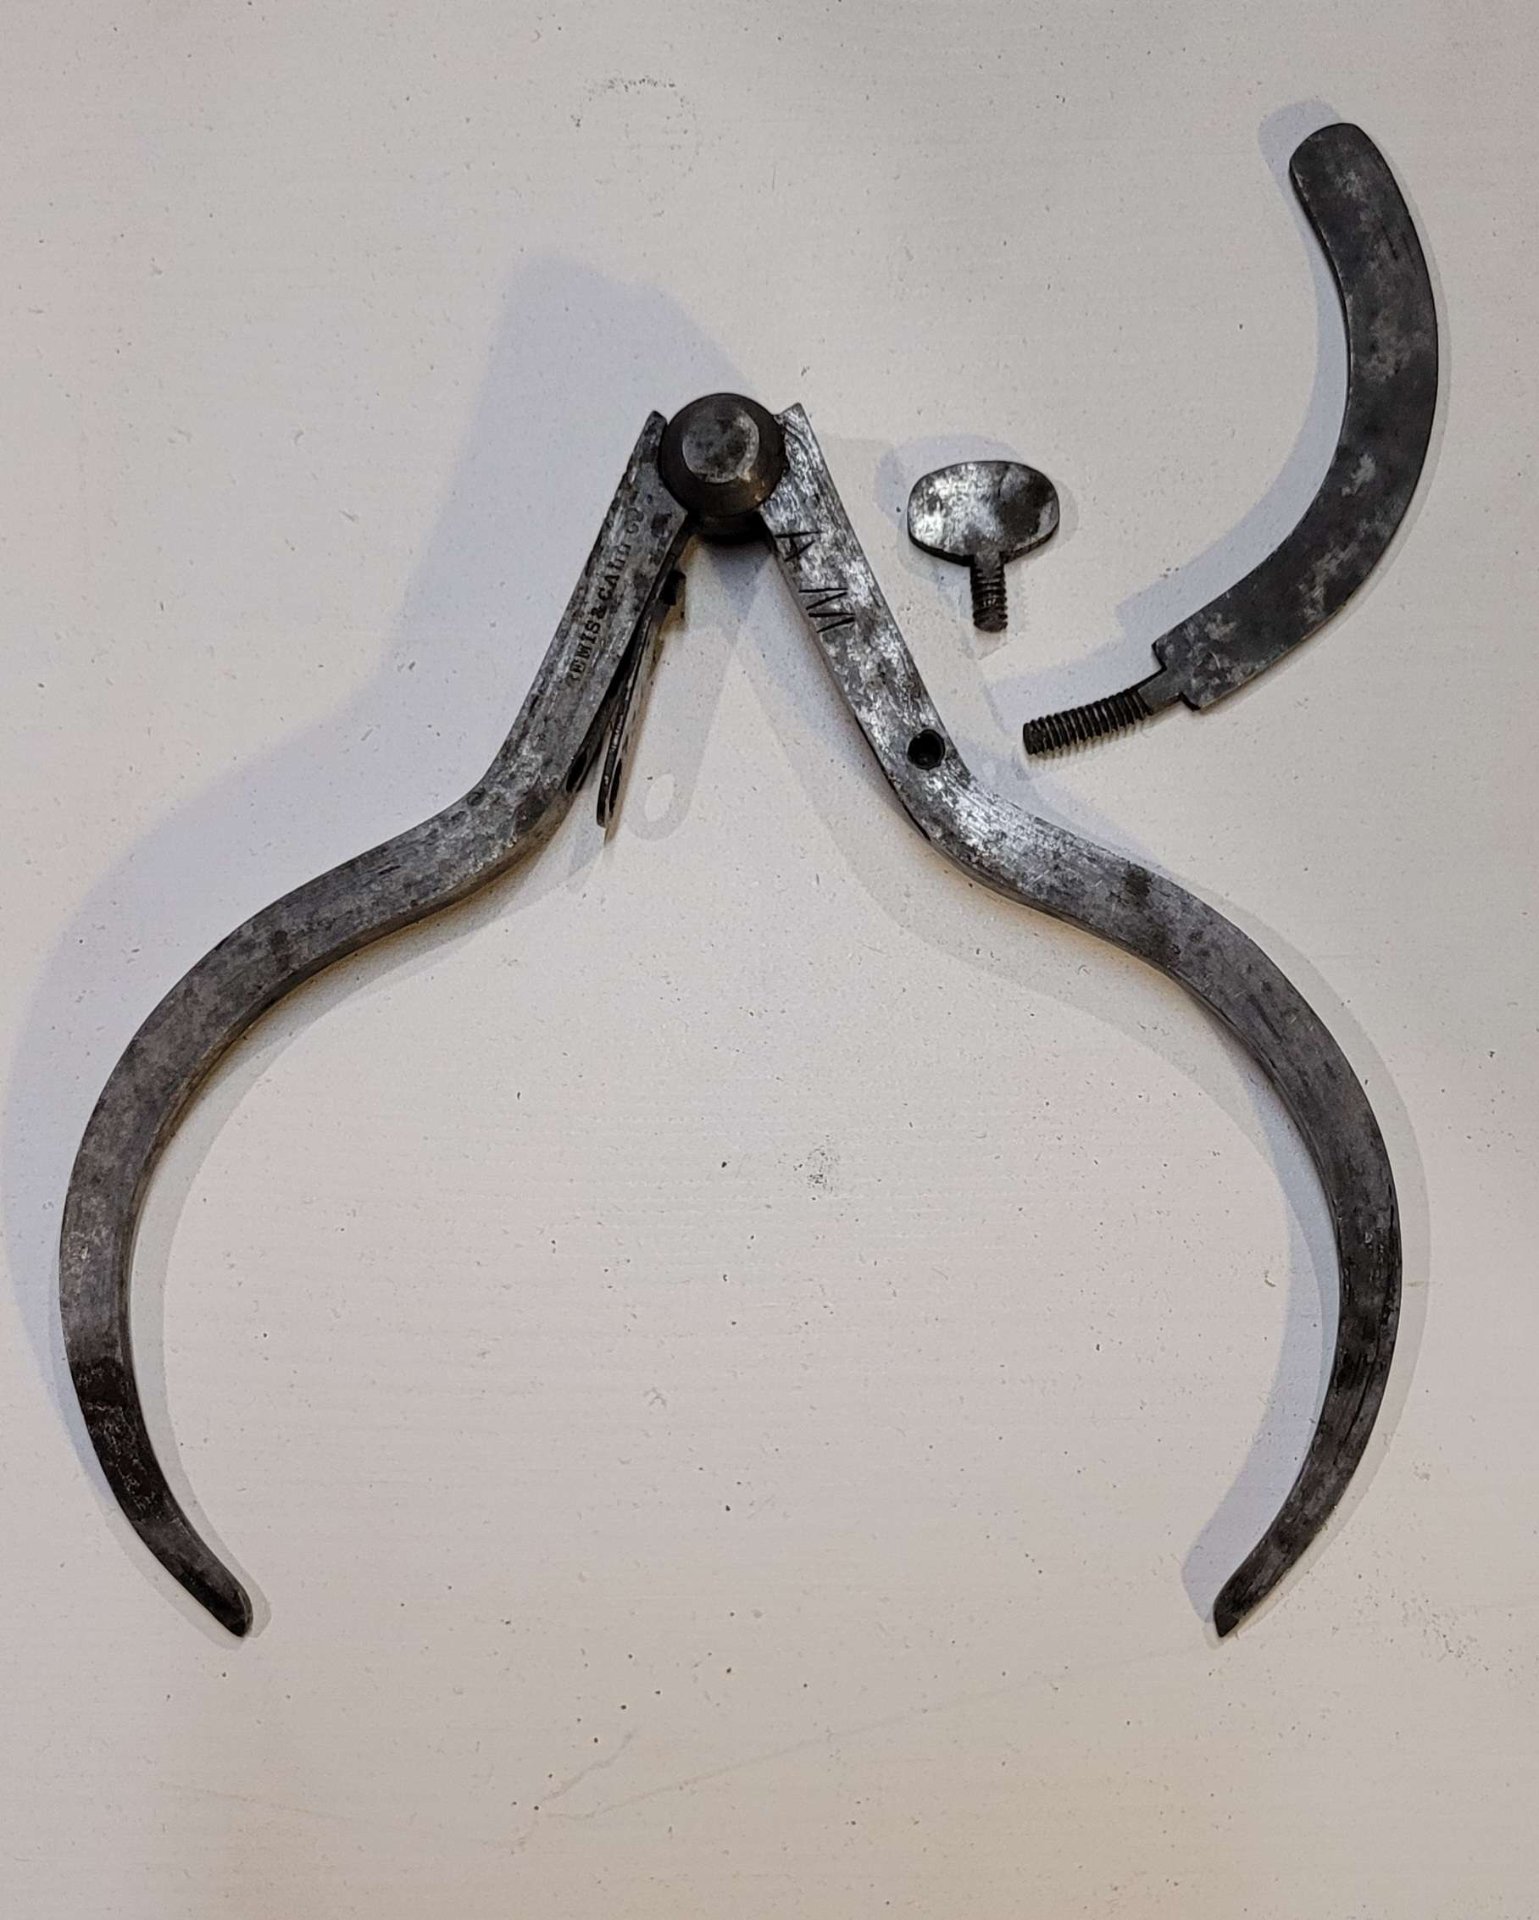
The calipers, straight out of the evaporust. You can already see some text which was hidden before, along with the initials AM from a previous owner.

Now that the worst of the rust had been dissolved, it was time to switch from chemical to mechanical cleaning. I sanded it down with 400 grit emery cloth.

The calipers with only one side sanded.

As I cleaned up the sides, I found a few neat bits of history:

Here's some funny nicks up near the joint on one side. I wonder what caused them. And the previous owner's mark on the right side, AM. This is a big part of why I love old tools. I love the history they carry with them, even if I don't know all of it.

Looking better, but still a ways to go. I was surprised to find that there weren't any markings on the little distance arm. I'd been expecting to find little angle tickmarks or something, maybe even printed numbers, but there weren't any to be seen after the evaporust, or once I started gently sanding off the remaining rust and the black crud evaporust leaves behind.

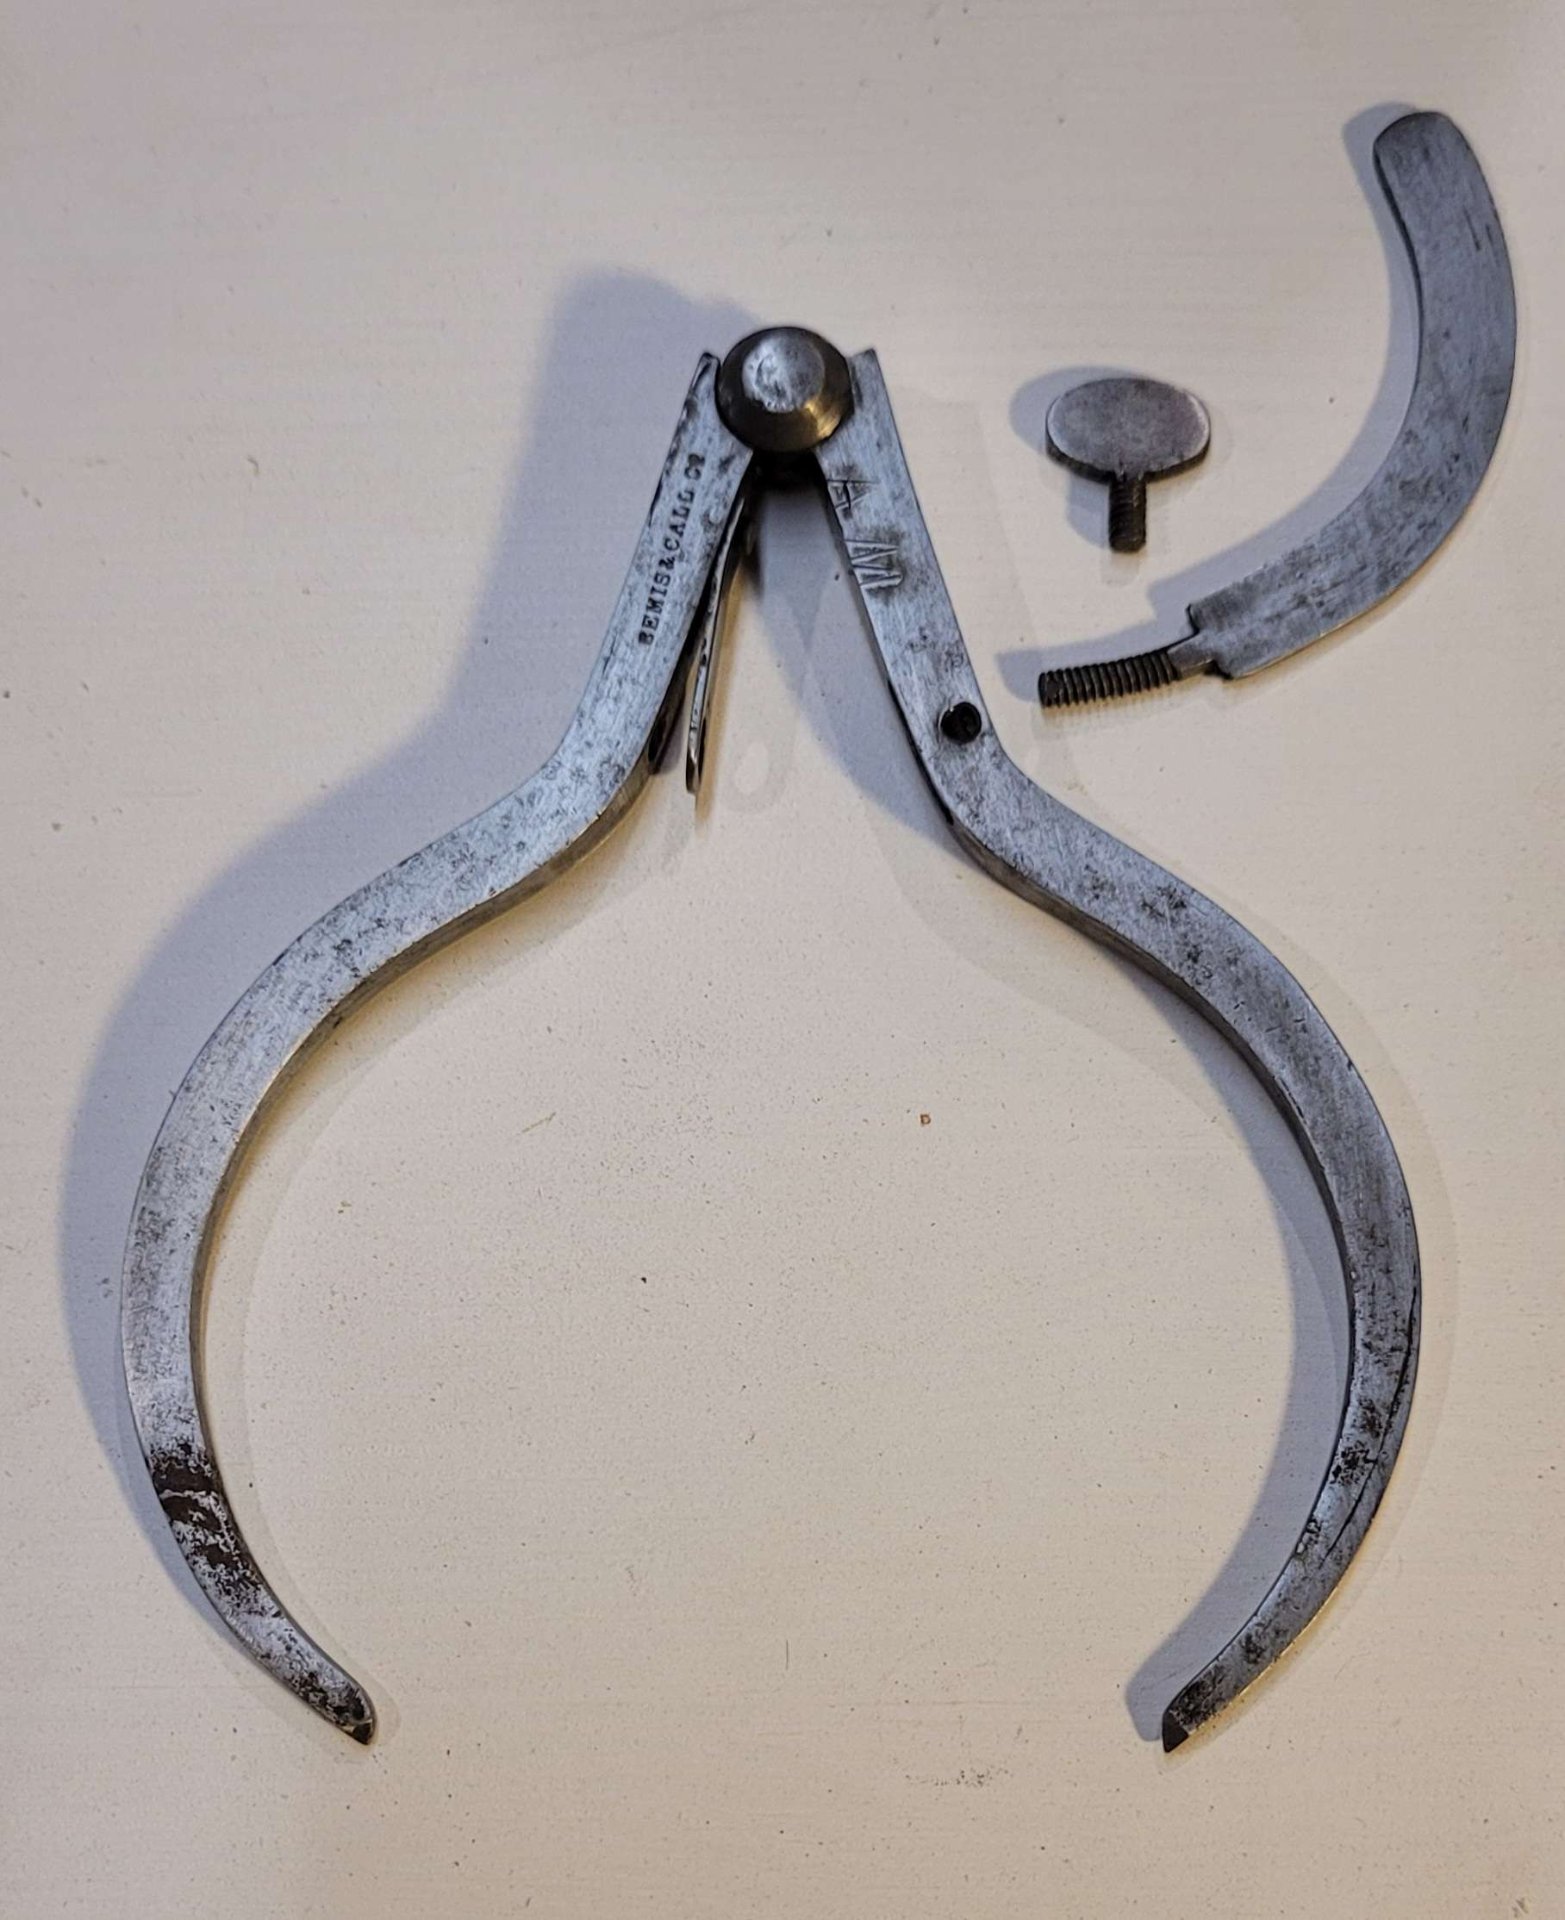
Once I had most of the rust gone, I switched to steel wool. I didn't want to take too much material off the surfaces, and I felt the more flexible steel wool would hit inside the pitting from the rust better.

The steel wool shined it up quite nicely. And here's a closeup of some of the surface pitting left over by the rust on the left side. The back of these calipers didn't have this kind of damage.

It was tempting to leave it here, but I didn't want the rust to return, so I decided to treat the calipers with cold blue, to provide some protection against oxidation. There are other ways to protect steel, but I like the look and it seems to hold up well enough.

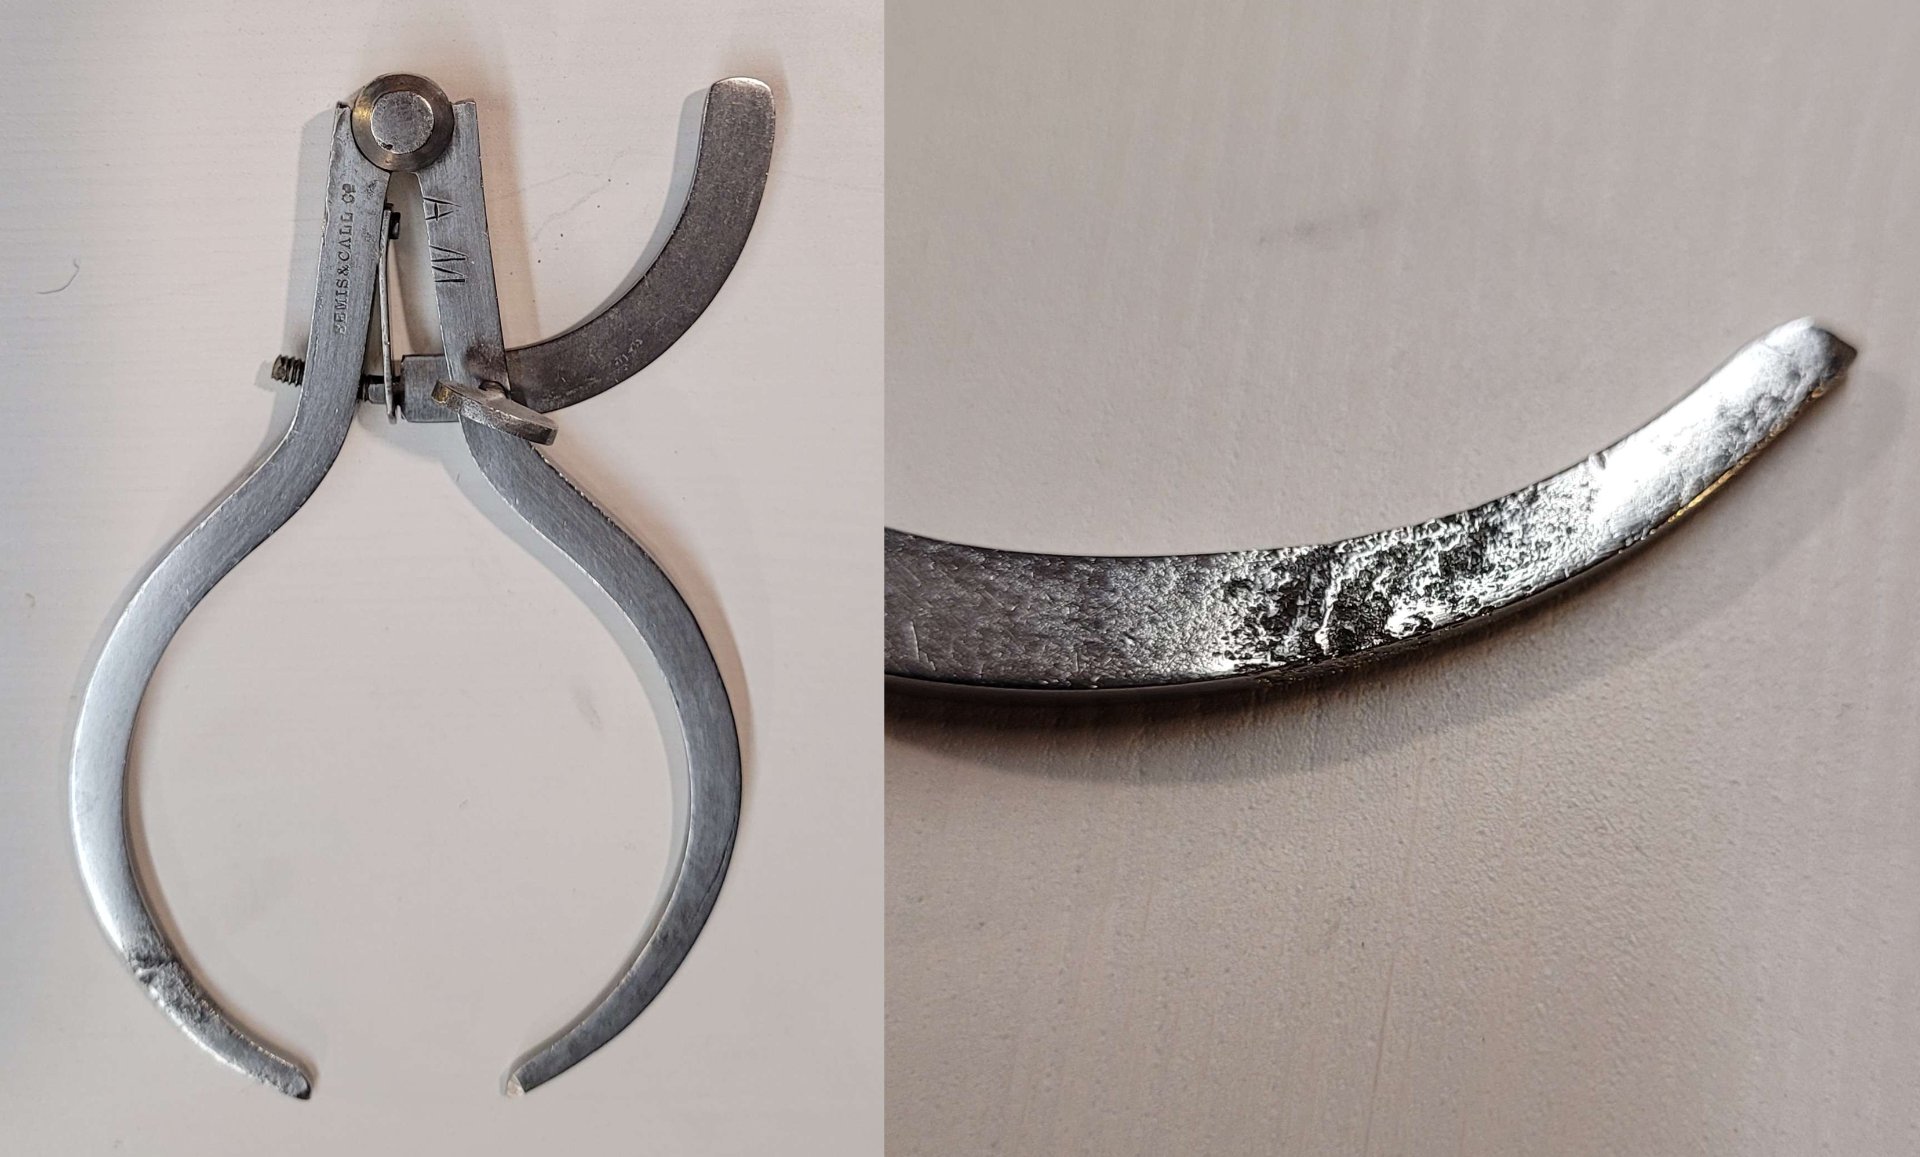
Cold blue always looks a little rough when it first goes on (this stuff is a gel you don't want to get on your hands. You wipe it on, leave it to darken the metal for 60 seconds, and wipe it off again) but a little burnishing with 0000 steel wool will tidy it up:

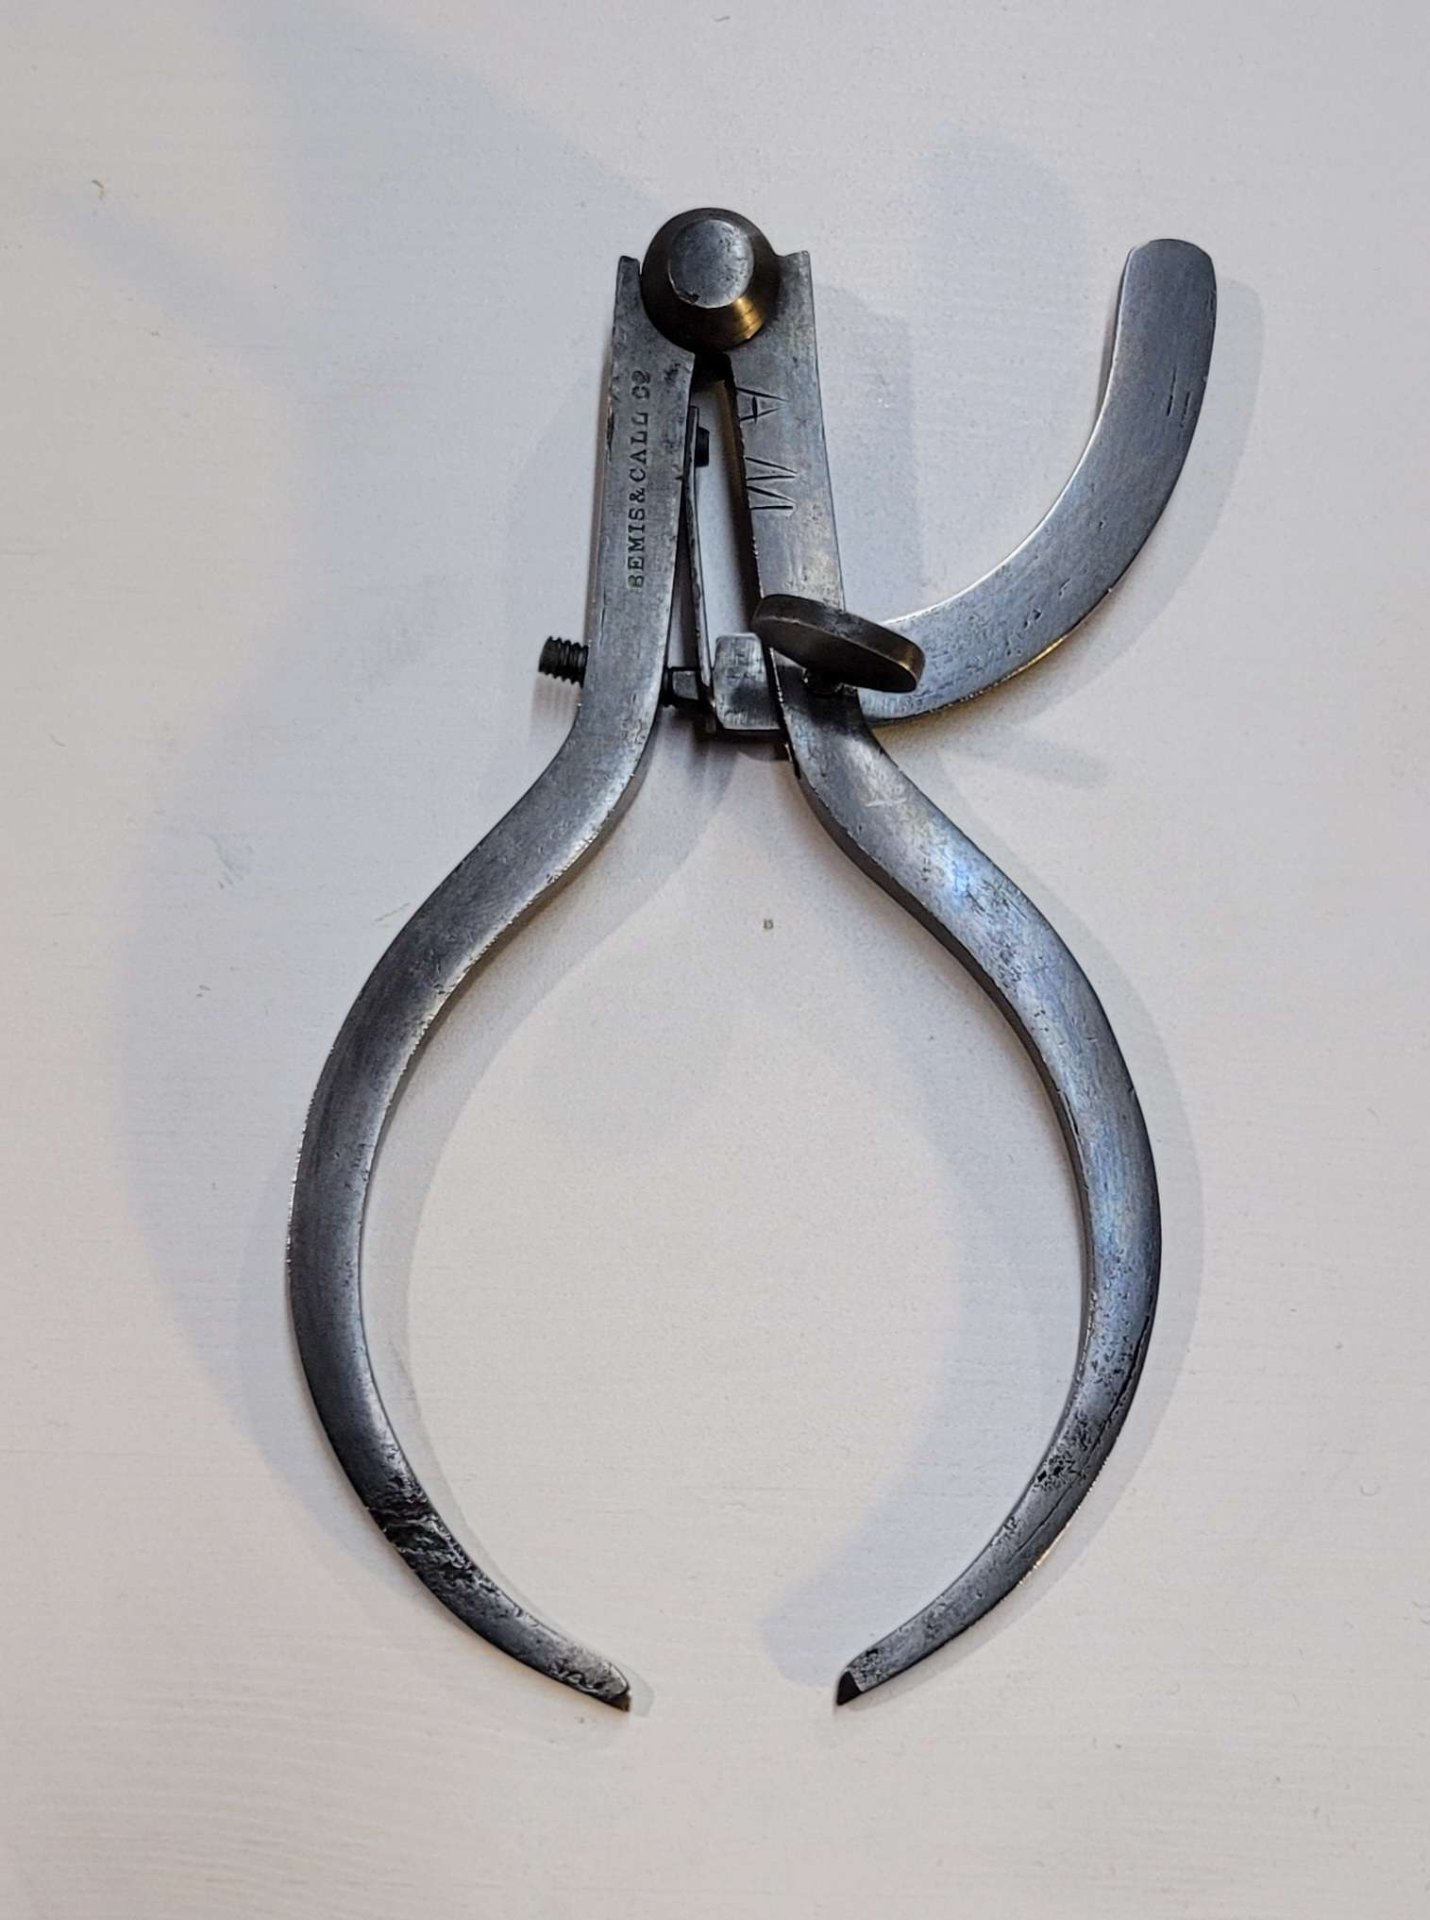
There we go, still pretty shiny, but not as likely to rust again. Not bad considering how it looked in the beginning. Hope you'd approve, AM.

(I wrote this post for the making/fixing things blog I have on our local movim instance. If you're a slrpnk.net local, your credentials will work on movim automatically!)

8


cross-posted from: https://feddit.cl/post/2652008

Kobo and iFixit partner for OEM parts and repair guides

9
43
submitted 3 months ago* (last edited 3 months ago) by SharkEatingBreakfast@sopuli.xyz to c/fixing


Refrigerator is a Frigidaire LTFR1832TF0.

Leak came from the front-right side.

I did not notice any temperature fluctuations, but I also don't notice much of anything. It still seemed cold when I unplugged it, though!

Checked the drain pan & it seems dry? Not overflowing or anything.

No water on inside of refrigerator.

Anyone have any idea what might be going on? I'd really appreciate it, as no one can take a look for another 3 days.

I don't want my food to spoil, as I don't have a lot of money. I just want to know if it'd be safe to plug it back in!

Thank you.

EDIT: had my BIL stop by to take a look. More than likely it's refrigerant. The compressor was fine, but one of the lines on it would not get cold, so that's that. Probably a leak in the line, more than likely from a failed seal.

The cost to refill the refrigerant / repair the line / seal would cost waaaaay more than a new fridge, unfortunately.

Thanks, y'all. Appreciate the help and advice.

10
34
Quick Shed Door Repair (movim.slrpnk.net)
submitted 3 months ago by JacobCoffinWrites to c/fixing


This was a pretty quick little project - some of my friends recently bought a house, it came with a shed, and the door of that shed was broken. The design of the door allowed it to swing open about 180 degrees, at which point it'd hit its own frame.The wind must have caught it one day and swung it open hard. When that big wide door hit the frame so close to its fulcrum, it just snapped right down the line. It also bent all the hinges.

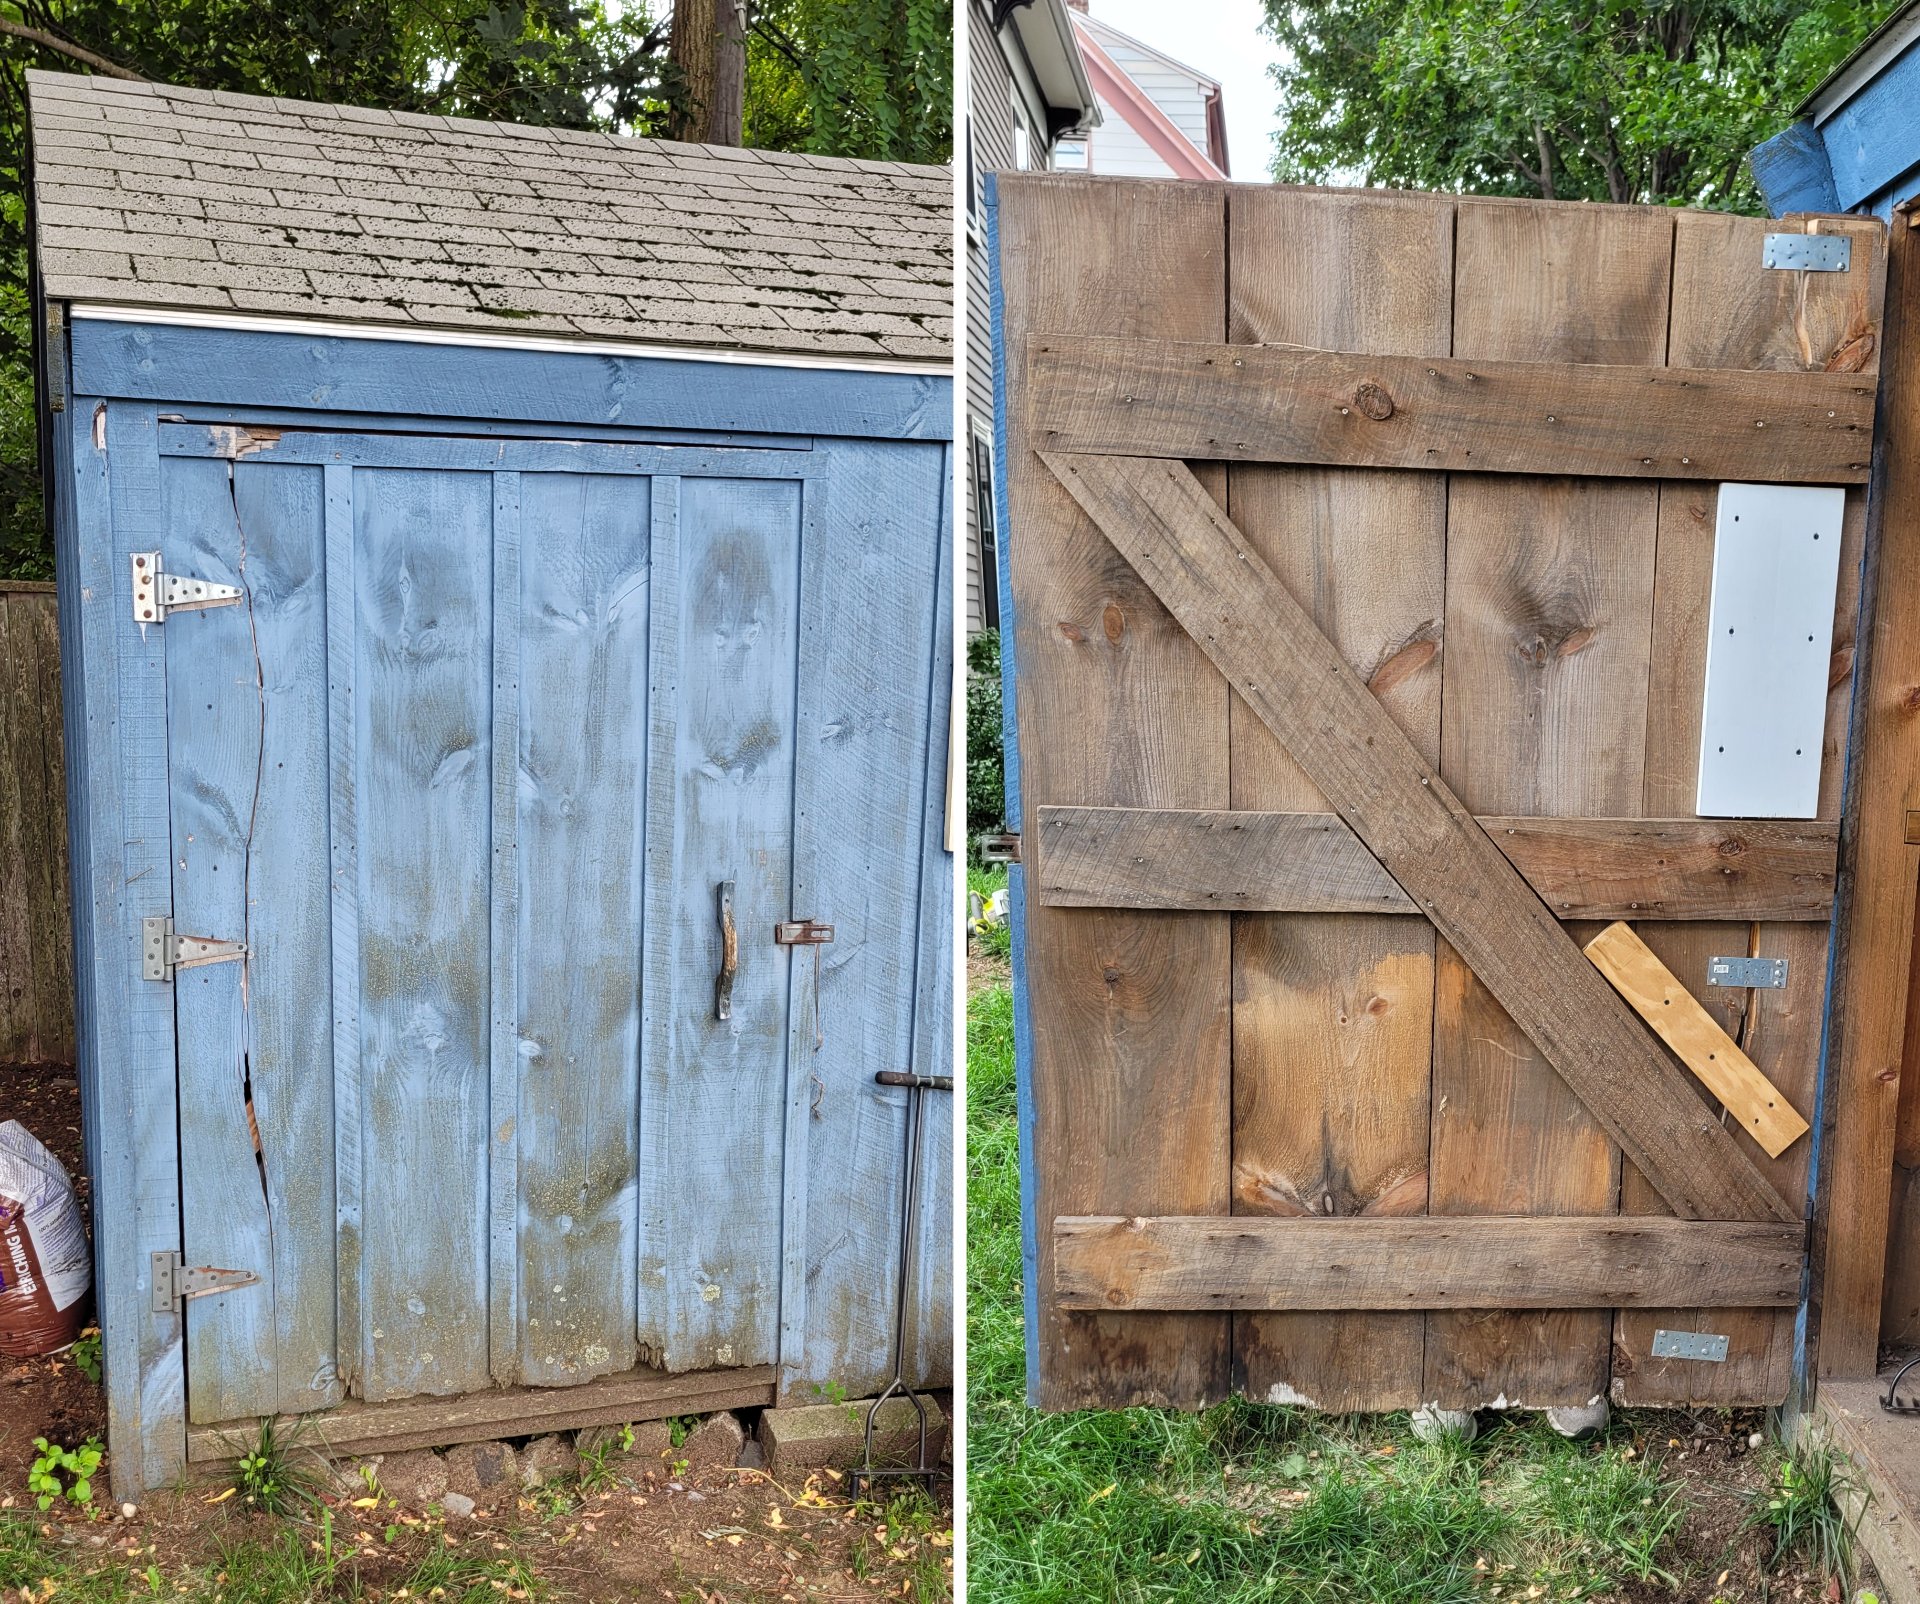
The previous owners tried to fix it, it looks like by lifting the door back in place and driving some mismatched screws through some wood scraps and metal plates. That left the door drooping, hanging crooked in the frame, and flexing kind of alarmingly when it opened.

We'd talked about taking it down and fixing it properly, I even took some measurements.

Then one morning I got lucky, I saw a post on our local Buy Nothing -type page where someone was offering up some 1"x12" boards they'd been using as shelves in a shed. They were a bit weathered but otherwise in good shape (no cracks, warp, or rot). It was trash day in that neighborhood so I hustled out there and claimed the whole pile. 1"x12"s ain't cheap.

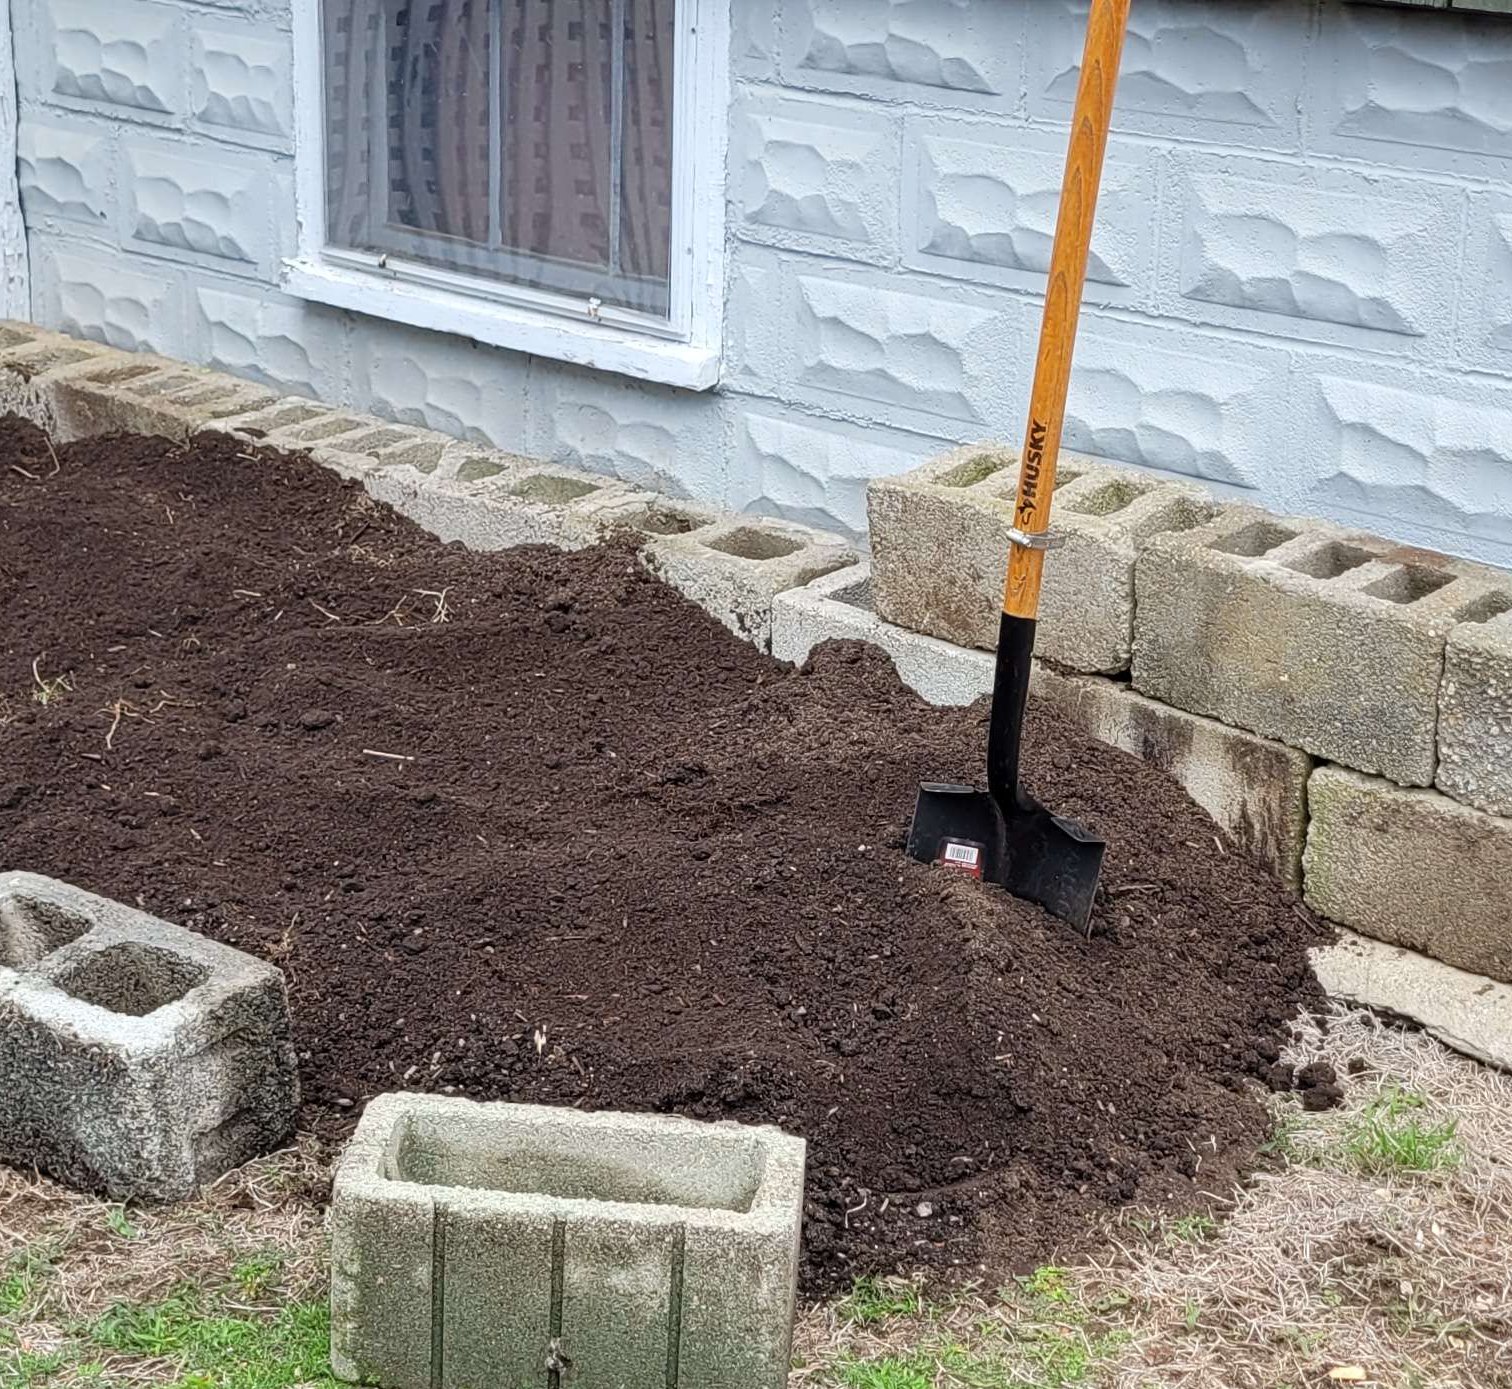
On the way back I picked up a shovel with a cracked handle which I fixed with a hose clamp and have been using for a couple years now.

We set a day, I packed the lumber and tools, and we started in on the shed. I think we also planted a peach tree (using my new shovel) that day.

We started by taking the door off the shed and setting it on some sawhorses I brought.

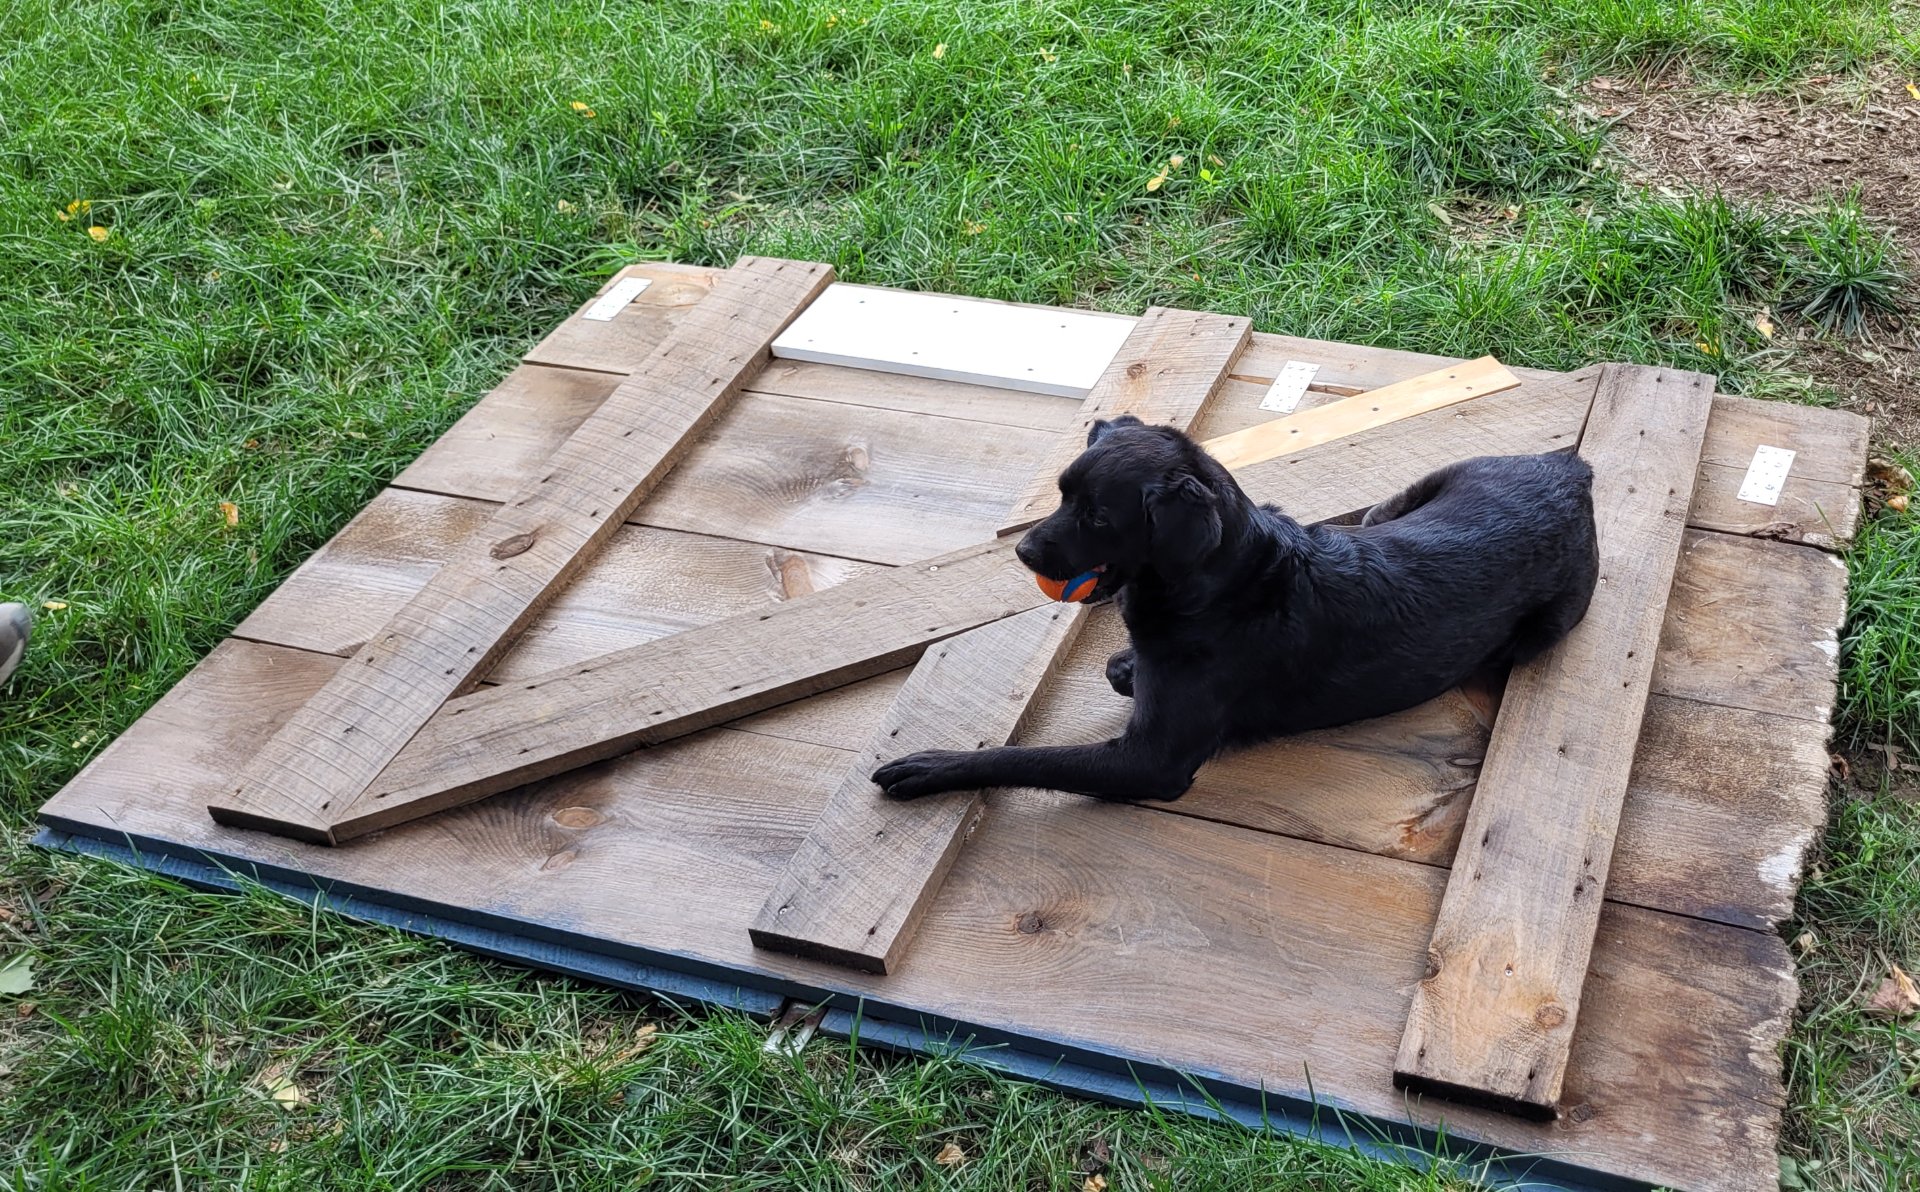
(Dog helping hold down the door)

This was where we made our first unfortunate discovery. The shed was older than we'd realized. The 1"x12"s the door had been made from were rough cut, not dimensional, so the boards I'd brought were about half an inch narrower, and a quarter inch thinner than the originals.

So we had a couple options here - all the boards were rotten for a few inches of the bottom. We could replace all of them with the new ones, which would be a close fit of all our materials, and would lose us a couple inches of width unless we added another board, or we could save lumber all around and change the design to keep most of the existing door but make it a little janky. They were good with that, so we did a kind of strange design.

First we removed the split board and it's support scraps and set them aside. Then we cut one of the new boards to the original/final height of the door.

Next we measured far enough up to catch all the rot, and we cut the door that much shorter.

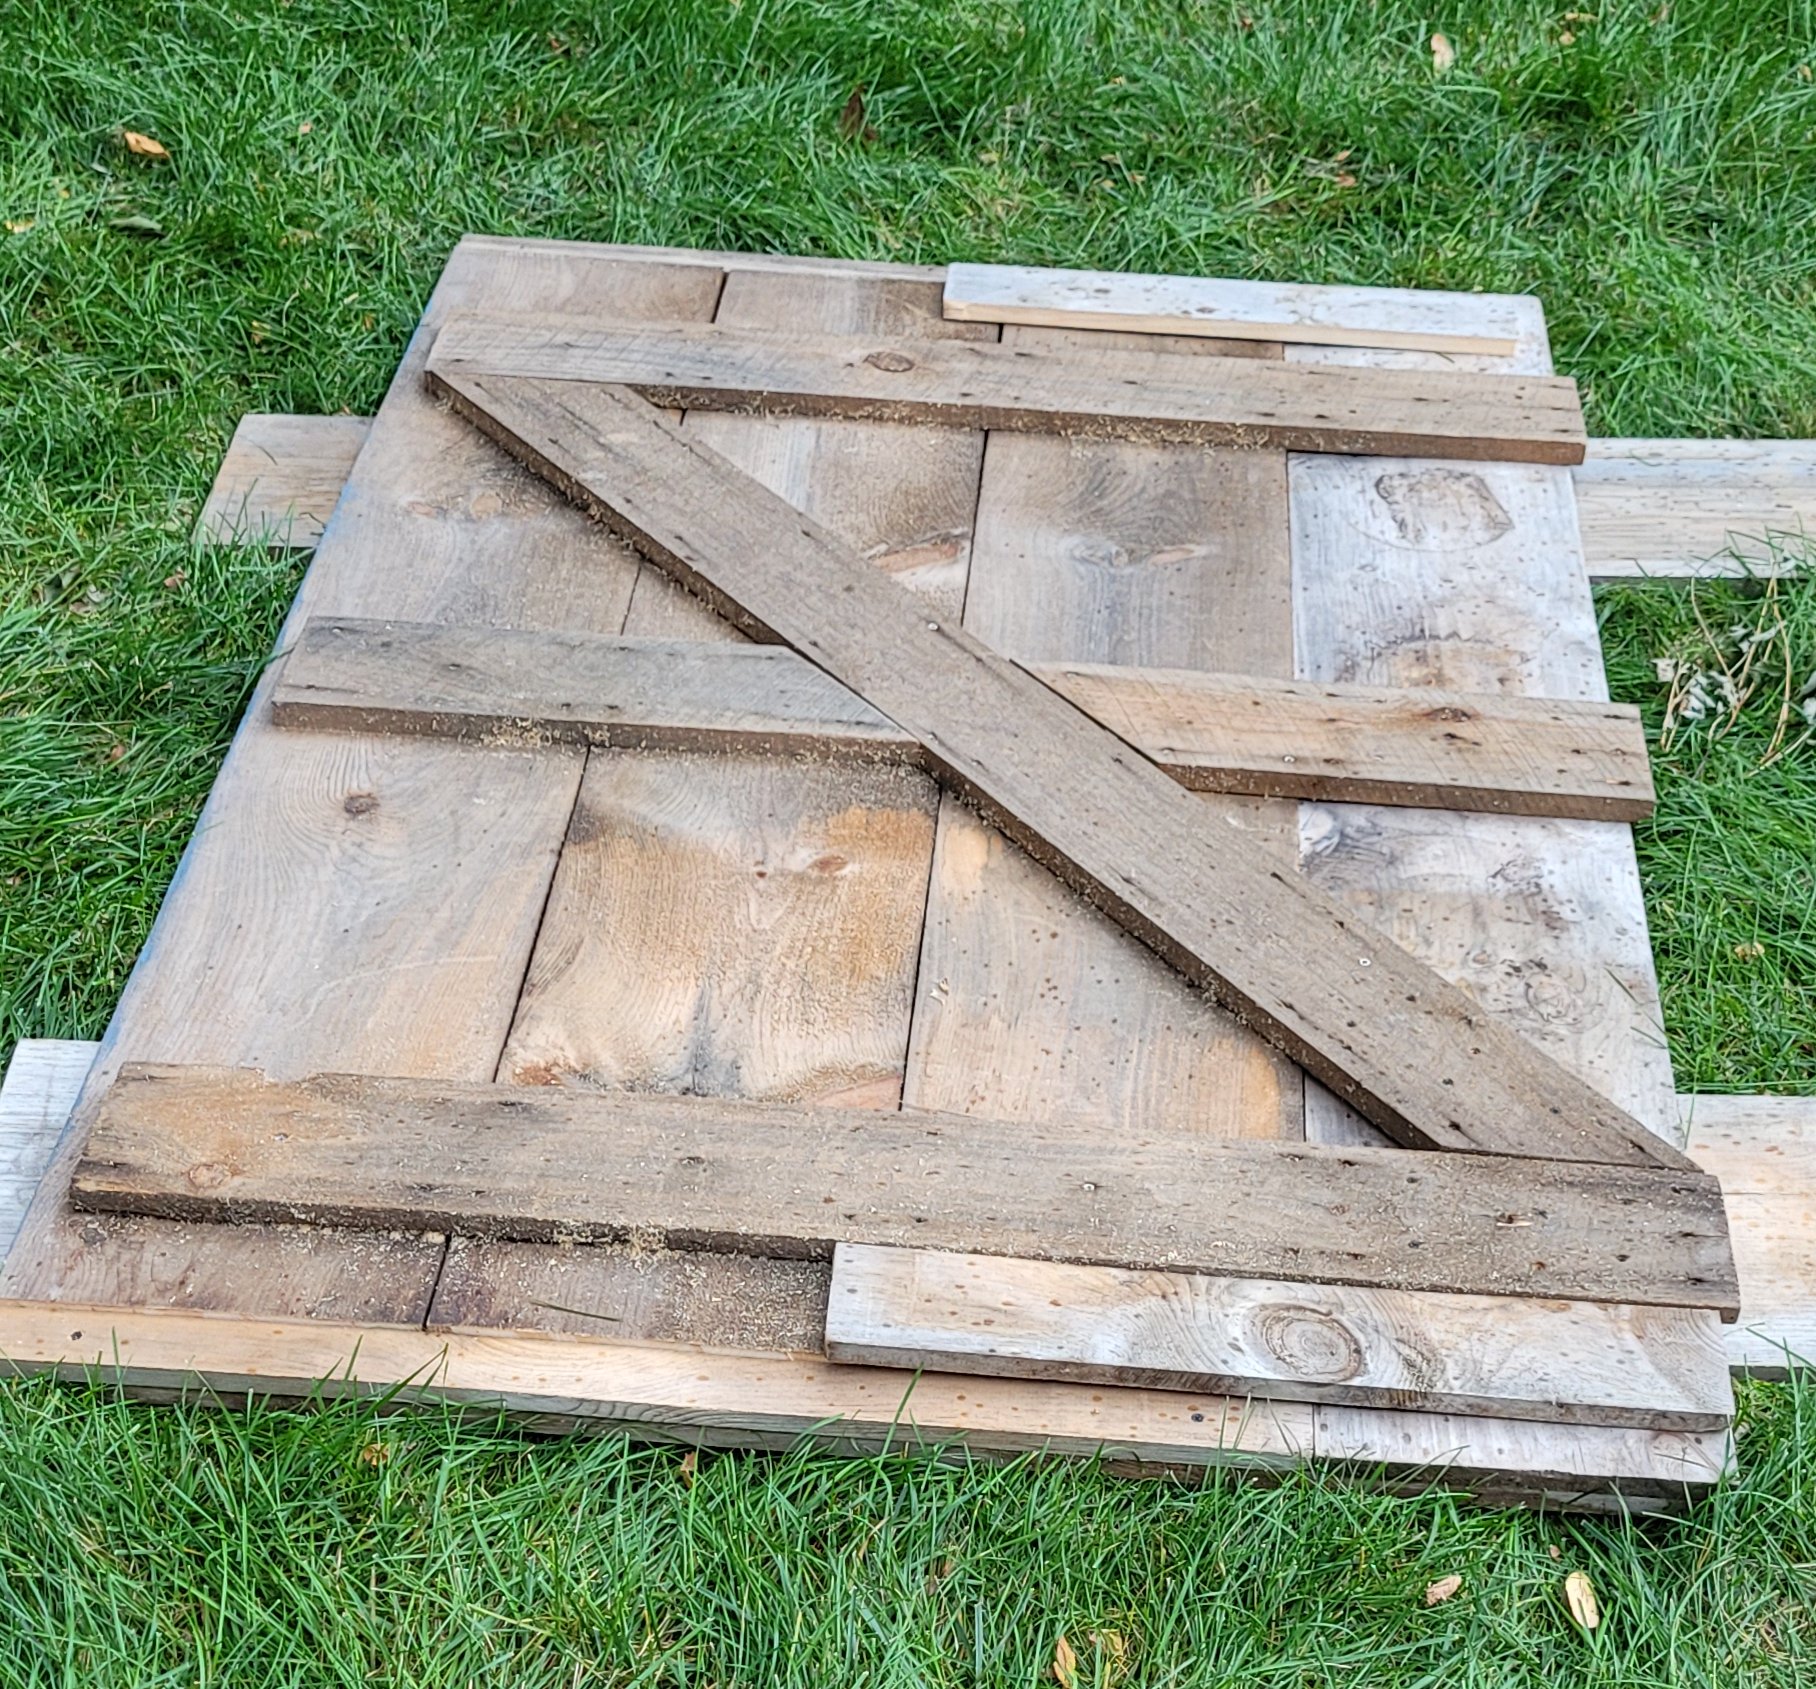
We attached the new vertical board so it extended a couple inches at the top and bottom (it's on the right in the picture above). Then we added two braces across the face of the door, so they went across at the final height of the door/the long new board, leaving a bit of space above and below the old boards. These would add some extra ridigidity, by having pieces going across on the front and the back, and they'd hide the difference in length. Then we cut some pieces to go behind them, fitting flush above and below the old boards. These weren't structural, they just took up space so critters and weather wouldn't get in.

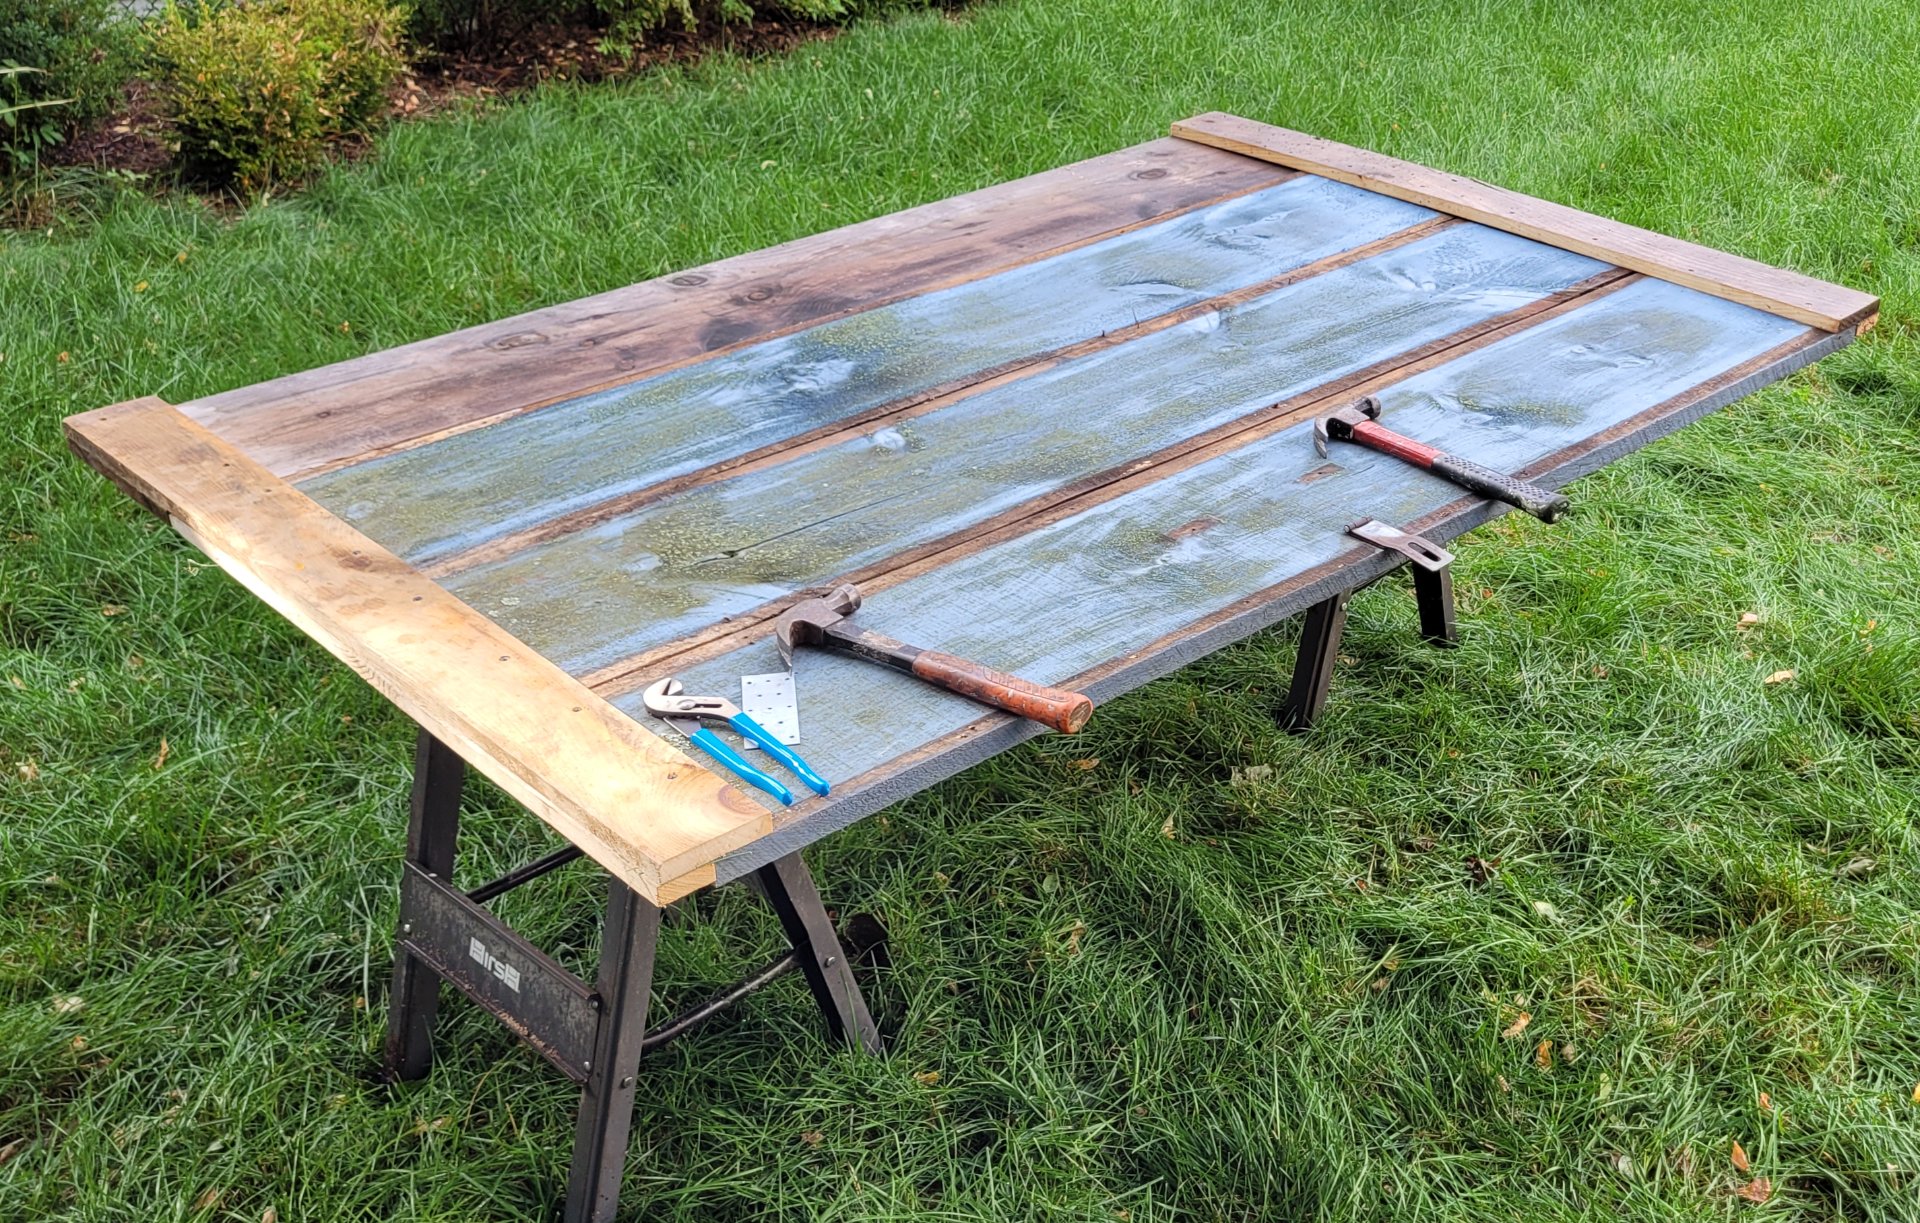
Once the door was made, we started looking at hanging it again.

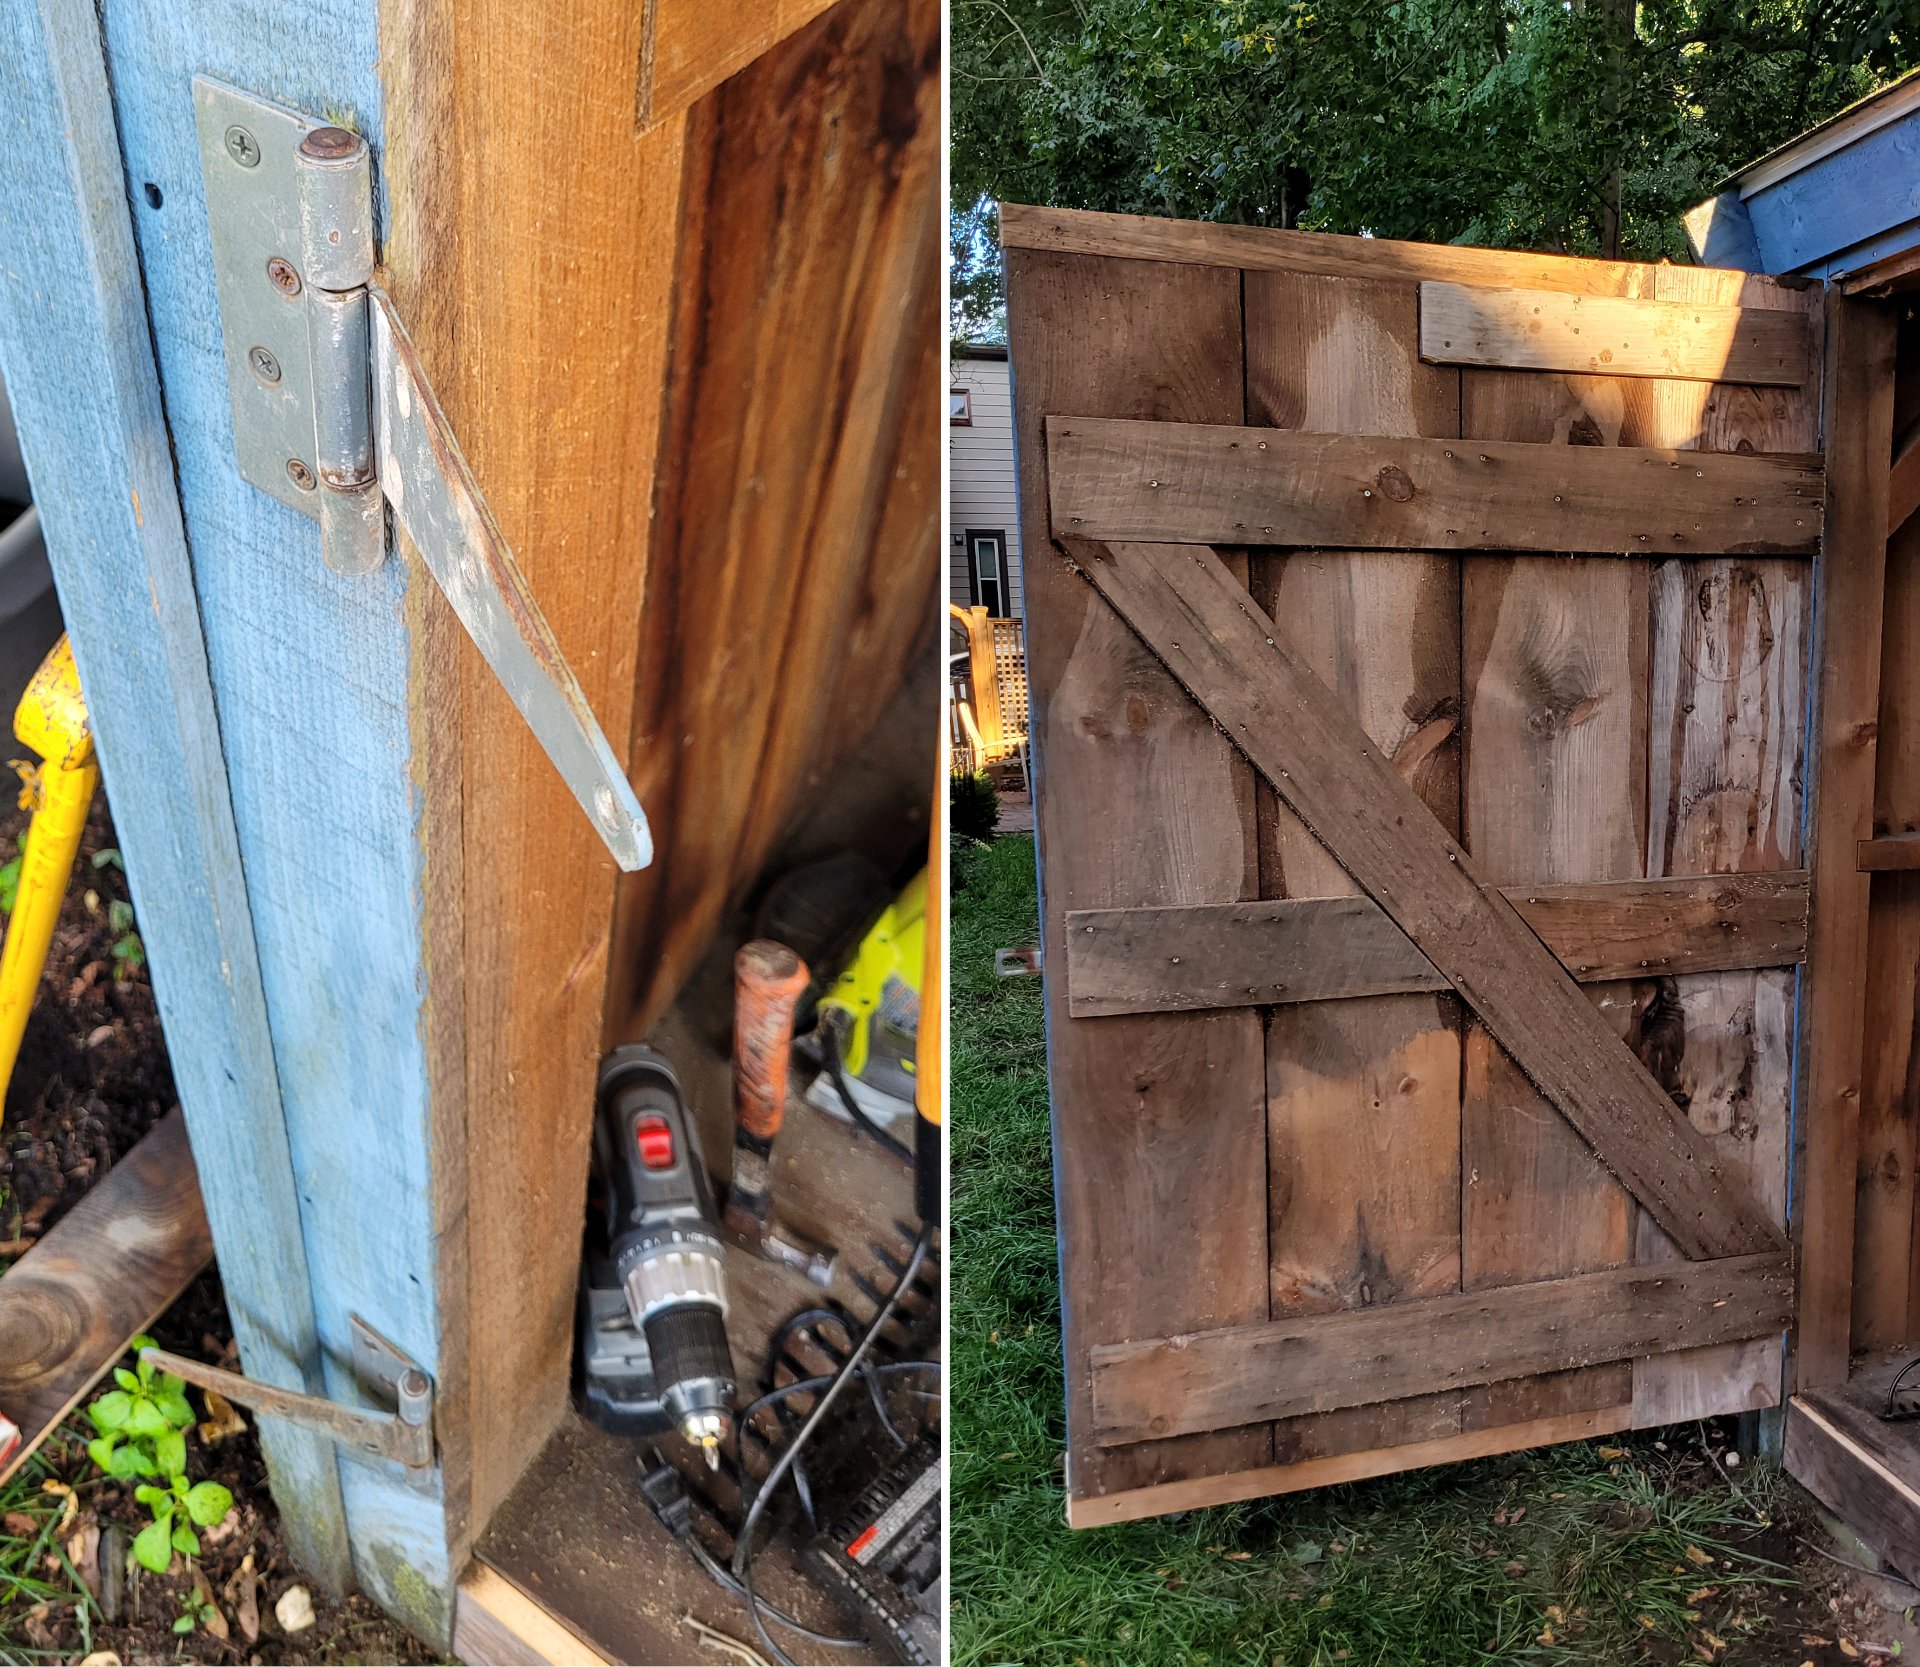
Unfortunate discovery two: the doorway was crooked. Part of that was the fault of the badly rotted board which crossed the doorway under the door. It didn't seem to be doing anything but catching rain and soaking it up, so we pried it off and replaced it. Luckily it only crossed the doorway, it wasn't actually part of the building frame, which seemed to be in okay shape. The top of the doorway was also out of square, but not enough to be a major problem. As they reminded me a few times, it's a shed, not a house.

We straightened out the hinges by putting them on a brick and pounding on the high points with a small sledge (not ideal but it worked). Then we hung them back up and attached the door. From what I remember, it sat just above the new lower plate when it was closed, might have rested on it but I don't remember.

The last step was to cut a thin piece to attach to the inside of the door frame to make up for the width lost by replacing a roughcut board with dimensional.

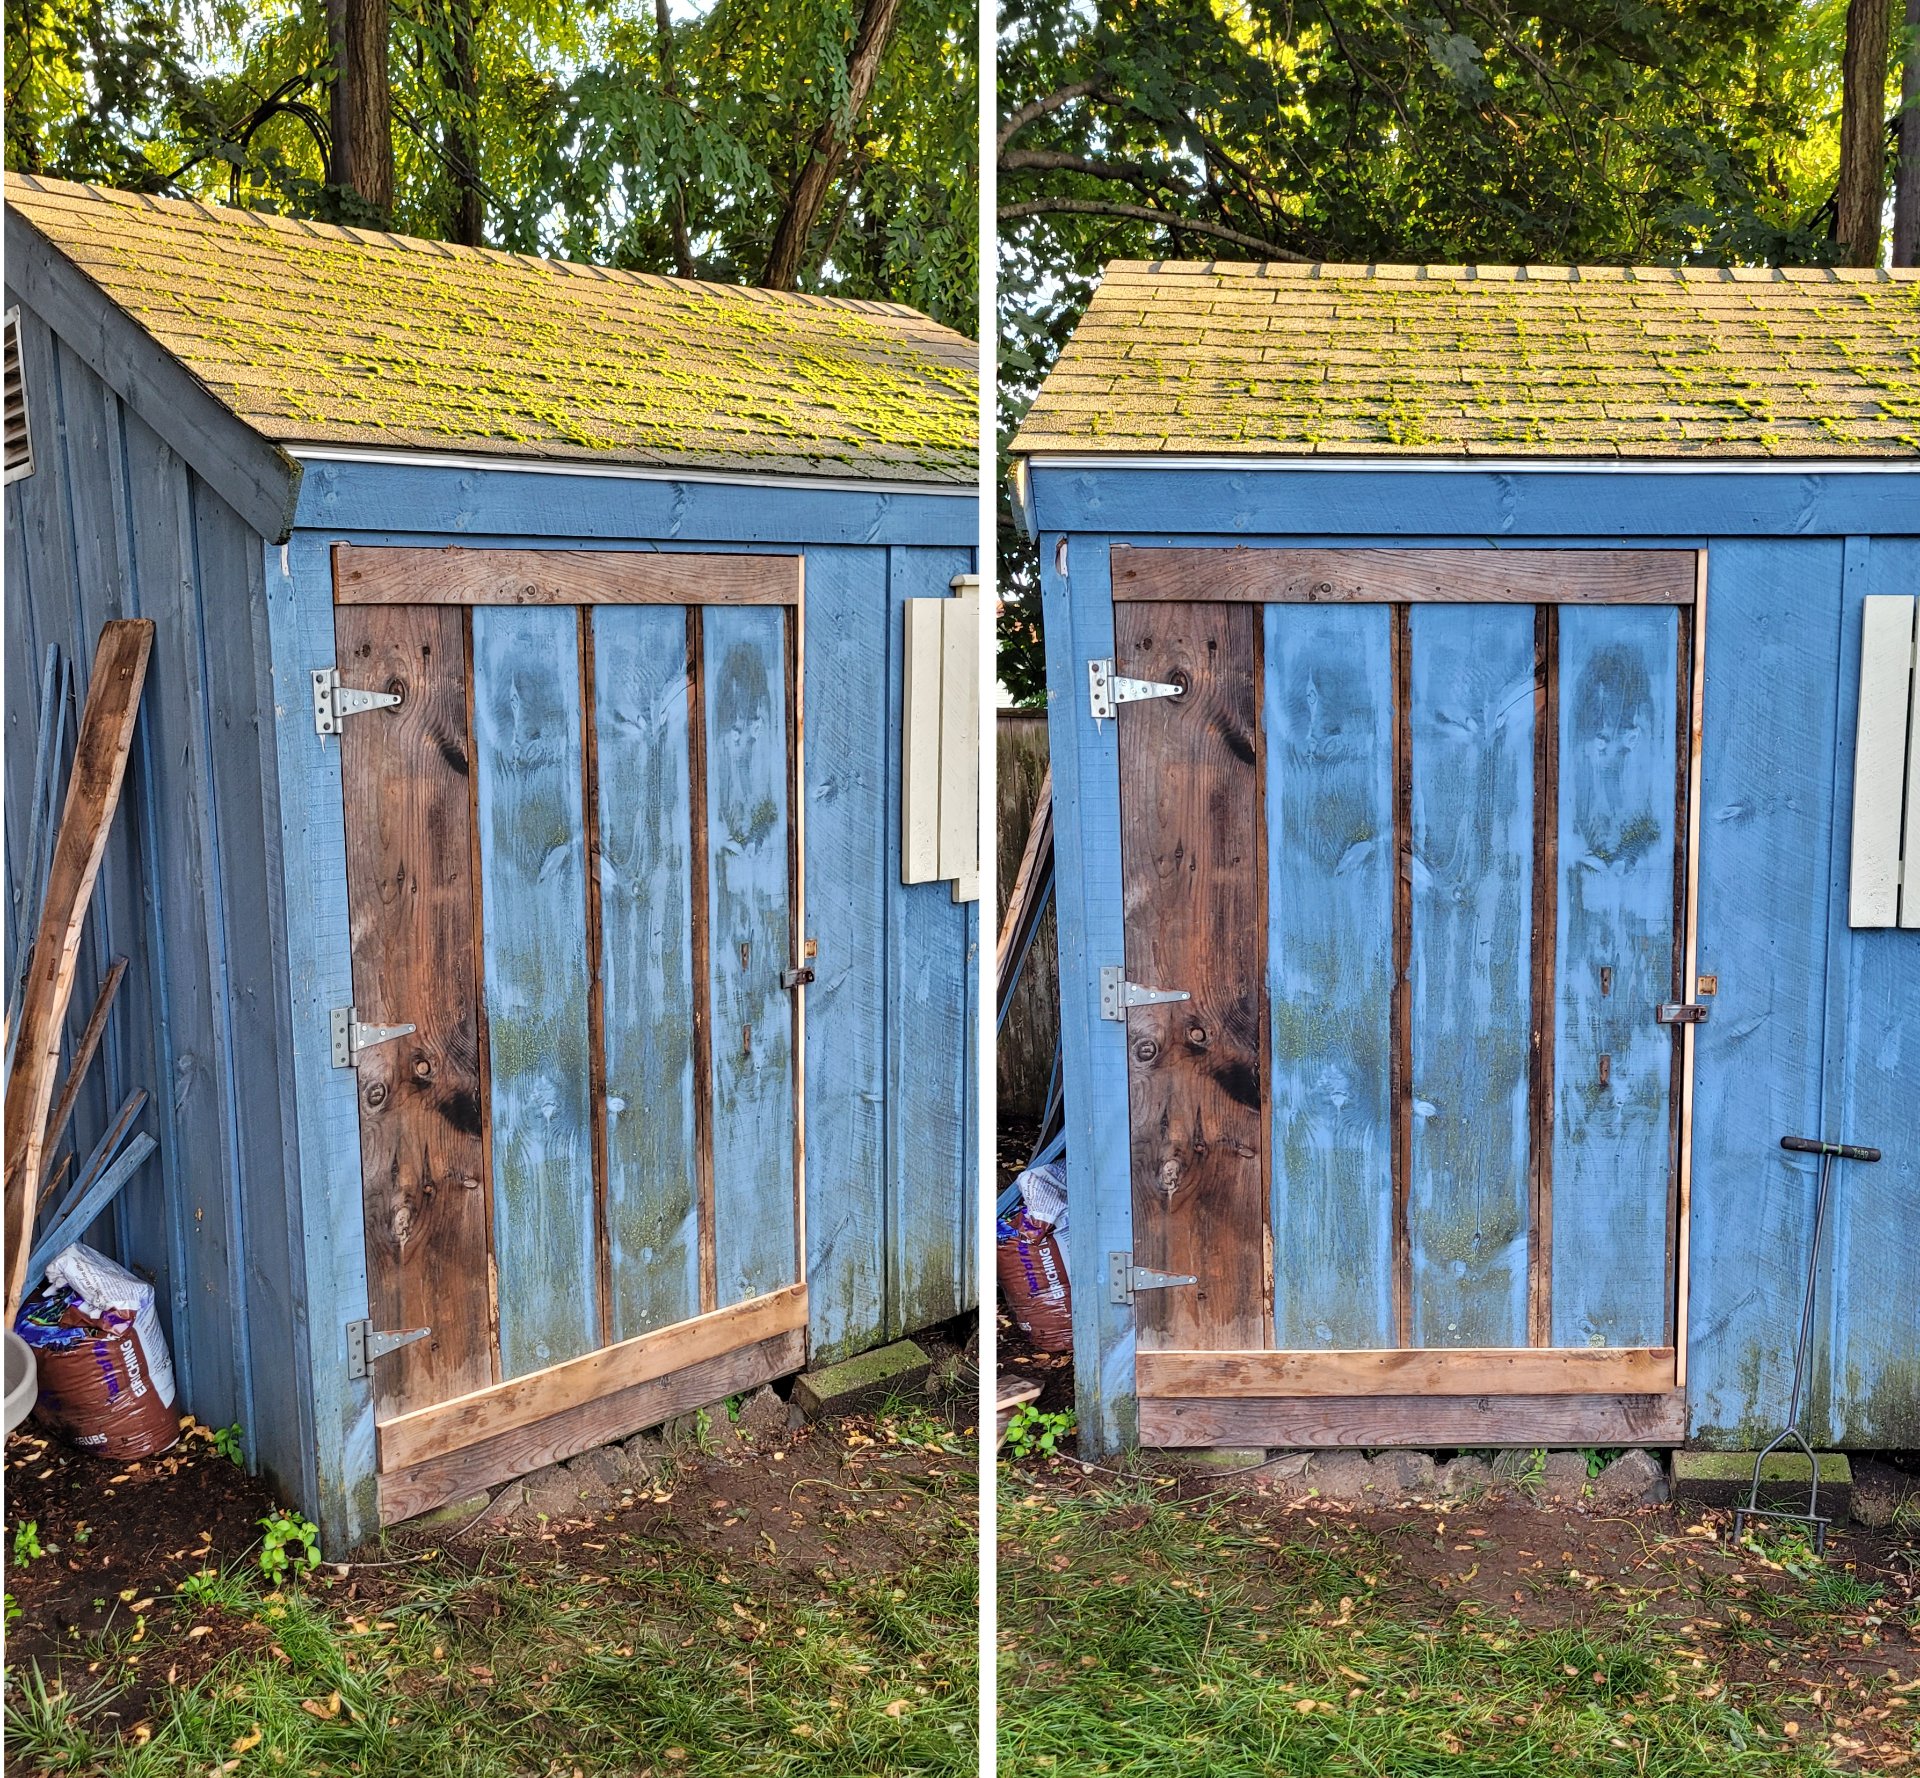
From there, I think we called it good. It had rained on and off during the project, and we didn't want to re-attach the trim while it was wet for fear of trapping water between the boards.

We cleaned up the tools and had some pizza.

As a side project, I took the original, very rotted wooden door handle, and the scraps of the split board. From the dimensions of the original and the look of the wood, I figured they cut the original from scraps of the same roughcut 1x12s they built the rest of the shed out of, so I wanted to make the replacement the same way.

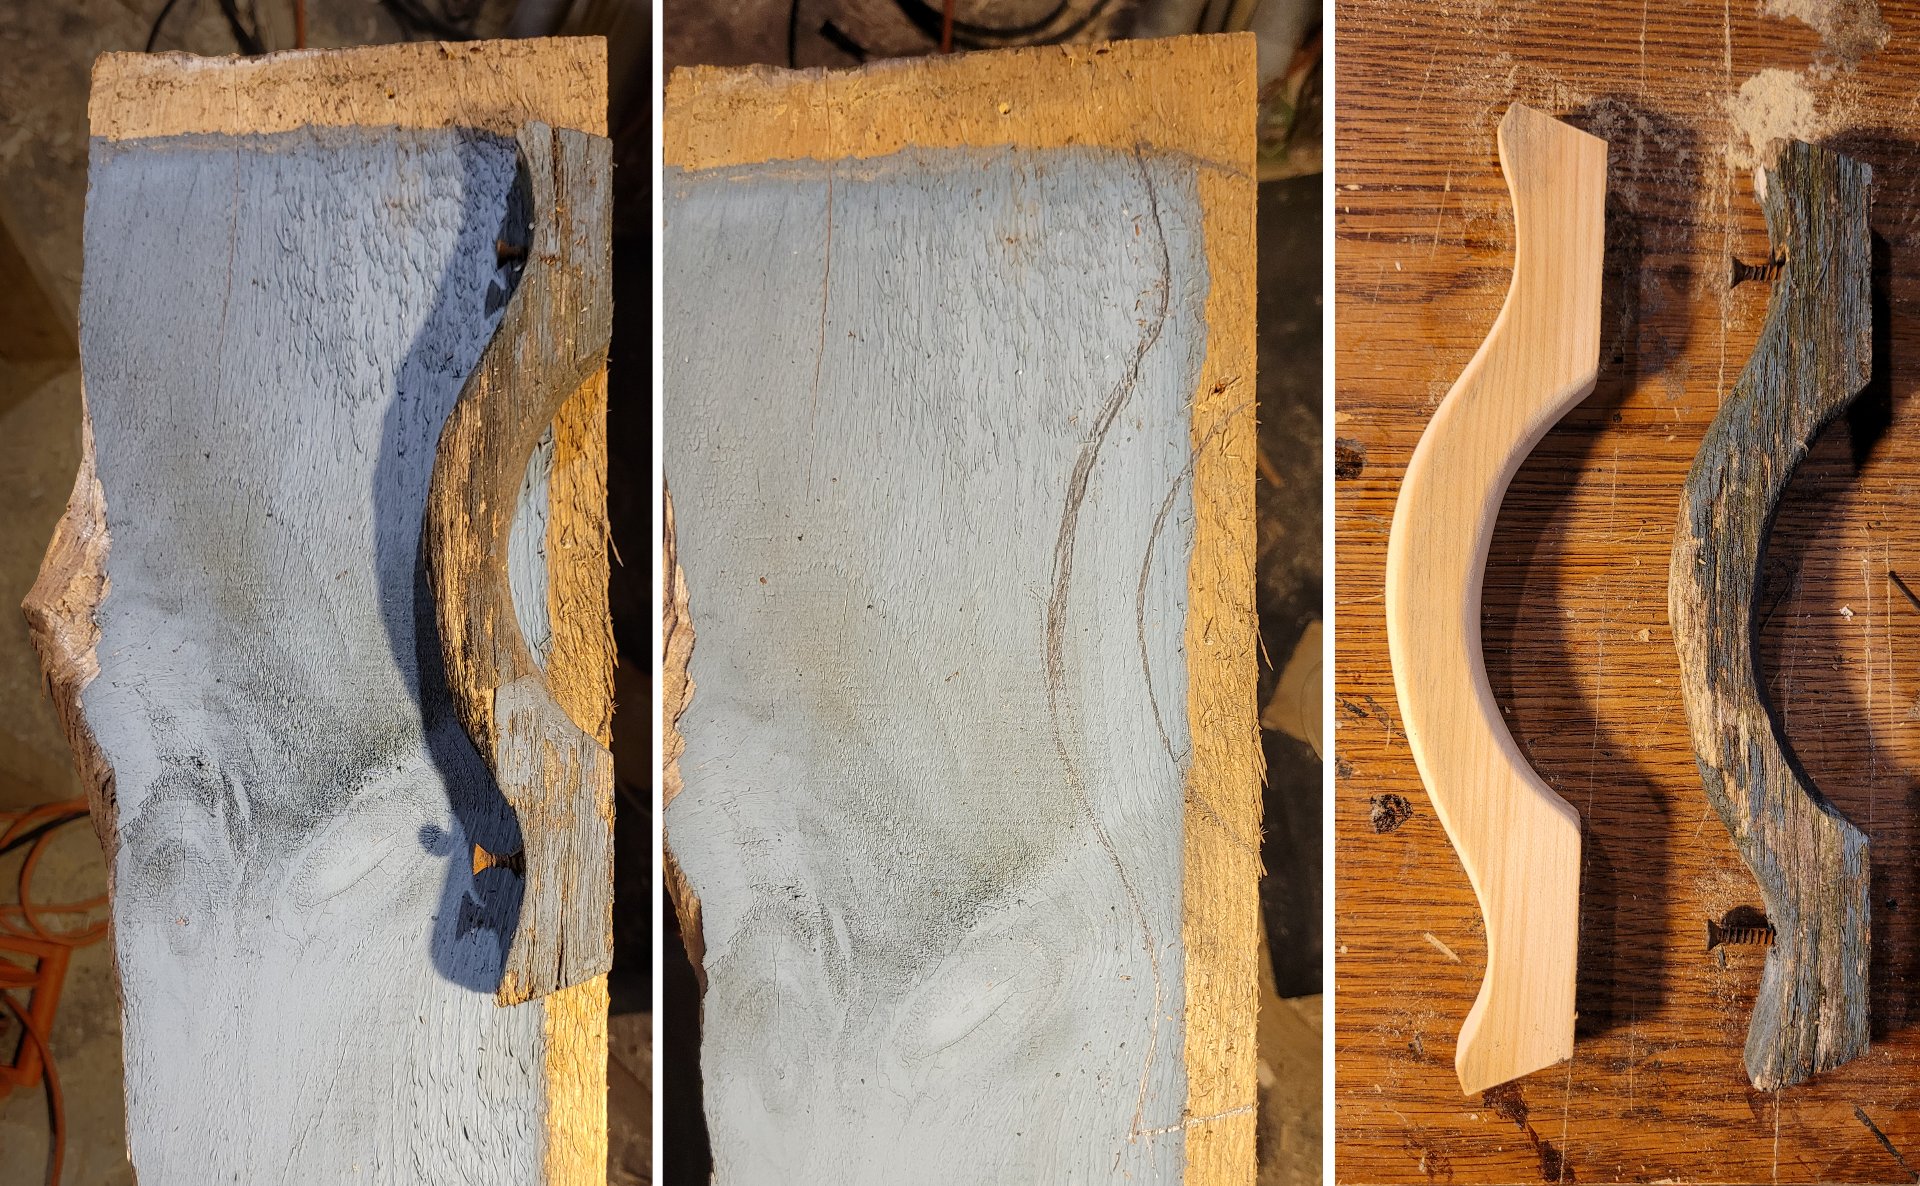
I traced the original onto the wood, flipped it end for end, and traced it again, and sort of averaged the two. The original wasn't actually symmetrical but my replacement would be much closer. Then I started sanding it down until it was comfortable to hold. I pre-drilled the holes for the screws, including space for the heads, so they wouldn't split the handle when it was attached.

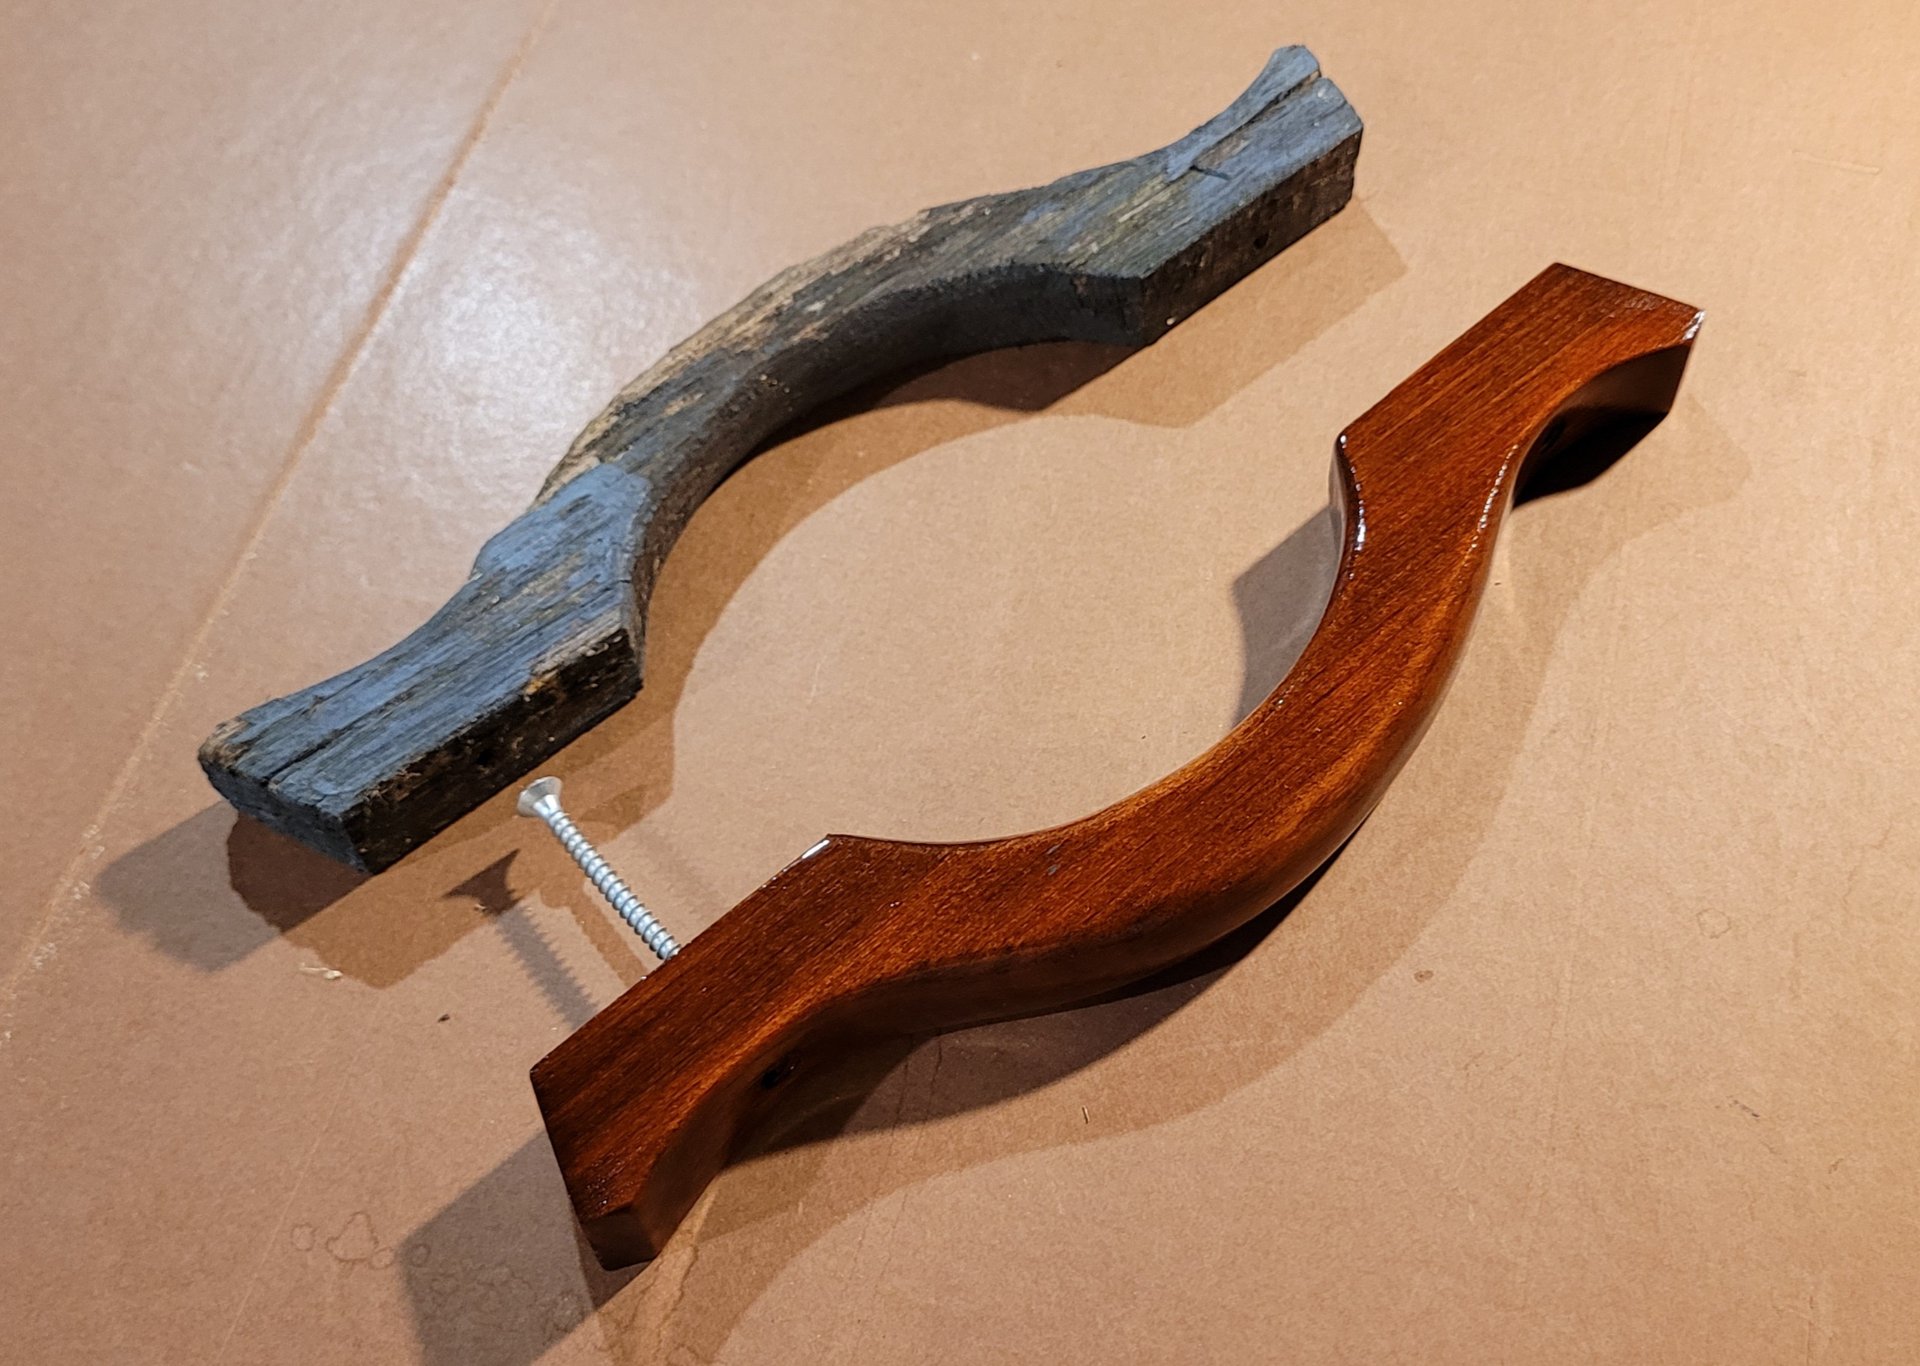
I stained it, I think my usual mix of Gunstock and Red Oak, then applied a few coats of urethane, sanding lightly between coats. I even got the back, where it'd touch the door, and the holes for the screws. I figured they could paint it whatever color they painted the door, like the original, or leave it as-is, either way it'd be very waterproof and last a long long time.

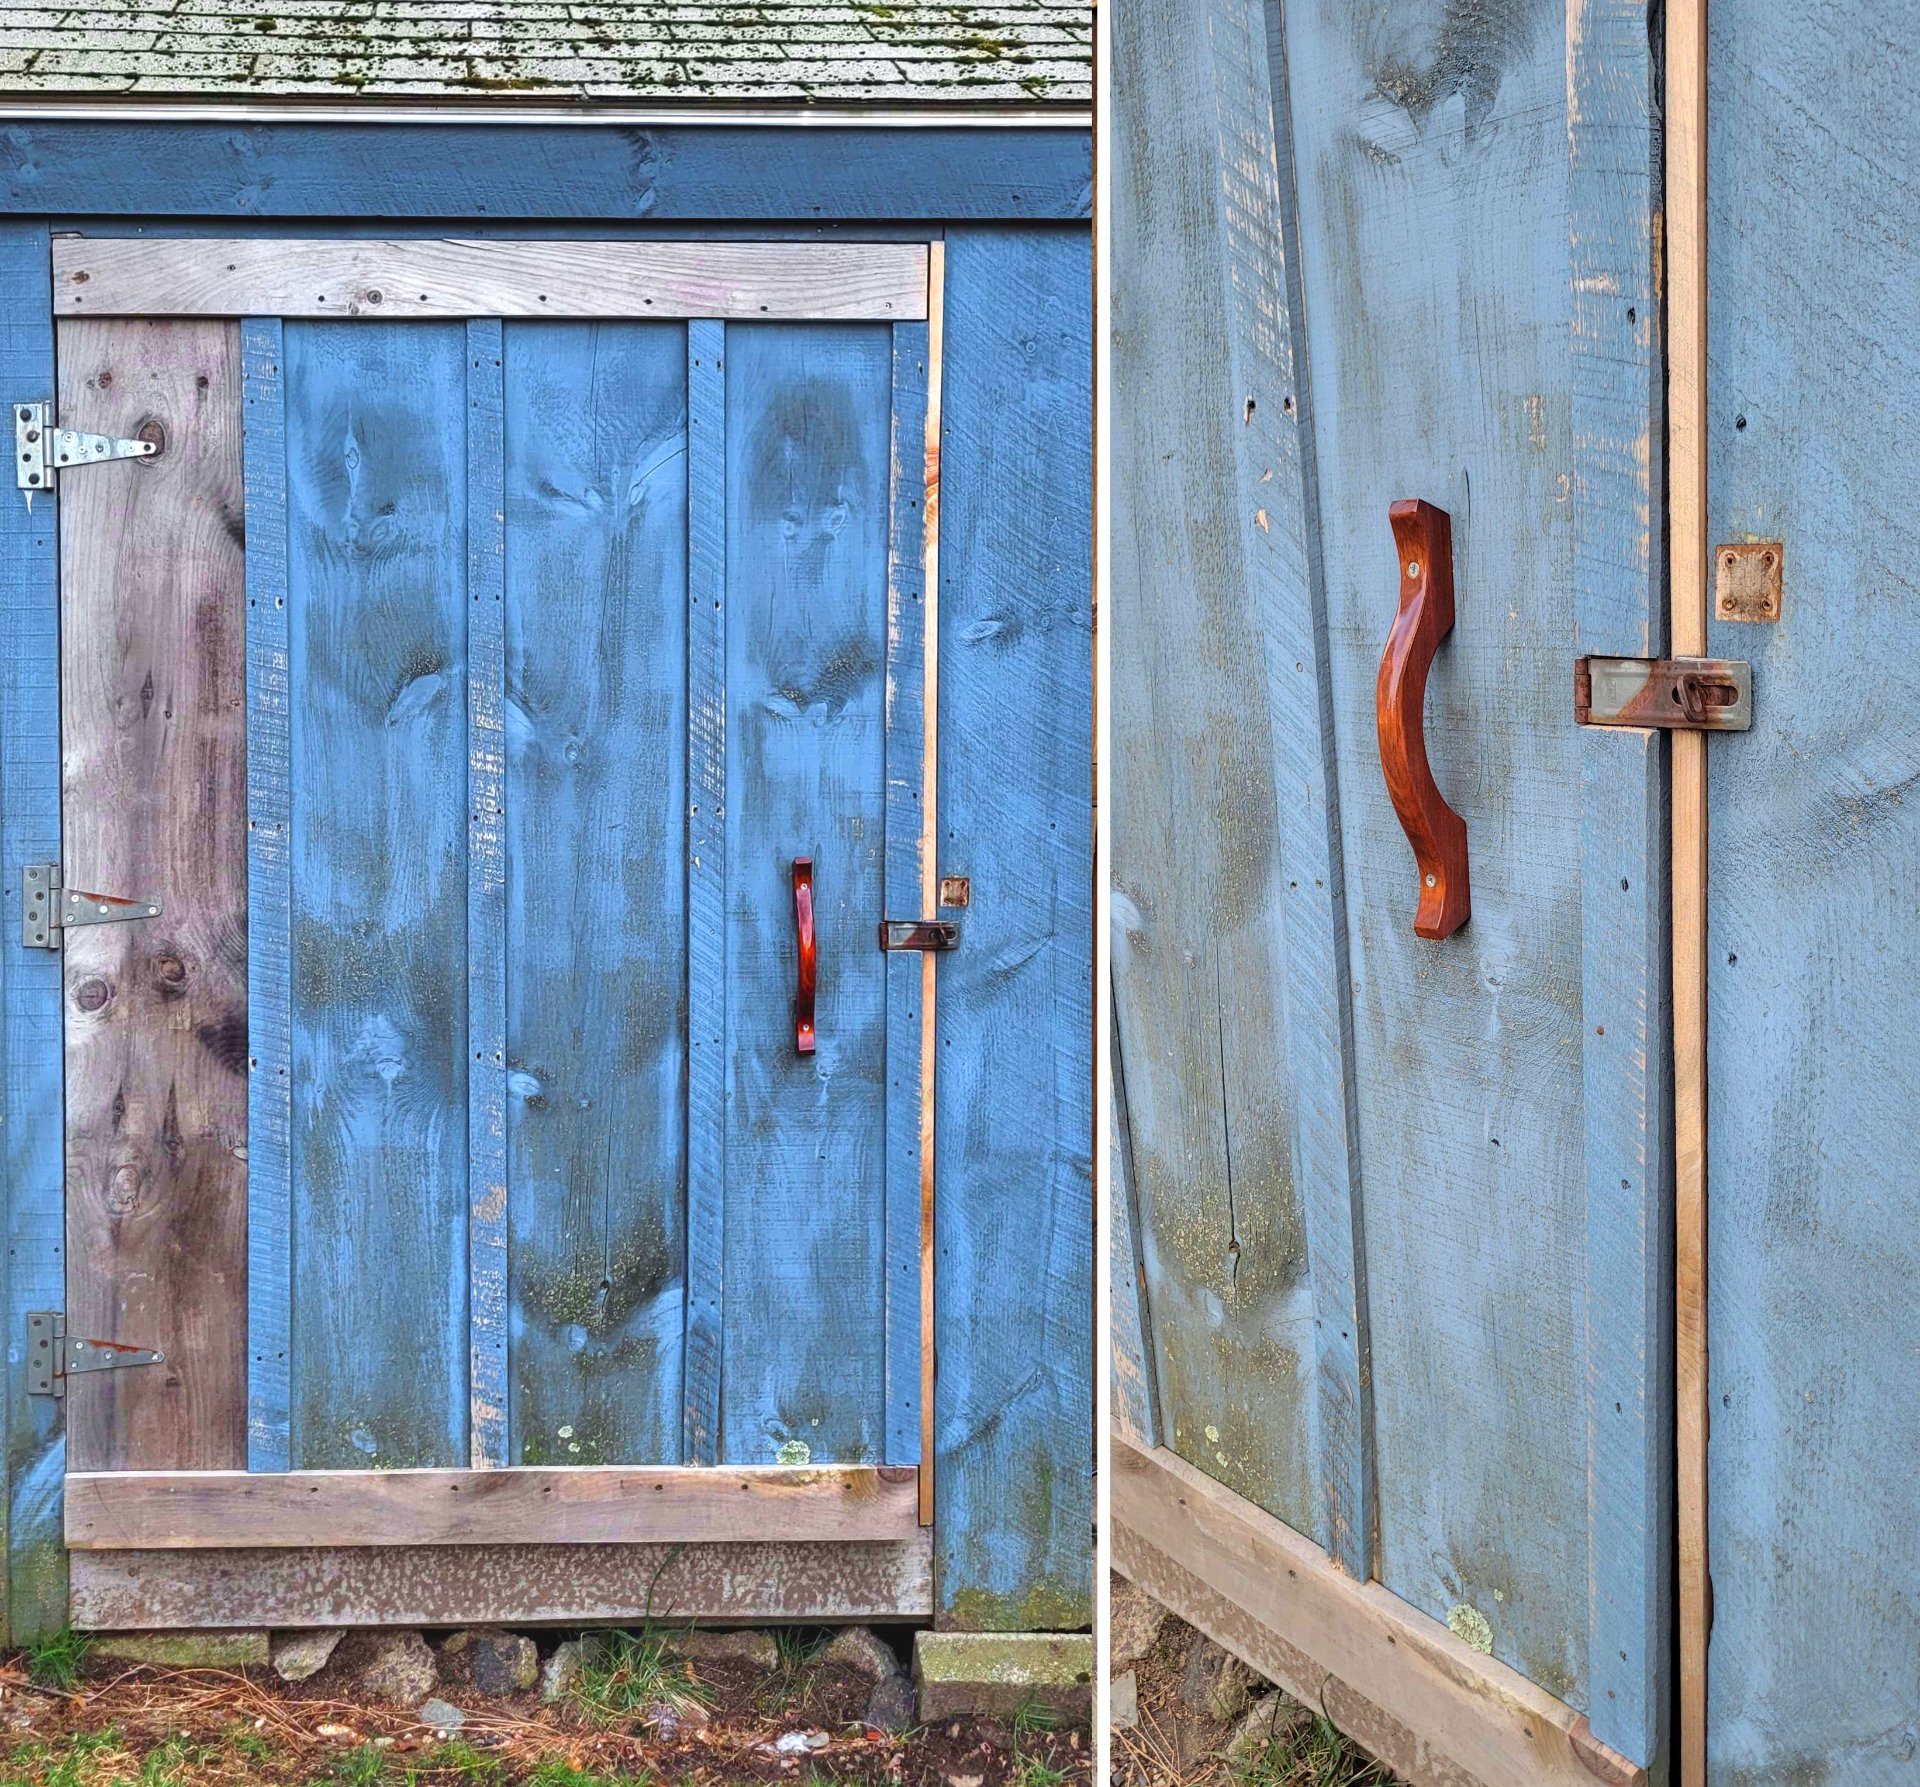
All it needs now is a new coat of paint.

11
12


I am quite happy so far with my FP5. But I am looking forward to the upcoming Ubuntu Touch and Mobian ports.

13


Once you get access to a laser cutter, you start to see all kinds of places you can use it in a project. Our local makerspace has one, and the more I use it, the more I find new applications, whether that’s in fabrication of flat parts, or just adding flair to smaller panels of a large project.

Around Christmas, I decided I was going to fix up my dad’s miter saw. It was an older, discontinued Delta 36250. The guard was missing(my grandfather didn’t believe in tools having guards) and the plastic insert in the table, where the saw blade came down, had been shattered for years.

The guard was an easy fix, bought a replacement part from ereplacementparts. But the plastic inserts were out of stock. In fact, even the scam parts websites that all look identical weren’t bold enough to lie and claim to have any of these things. Having examined what was left of the original, here’s my theory for why:

They’re junk. The space they fill is 5mm deep, but they were made to be cast out of plastic about 2mm thick with a lip around the edge to fill in the space. That plastic was super brittle. And then,just to make things better, the slot in the plastic, where the saw blade would go when it cut through the wood, wasn’t wide enough to accommodate the blade when it was rotated to do cuts at a 45 degree angle. Which it was designed to do. So the blade would come down through the wood, hit the brittle plastic at the wrong speed and blade type for cutting plastic, and shatter it. The inventories were out of stock because everyone broke theirs and ordered new ones, and they weren’t worth making in the first place

The obvious answer was to cut something close enough out of plywood and call it a day, but I wanted to get fancy with it. So I took some pictures, removed all the screws, claimed all the shards of plastic, measured the space, and brought the pieces home. Luckily enough pieces of the insert remained to get every measurement except overall length (which I measured while I was there). I used my calipers to get the original slot width, positions of the screw holes, etc. I drew up a vector image with my best guess at the final dimensions, and widened the slot until it slightly exceeded the damage marks from when the saw cut into it at a 45.

To get the curve at the corners I scanned in one of the shards, pasted it into the schematic in inkscape, and adjusted the rounded corners setting on the rectangle until it matched the scan.

On our makerspace night I cut a few cardstock templates, chased the screw holes around the design until they lined up with my plastic shards. And because I like adding some decorative aspect to practical items, I also drew up and cut a stencil of the name of his old military unit surrounded by a hawser rope.

This is one of the places the laser cutter really shines. When I was doing spray paint stencils in the past, I always cut them by hand with a scalpel blade(ironically cheaper than xacto knife blades). But this is tedious, takes forever, and certain designs really don’t lend themselves to it, so you find yourself spending lots of time gluing your bridges back together as they tear or bend. With the laser cutter, I had a template literally in minutes, and at least as precise as I could have done it. Some folks feel the art looses something when you make it easy that way, I’m personally more about results, especially when I’m on a timeline.

The makerspace didn’t have any plexi in the thickness I needed for the insert, so I reached out to TAP plastics for a recommendation. They had 4.5mm High Impact Modified plexiglass which they’d ship in custom dimensions, so I could get something small enough to fit inside the cutter. I went ahead and ordered that, and about a week later I had it. Enough material for four tries.

We ran the first cut slow in order to cut the thicker-than-usual plexi. That ended up melting it a bit along the edges and at the holes, so we did the second in two passes. I also redesigned the vector with smaller holes, and sent it again. This one came out better dimensionally, but the cutting fogged the plexiglass (it was the kind protected by sheets of plastic rather than paper, so we had to remove the stuff before running it in the laser). This wouldn’t be a problem except that I was planning to stencil the art onto the back of the plexiglass, so it would look deep and glossy, and would be protected by the plastic itself.

I covered the remaining material in painter’s tape and ran it again. The third one came out great, and I took them home for finishing.

The next step was to chamfer the screw holes on the drill press.This would let the heads of the screws sink down into the plastic where they’d be out of the way of boards sliding across the worktable.

Once I had that done, I peeled the painter’s tape off the back,and for once managed to remember to double check that it was actually the back and oriented correctly and everything. Then I attached the stencil so it was mirrored. I normally use temporary spray adhesive where I can to fasten the stencil down, to minimize the underspray. But a reverse stencil means any glue residue would end up between the plastic and the next coat of paint, so I had to skip it and just use stencil spiders (little metal weights, usually nuts, with paperclip/wire legs, which help you pin down high points).

I got very lucky, the paint went on well and didn’t leave me with any spots I had a problem with. I gave it a couple days to dry before messing with the stencil (this was good graff artist paint, but I’ve had the cheap stuff dry tacky, then when you try to lift the stencil, the paint stretches, snaps, falls onto the work and bonds there. I didn’t think that would happen with this stuff but I wanted to be really sure). Waiting to find out if it came out okay is the worst part, for me.

When that was dry I checked it over, and painted on the background color.

By that point, I was out of time to check it for fit, so I wrapped it and waited until Christmas to find out if it would fit. Later that day, we tested it, and it was overall pretty good - I had to chamfer the holes a bit deeper on his drill press, and used a thin round file to adjust a couple of them just a touch outwards from the center. But it fit and looked quite nice overall. My vector file isn’t perfect, but I’m providing it on my website just in case anyone out there has a compatible saw and also access to a laser cutter, and for some reason wants to follow me down his road.

The saw file is available here as a pdf: https://jacobcoffinwrites.files.wordpress.com/2024/01/saw-insert-great.pdf (apparently wordpress won't host SVG files.)

And here as both pdf and svg: https://mega.nz/folder/CdMwVDQa#yiHp5k_WbOxrNcYCRwWyiA

(Sorry not to show the stencil, I realized partway through writing this that my dad wouldn't appreciate it if I did, but I still like talking about the stencil art process.)

14


Note these two communities are essentially the same:

Mods might want to mention the other community in the sidebar as a related community. Note ATM both communities are on respectable proper decentralized nodes (e.g. neither are on Cloudflare).

15
16


This article is about fixing, but with a twist - it's about fixing trains that their manufacturer sabotaged. :D

In Poland, it took the hacker crew "Dragon Sector" months of work to find a software "time bomb" that was sabotaging "Impuls" trains manufactured by Newag, once their maintenance was handed over to another company.

Let this be a reminder to everyone about closed source technology and critical infrastructure.

17


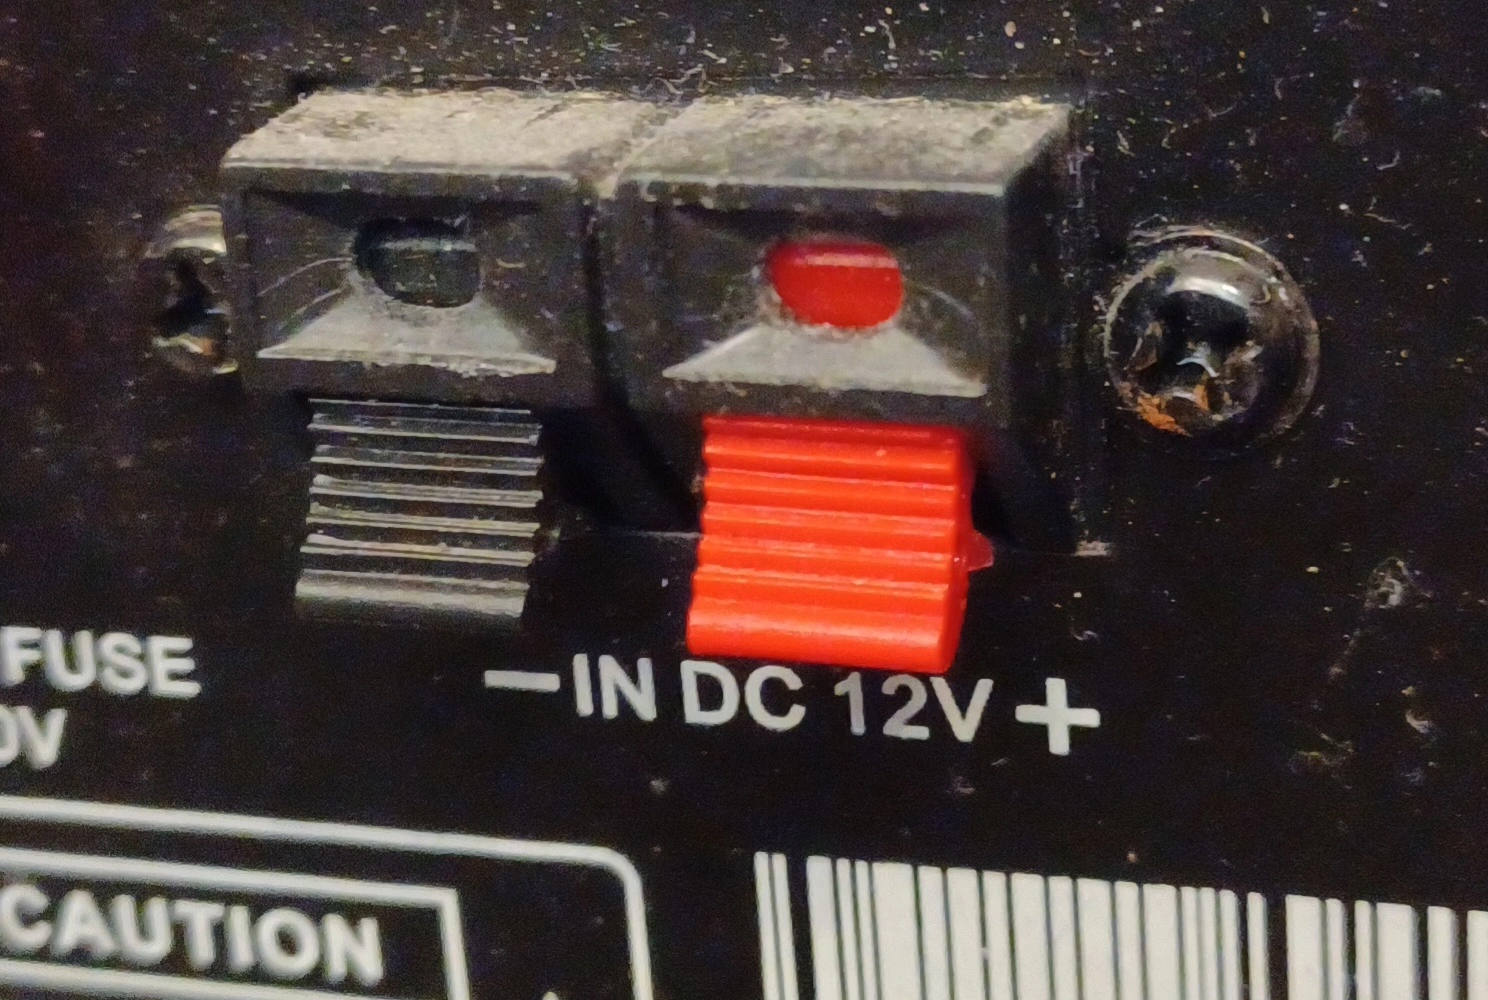
And is there a way to push this metal tab back in? It doesn't want to go.

18
179
submitted 8 months ago* (last edited 8 months ago) by activistPnk to c/fixing


Batteries died. It was a puzzle to disassemble it. It was booby-trapped with fragile self-destructing mechanisms like hair-thin wires ready to snap wrapped around the battery which had welded tabs soldered to wires. Requires surgical delicacy but at the same time lots of force to pry 3 plastic clips simultaneously while pulling off an inner casing using 2 hands on a task that needs 4 hands. Had to buy rechargeable batteries with tabs welded on where the tabs were not oriented in the direction the device was designed for so in one joint I had to put the soldering iron directly on the battery terminal. The battery pair costed 1¼ big macs because tabbed nippleless batteries are not a competitive market and only sold at retail prices. A new toothbrush probably would have had the same price but then I would have been suckering into giving them what they want.

I was able to do the job without breakage and it works. I was lucky the soldering heat did not destroy the costly battery. So I would like to send a very big fuck you to #Philips who tried to force me to buy another toothbrush, which I bought before I started boycotting Philips due to their shavers having the same disrespect for a #rightToRepair.

UPDATE

Just checked my records and see that I paid the equivalent of 4 Big Macs (today’s price) back in Jan. 2015. So the original batteries lasted ~8¾ years. Thus the batteries are indeed cheaper. I chose this model because it supports both 120v & 240v which I think is rare with induction charged toothbrushes.

Making a spot welder­

Note that instead of buying batteries with tabs, I could have built a spot welder to put tabs on myself which would mean being able to buy any cheap batteries (which is half tempting because I am a cheap bastard). You basically keep an eye out for microwave ovens that people have trashed and cannabalize the transformer which can then be used to make a spot welder. Maybe I’ll do that next time.

Better toothbrushes

There is a toothbrush that takes normal AA batteries (which I keep at my folks’ house). It obviously avoids the problem of permanent batteries. But it has no charging system so the batteries have to be removed periodically for recharging. The bottom cap is very tight fitting plastic over a rubber o-ring which eventually cracked after so many times opening. If the cap had been metal it would have been the perfect toothbrush. One benefit is that it works worldwide.

19
15
submitted 8 months ago* (last edited 8 months ago) by Antitoxic9087 to c/fixing


I have a LED lightbulb that starts to flicker. Is there anyway to fix it, or any parts of it that could be useful for other uses(i.e. diodes for use in electrical circuits)?

Correction: After checking the product serial number carefully it is a fluorescent lightbulb as many pointed out. Thanks for the correction and advice.

(PS I am renting a house now so the type of lightbulb is of my landlord's choice. Obviously were I to choose I would rather have a LED lightbulb)

20
7
submitted 9 months ago* (last edited 9 months ago) by JacobCoffinWrites to c/fixing


cross-posted from: https://slrpnk.net/post/3170240

(view this in gemini too! gemini://okasen.smol.pub/how-a-dress-becomes-a-sweater)

I just want to share this sweater DIY project I did last night in a furious anger at fast fashion. If anyone wants specific construction details, I can try to provide answers to questions! But in general, it was very slapdash and haphazard and I don't recommend anyone just jump straight into turning one piece of clothing into an entirely other piece. It takes a lot of practice and... battle-hardenedness... to not give up or be too perfectionist with this kinda stuff. So if you're already a sewist, give something like this a go! If you're not a sewist: become one!

21
22
23


cross-posted from: https://slrpnk.net/post/1744045

Step-by-step explanations how to fix a garment using Sashiko and Japanese techniques. This blog features two Sashiko techniques (one explained and one in a step-by-step video)

24


Arcade cabinets aren't very solarpunk. They were huge items, heavy particle board, plastic, metal and glass and electronics, meant to be used for a couple of years and thrown away. For most of the golden age of arcade gaming, cabs were a bespoke arrangement, each one designed custom for their specific game, so when a particular model failed to sell as well as anticipated, brand new units were often dumped in a landfill rather than repurposed.

Just the same, I want to share a blog about arcade cabinet restoration (and also arcade history etc). Here's why:

Something brushes against solarpunk, I think, in the way the collectors of arcade cabinets treat them, like the technology is a precious natural resource, discovered in old barns and garages and warehouses, carefully recovered and conserved. Still put to use, but carefully, with the intent to pass them on to the next person.

Parts are traded around, broken machines carefully fixed. Favors traded. Even cabinets destroyed by water damage or mold are often picked over for parts, for the components are part of a small and ever-dwindling supply with no modern, (or at least authentic) replacements to be had.

I think they treat this technology the way I wish everyone else would, and how I think people in solarpunk fiction, which sometimes takes place in postapocalyptic settings where society is rebuilding more carefully, might treat the working remainders of a more wasteful society.

(They're helped of course in that technology was simpler for arcade gaming's run from the 60's through the 80's. Big chunky components, simple single layer boards, something a knowledgeable person with a multimeter and soldering iron could fix. I think there are some areas (certainly not computing) where I wouldn't mind seeing a return to simpler designs. Why is there a multi layer PCB with in-built components in my blender that works the same way as my grandparents'? But we'll need more of a fixing culture for there to be any real benefit to that.)

This blog goes into the history of arcades and gaming, but it also chronicals 'raids' where collectors work together to recover recently -rediscovered, often abandoned arcade cabinets and the writer's personal arcade cabinet restoration projects.

If you like seeing old stuff fixed up, especially around both electronics and furniture, I definitely recommend this.

25
view more: next ›