26
DIY
2814 readers
3 users here now
Share your self-made stuff and half-baked projects here.
Also check out !diy@beehaw.org
There is also a related XMPP chat.
founded 2 years ago
MODERATORS
27
28
29
30
31
32
33
27


34
35
36
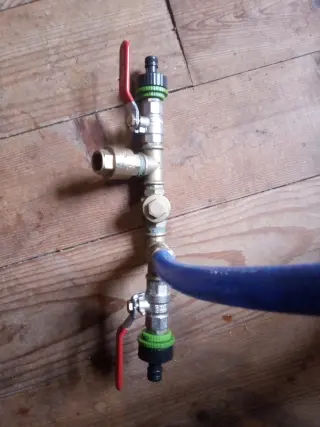
A couple of years ago I built two ram pumps and installed them in the stream near my house. They pumped water for the garden for a few months during spring and summer. I'm okay with the fact that the pumps are just useful during part of the year, but didn't really like damming up the entire stream for my installation, seemed rude towards wildlife.
So this year I returned with a longer tube and just took the water from further upstream. I have only about 70cm head. I haven't really measured the height I'm getting, but it's more than the first year and enough for what I want to do.
My installation in the stream is very simple: fence post hammered/wedged into the stream bed, pump tied to it with wire. Everything wobbles a tiny bit. Might return and solidify that later, but I love it when stuff is so simple that I can just throw it into the stream and it works. After a while of pumping by hand it just runs. Variations in water height might stop it as it sits low in the water. Will report back tomorrow.
This is for a reservoir IBC and washing tank outside the kitchen. I'm thinking about adding a solar heating panel in there as well.
The image is of a smaller kid-sized pump that I want to turn into a demonstration model to take to markets and fairs.
37
123
It was even the same brand. I love when hoarding materials pays back.

38
39
40
41
Something neat I've discovered - you can repost the content of your movim blog straight into a lemmy post and it's all compatible, uses the same markup. I'll repost all this to imgur as a backup at some point but for now this is awesome.

This was an earlier project on my make-everything-from-junk adventure. I've actually built two arcade cabinets - the first with the goal of using only secondhand stuff, sort of sequestering various junk into something that would be around for awhile, and eventually gave it away on our local Buy Nothing -type group. It was unfortunately very poorly documented, I don't have many pictures of it.
This second one was a gift/reason to hang around in the workshop building something with a friend. They'd seen the first one, and we got talking about building an arcade cabinet custom for them. I like projects that cross a few domains, woodworking, painting, electrical, etc, and I really like reusing materials. Ad I love having a reason to hang around working on projects with friends, so I was excited.
I really like the archival efforts around old arcade cabs, but I generally think of new custom-built arcade cabinets as being kinda wasteful. They use lots of new material, particle board, etc, and take up lots of space, often for a luxury item that doesn't end up getting used very much.
But playing retro games was actually already a big part of this friend's mental health routine so I knew they'd use it - and I was confident I could find most if not all the material secondhand, which would save them a lot of money. (In the end, we did use one panel of storebought particleboard for the front plate/door just to get it finished. Otherwise, aside from the buttons and raspberry pi, we still managed to make it all from old stuff.)
I started with what we already had: various 2"x4" and 1"x2" boards, some particleboard and plywood cut to the dimensions of the previous cabinet which could work as shelves, and most of the particleboard from a big upright storage cabinet which would be perfect for the sides.
A year or two earlier, I'd spotted it disassembled on trash day on my way to work. I hate to pass up good material so I quickly hauled it home before getting back into my routine. When a different friend really wanted to carve pumpkins during the COVID times, I took the sides of the cabinet, screwed on four table legs I got from metal recycling and set it up as a long table on our porch.
We used that table for quite awhile, as a simple workbench, and a side table at friendsgiving.
The pieces I'd used as a tabletop were just about perfect, a good height and depth, if you stood them on end. Unfortunately some fool had driven a bunch of screws into them, but that's what bondo is for.
Maybe it seems counterintuitive to start with materials rather than a design, but that's a big part of how I've always made things. I take an inventory of what I have, figure out how it can go together, figure out what kind of designs we can make with that, and work out a list of what else we'll need. I should note we also already had a TV - it belonged to my friend and it was important to them that we use it since it had no input lag (apparently the TV I got secondhand for the previous cabinet did, and that was a problem). So we knew the measurements there and it was compatible with what we had. Maybe it's just where I am, but I've found TVs of an appropriate size for an arcade cab screen to be absurdly easy to get, either from Buy Nothing or my local swap shop.
We now knew the upper limit on the height of the cabinet (as set by the cabinet/table pieces) and the width we'd probably use (based on the shelf pieces). Those were our constraints, so we started talking requirements. My friend is very tall, tall enough that on my more traditionally-shaped arcade cab, the marquee/roof blocks their view and they had to hunch forward to see the screen. The control panel was too low, making the posture problems worse. This would have to be taller in order for it to be comfortable. They wanted to be able to use it at parties, so the screen couldn't be recessed too far into the cabinet (either we'd have to cut the sides away like a traditional arcade cabinet (difficult to get that just right, likely we'd mess up the plastic cladding on the particleboard) or it'd have to be close to the front. They also wanted it to be sturdy. Really sturdy. I really enjoy overengineering things, so I was looking forward to that part.
My first suggestion was that we do something based on this Gravitar 'cabaret' cabinet prototype.
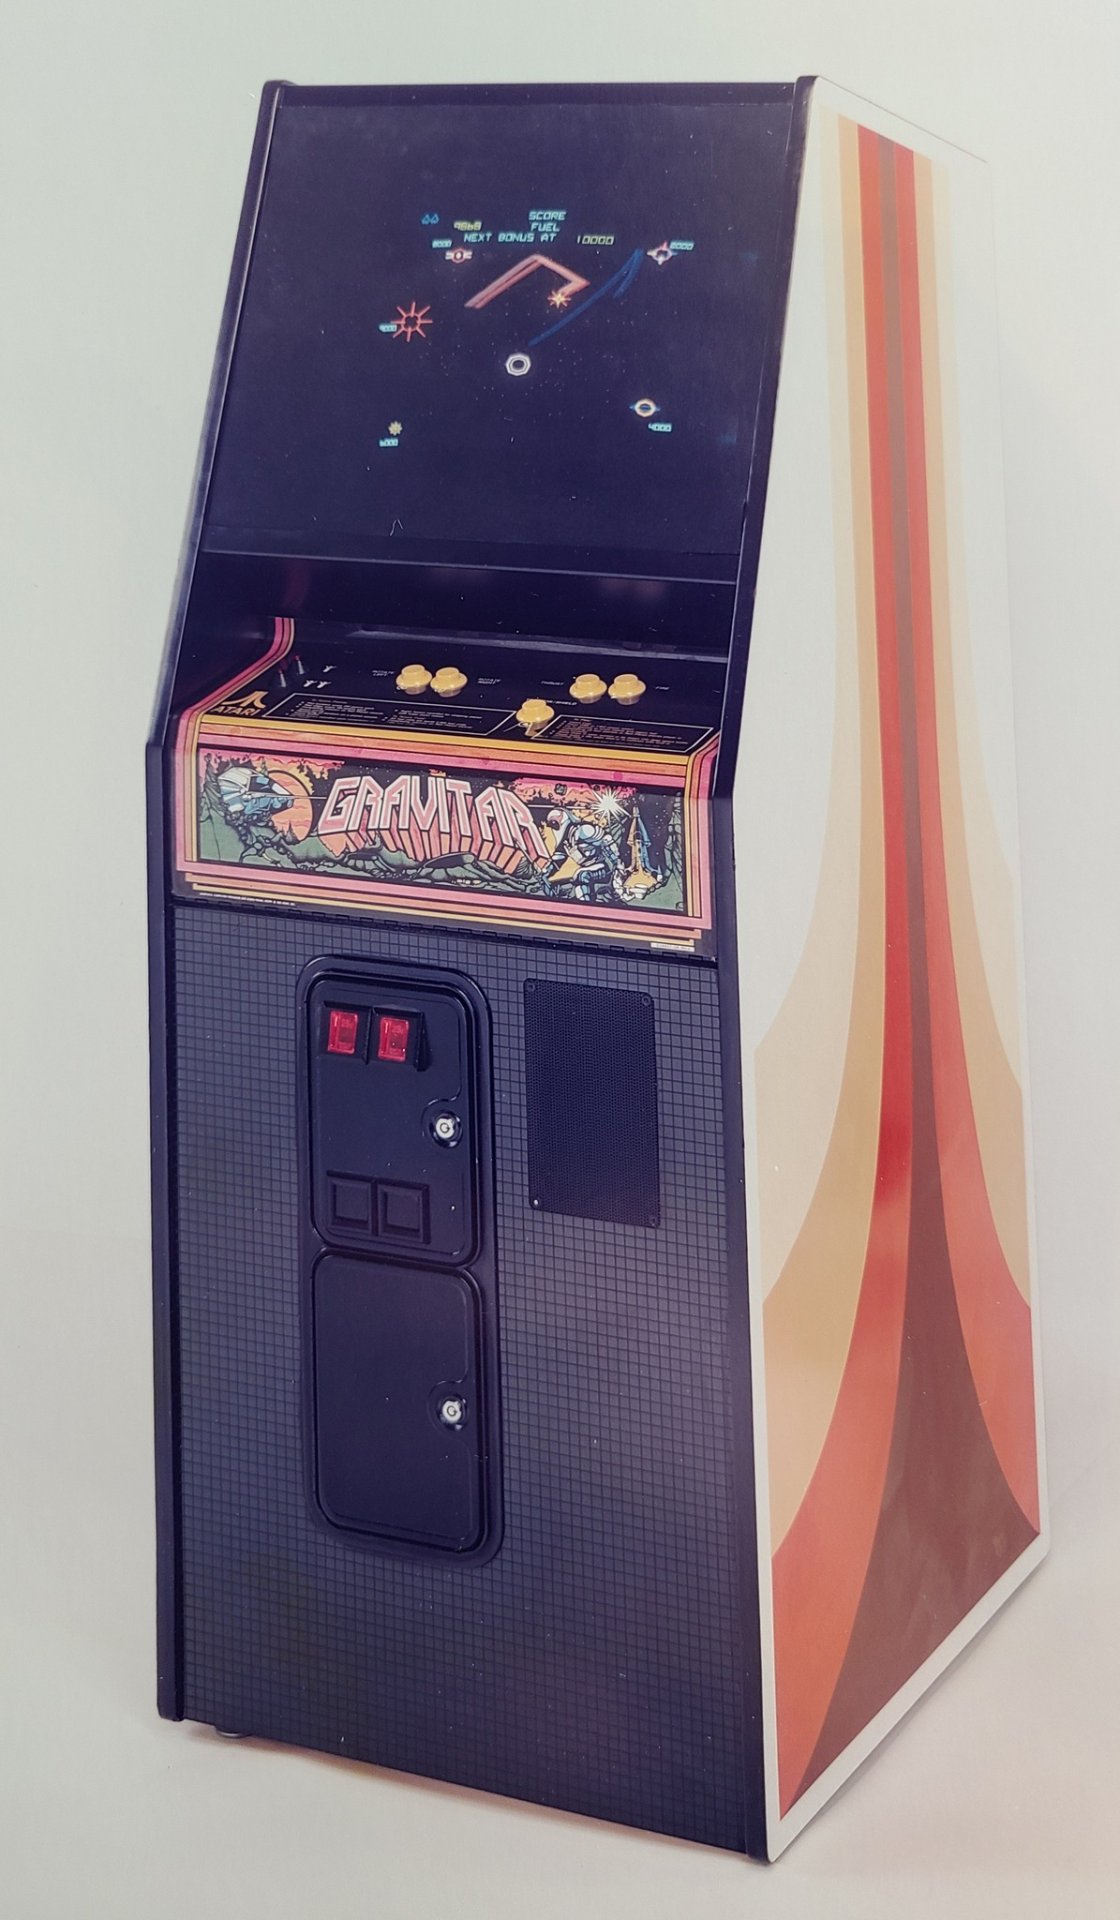
I had a few reasons for this: the marquee was below the screen, so the screen and controls could be as high as possible. The screen was closer to the front, so it would be easy for spectators or groups of players to see it from an angle, and the overall adjustments to our side panels would be aggressively simple. Two straight line cuts at a matching angle, that I could do.
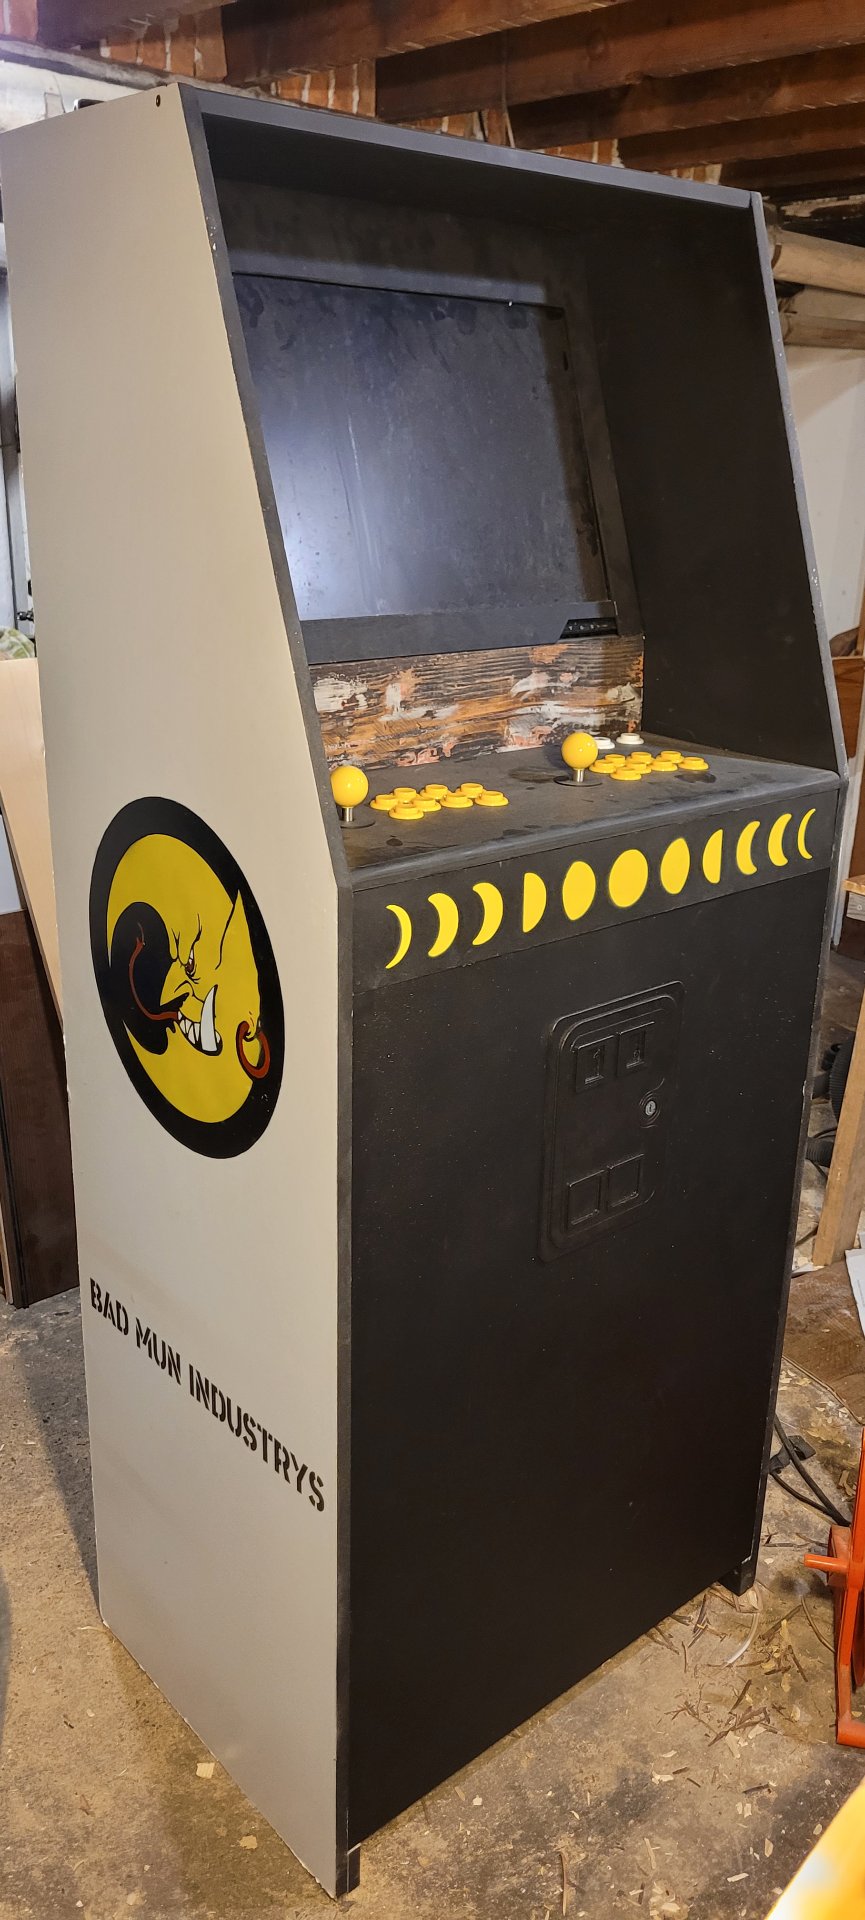
We talked design ideas a bit, as now was the time. We could do a specific game, or something generic (although I've always found the mame and other generic all-videogames themes to be really uninteresting, personally). Perhaps because we were basing our design on an abandoned prototype, they decided to aim for "like we found some weird pirate arcade machine out of time" and they picked the theme 'goblin dive bar' based on our shared love of warhammer.
I started drawing up a cabinet design, we talked about a logo and I made this from an old warhammer orks and goblins design:

Many thanks to them for pushing me to make it simpler and simpler. I think that was a good call.
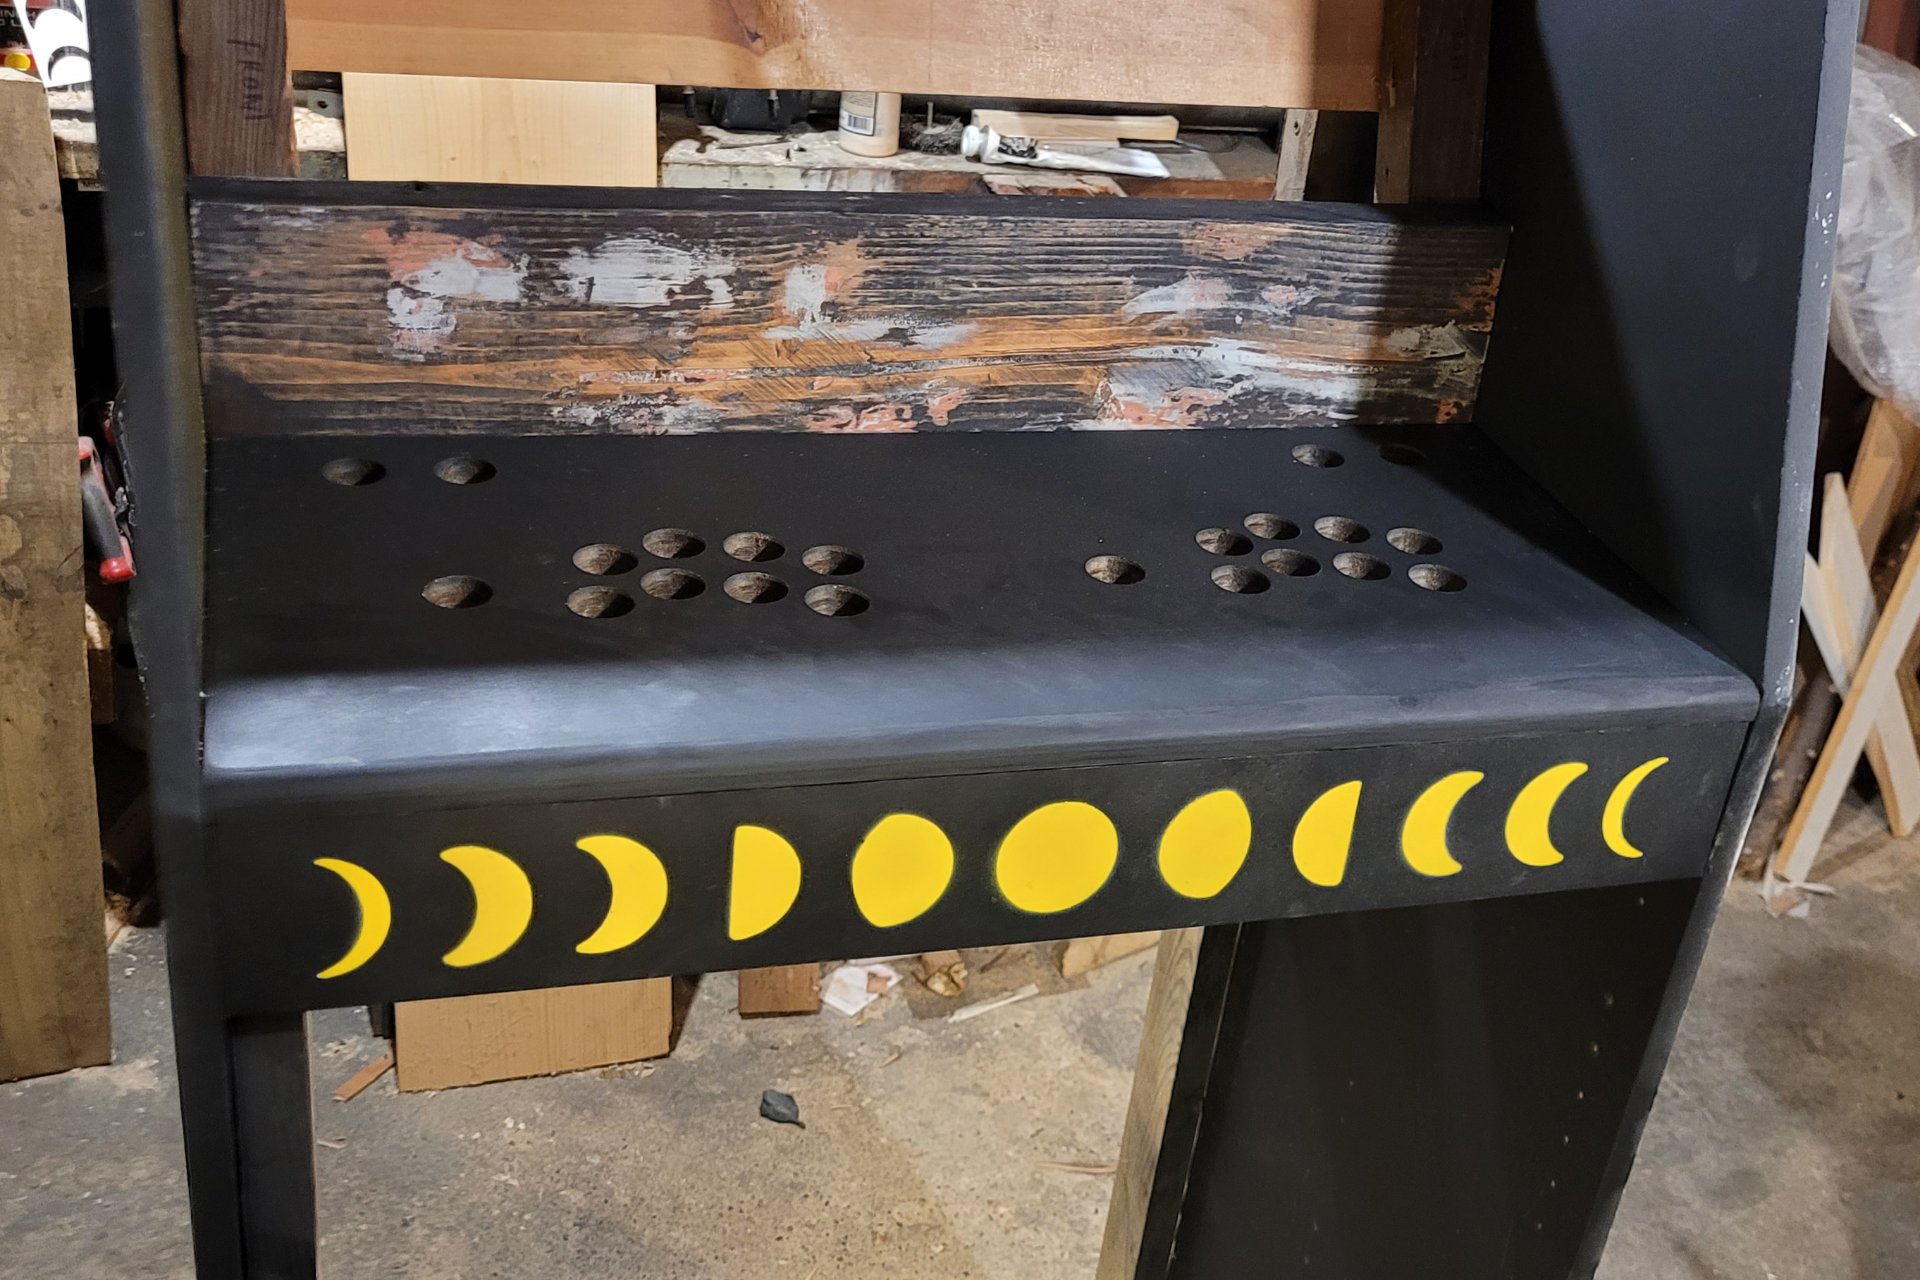
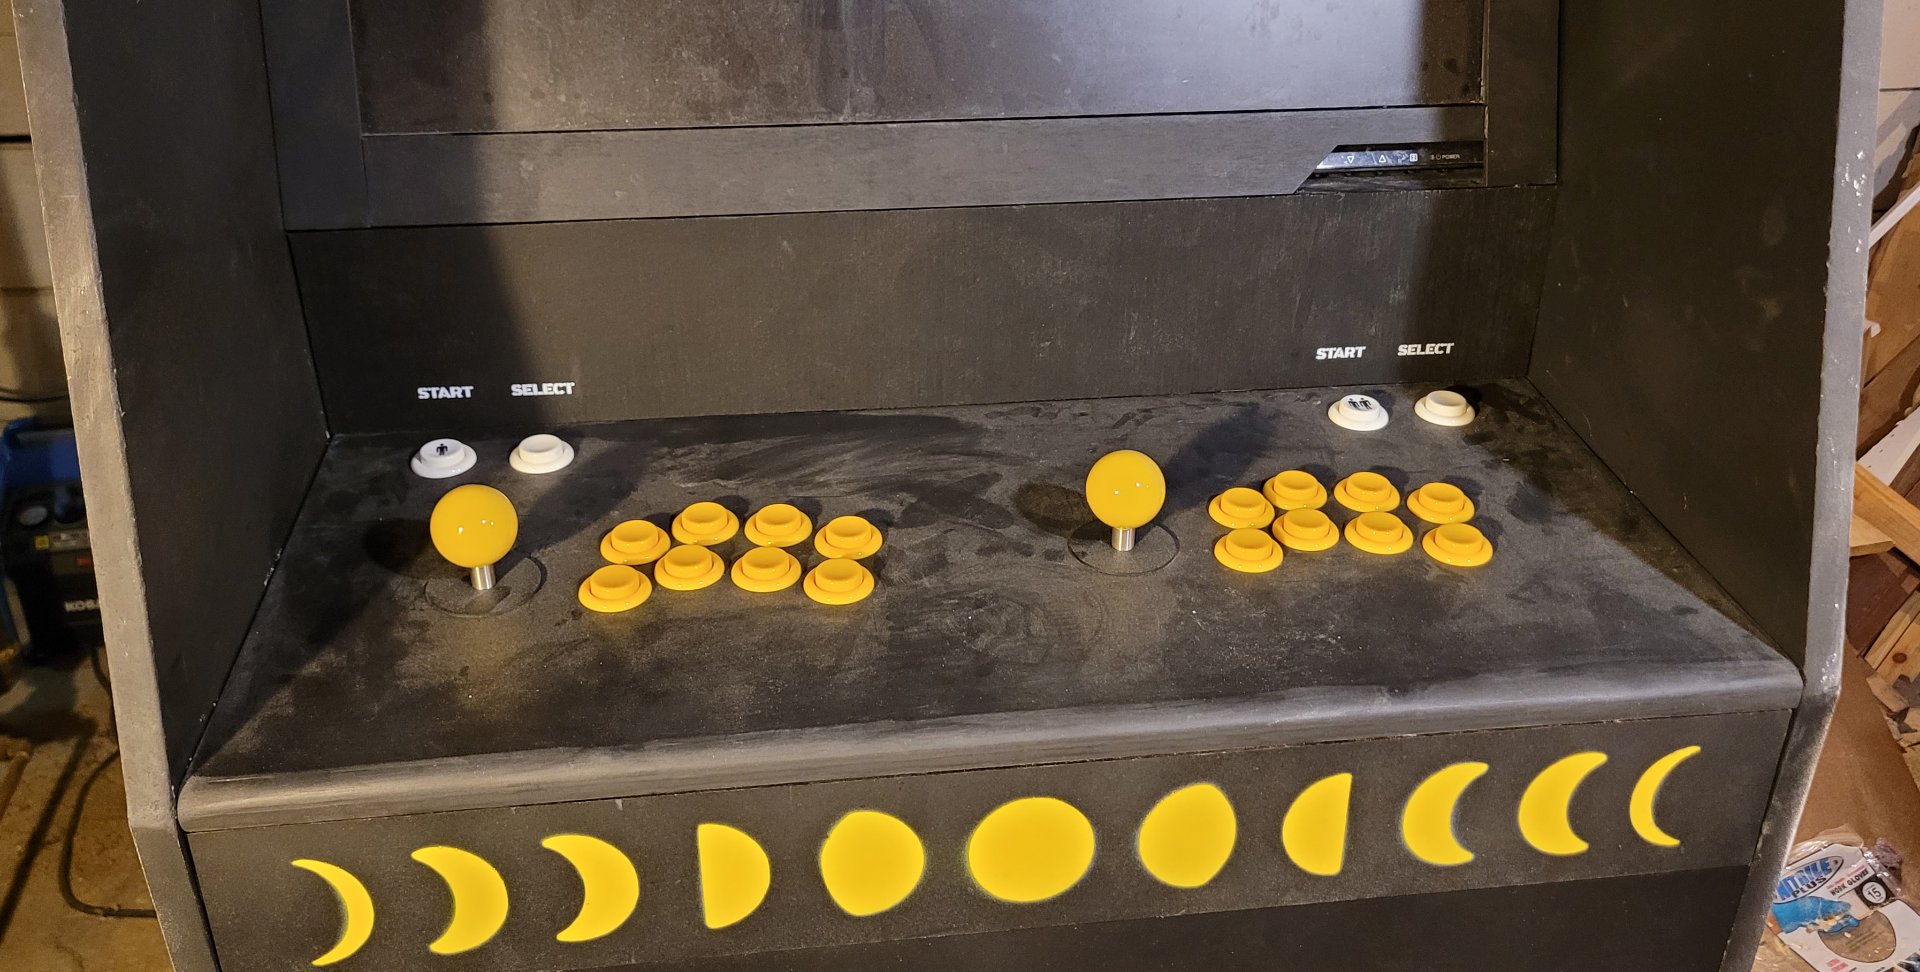
Arcade cabs are a great project because they take at least a little of everything - I really enjoyed the graphic design bit and went on to make stickers to cover it with later. With that figured out, I added a couple other flourishes, the moons on the marquee plate and the yellow buttons. My friend picked the name of the arcade company and we tried some stencil fonts and a layout for the side art.
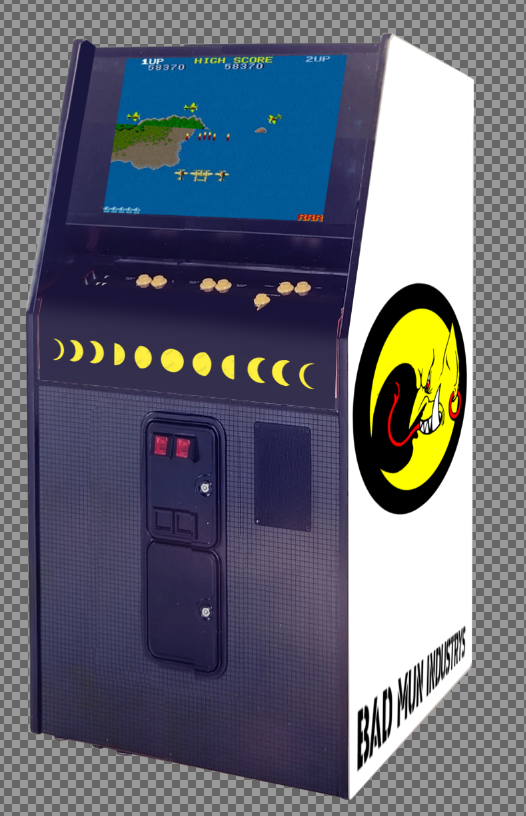
This is the mockup I gave them. It's pretty hacked together but I wanted to make sure we were working from the same plan.
Once that was done, it was time to start building. My original plan called for a frame of 2x4s forming a cube inside the structure, with 45 braces at every corner, with the sides attached like cladding. In the end that was mostly what we did, but we used some smaller boards for the frame and relied on the sides a little more for the structure.
I tried to find my original sketches, but wasn't able to. Either they were on wood I've since used in another project, or they're on some envelope or receipt mixed in with the rest of my detritus. Instead I drew this up from memory and the pictures I have:
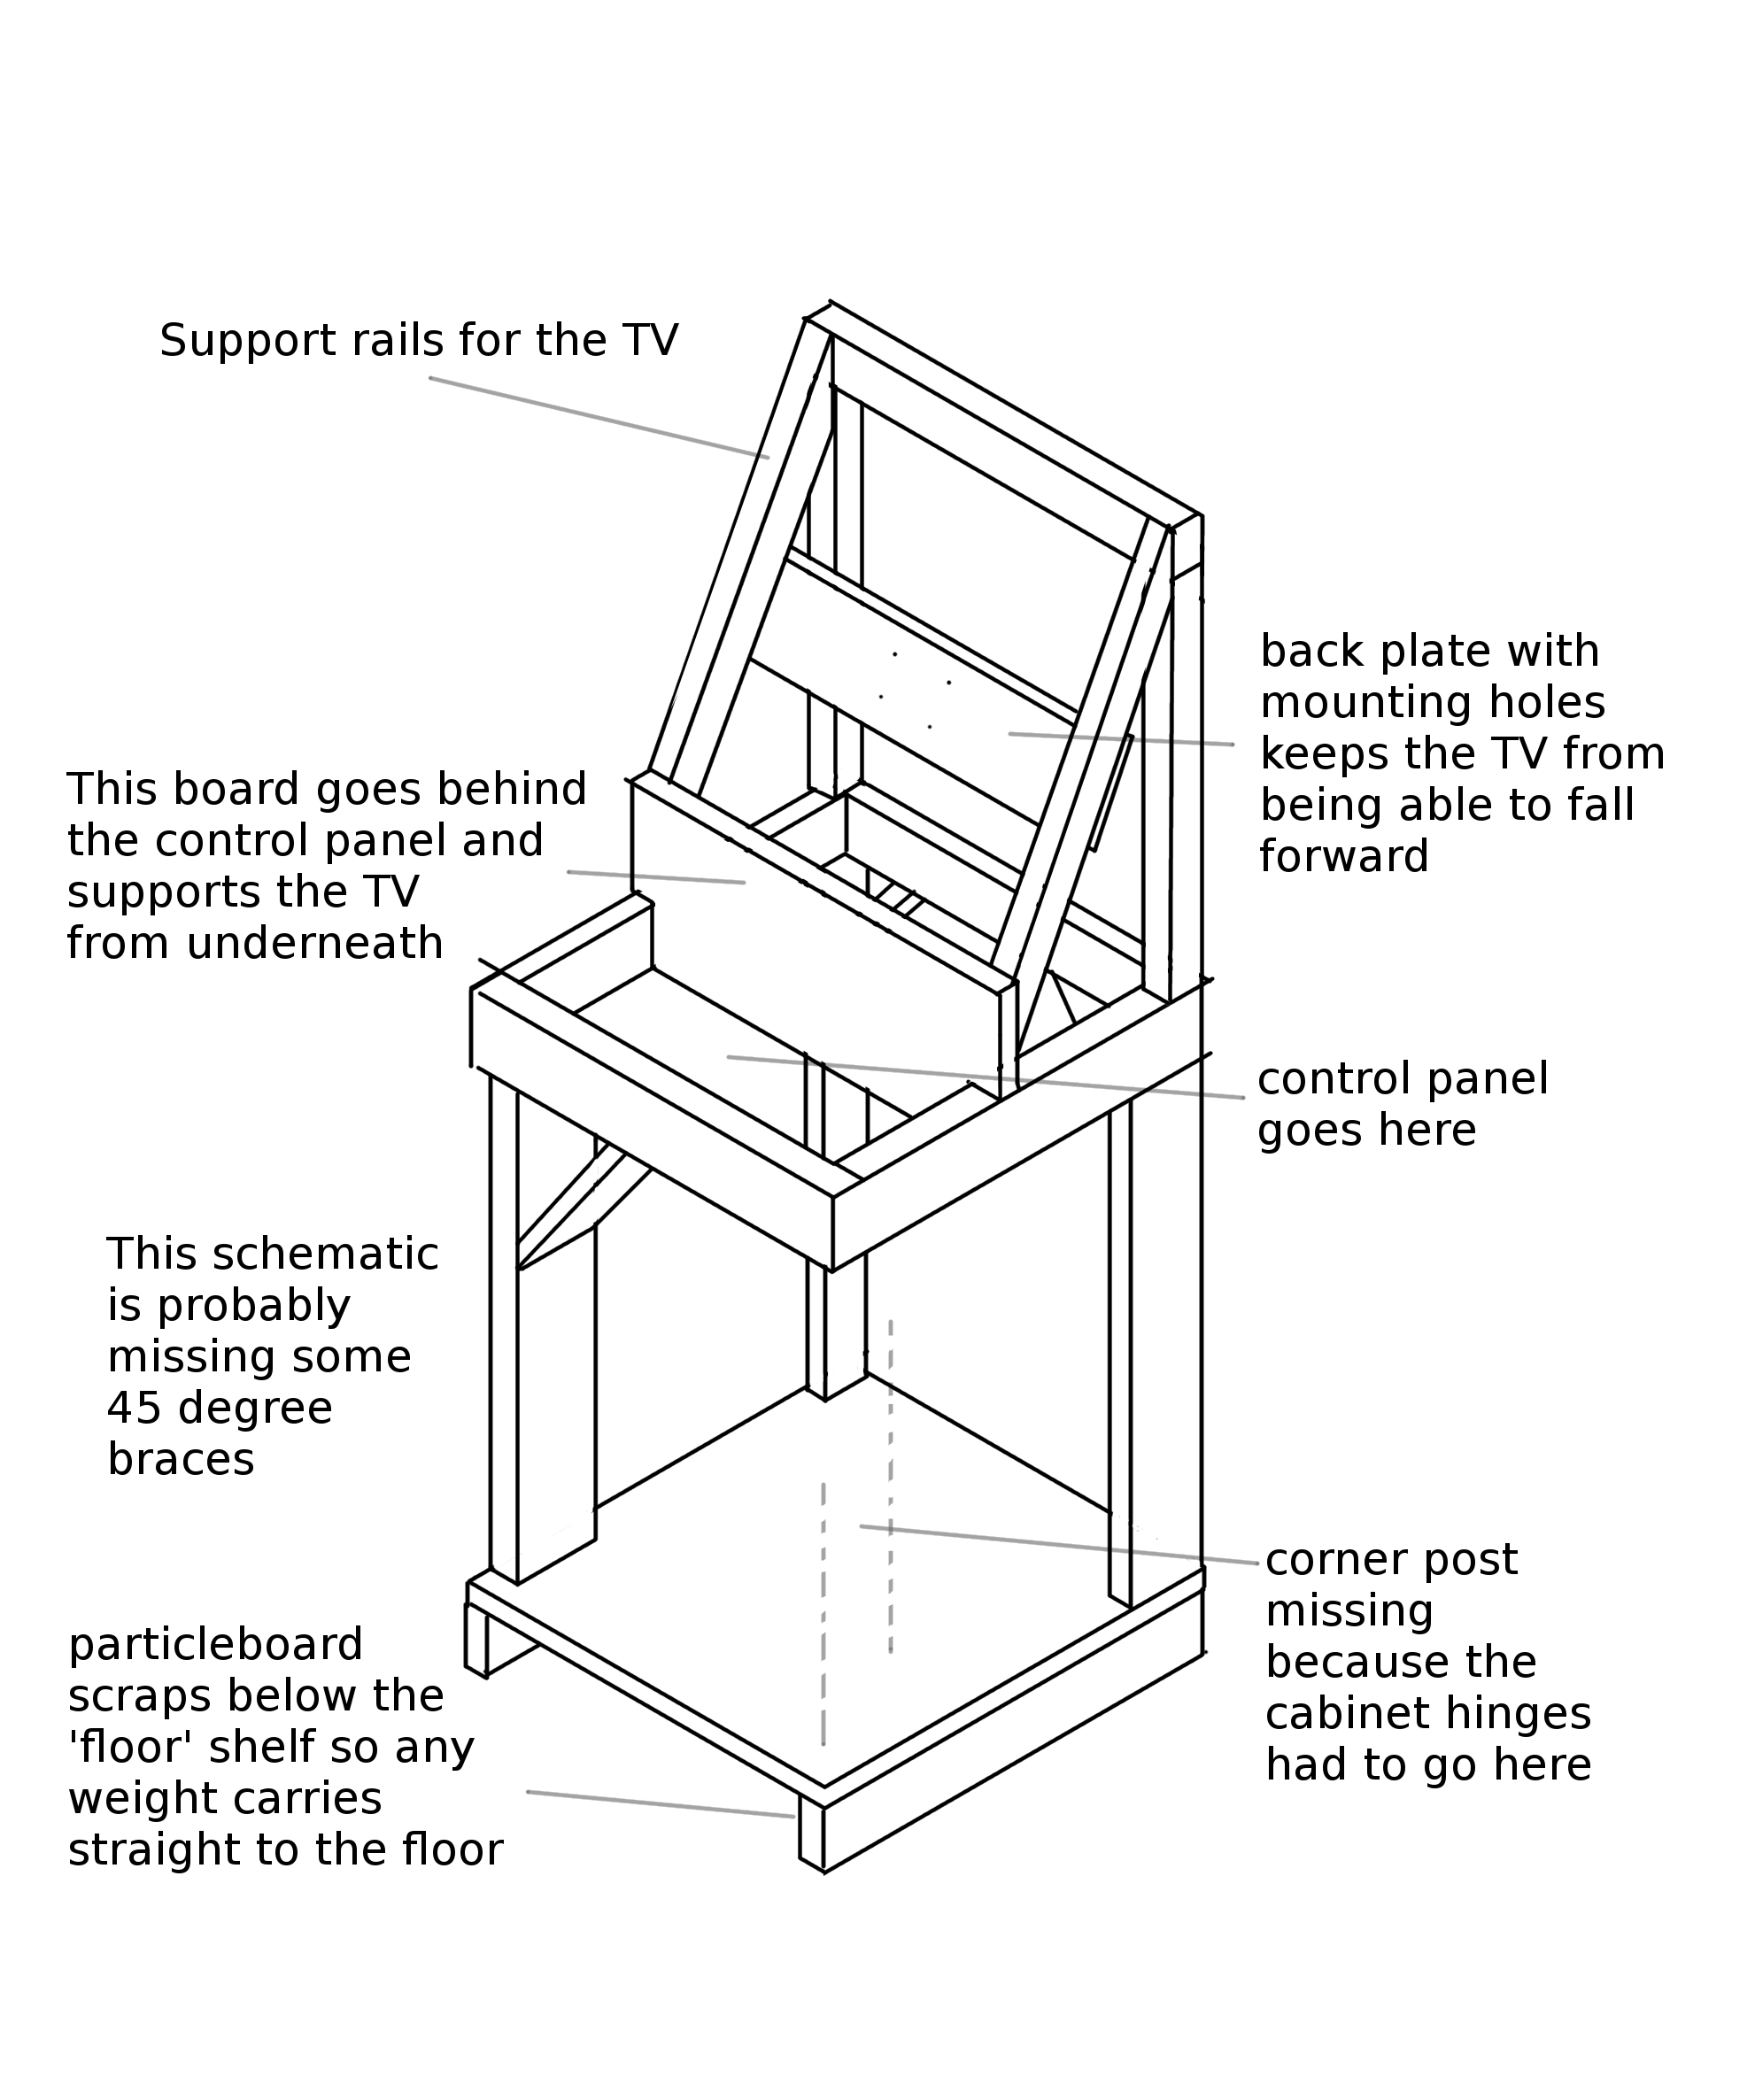
This sketch shows all the framing without the sides, front, or control panel. All of this was scrap lumber. The uprights were mostly a 6"x4" pressure treated post we ripped lengthwise on my neighbor's tablesaw (wear a dust mask if you're going to do that), the supports for the TV were scraps of house siding, and the big board supporting the TV was I think a scrap of 2"x12" which had been used as a concrete form and was pretty much garbage as far as materials go even after I scraped off most of the concrete.
We wanted it sturdy, so it had to have an internal frame so it wasn't relying on the particleboard sides for structure. I wanted the control panel in particular to bear its weight through the frame right to the floor. We also screwed everything to the inside of the sides of course, and that on its own was surprisingly sturdy. Lots of 45 degree braces helped to ensure it wouldn't sway or twist at all.
The TV frame was an improvement over my last design. On that one, the flatscreen sort of just rested in place on some rails. This time I wanted it to be fastened in place - after all, we were going to have to move this to my friend's place, and then they'd be moving it from apartment to apartment (and they since have, with no problems!).
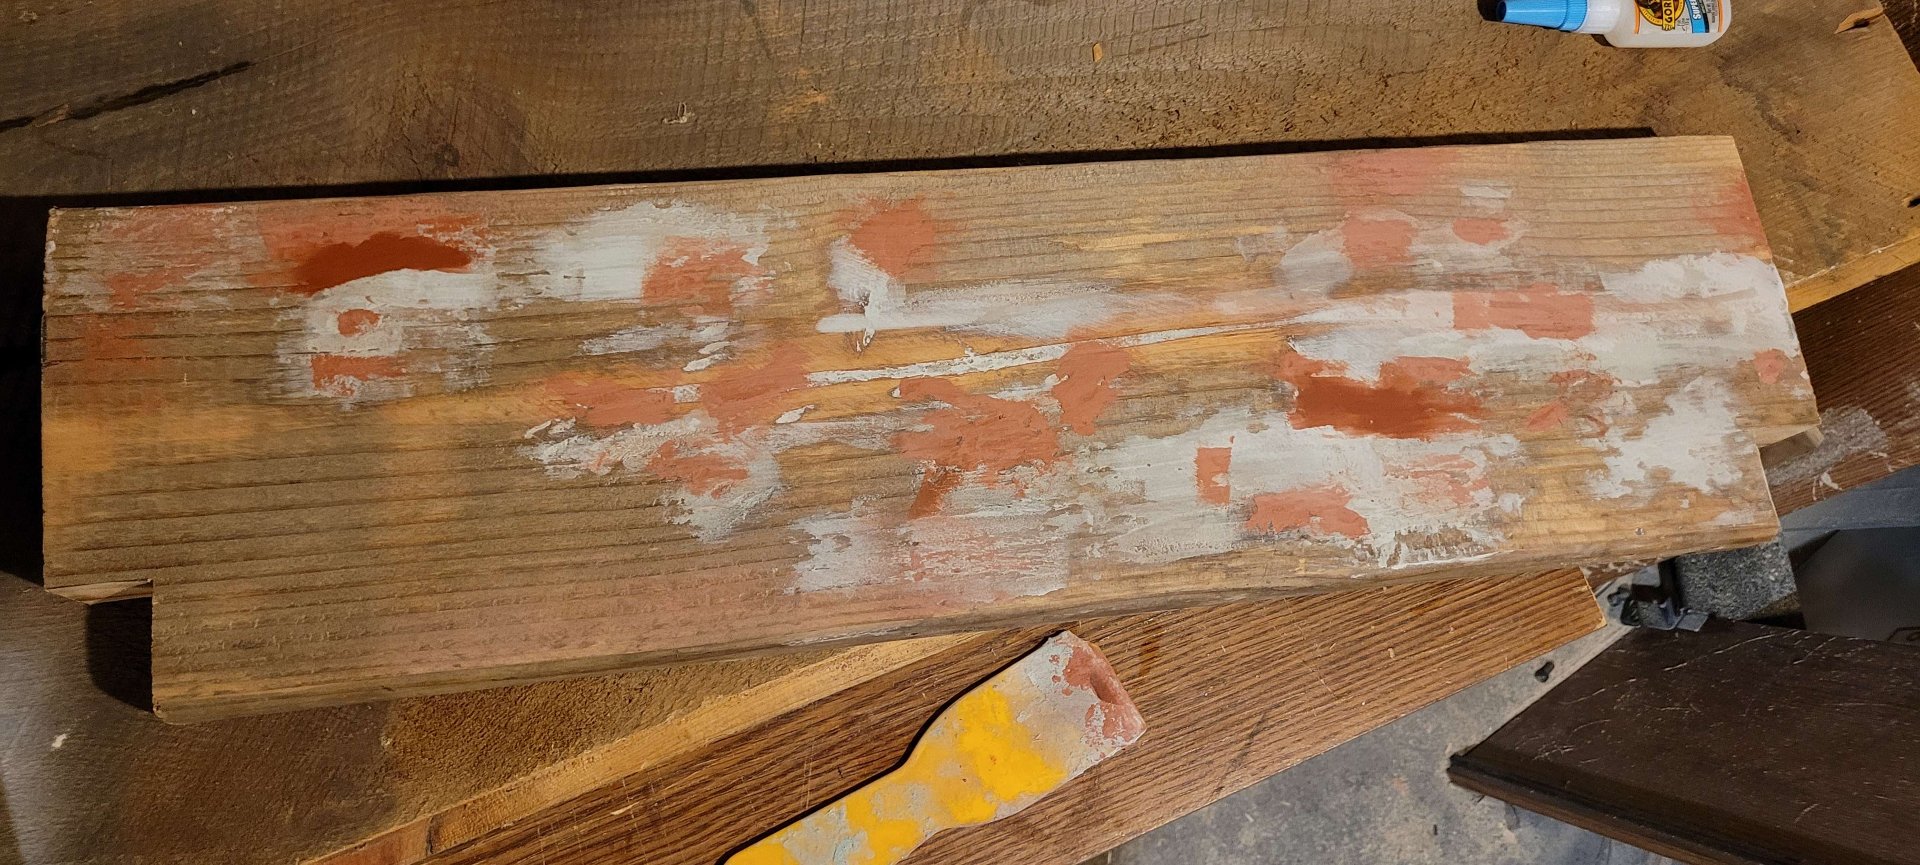
I don't have a ton of pictures from early on (I never think to take any until it starts to look like something). Here's one from while we were trying to make that 2"x"12" look better with bondo. Even once it was sanded smooth it still looked bad enough painted that I eventually cut a piece of plywood as cladding to cover it.
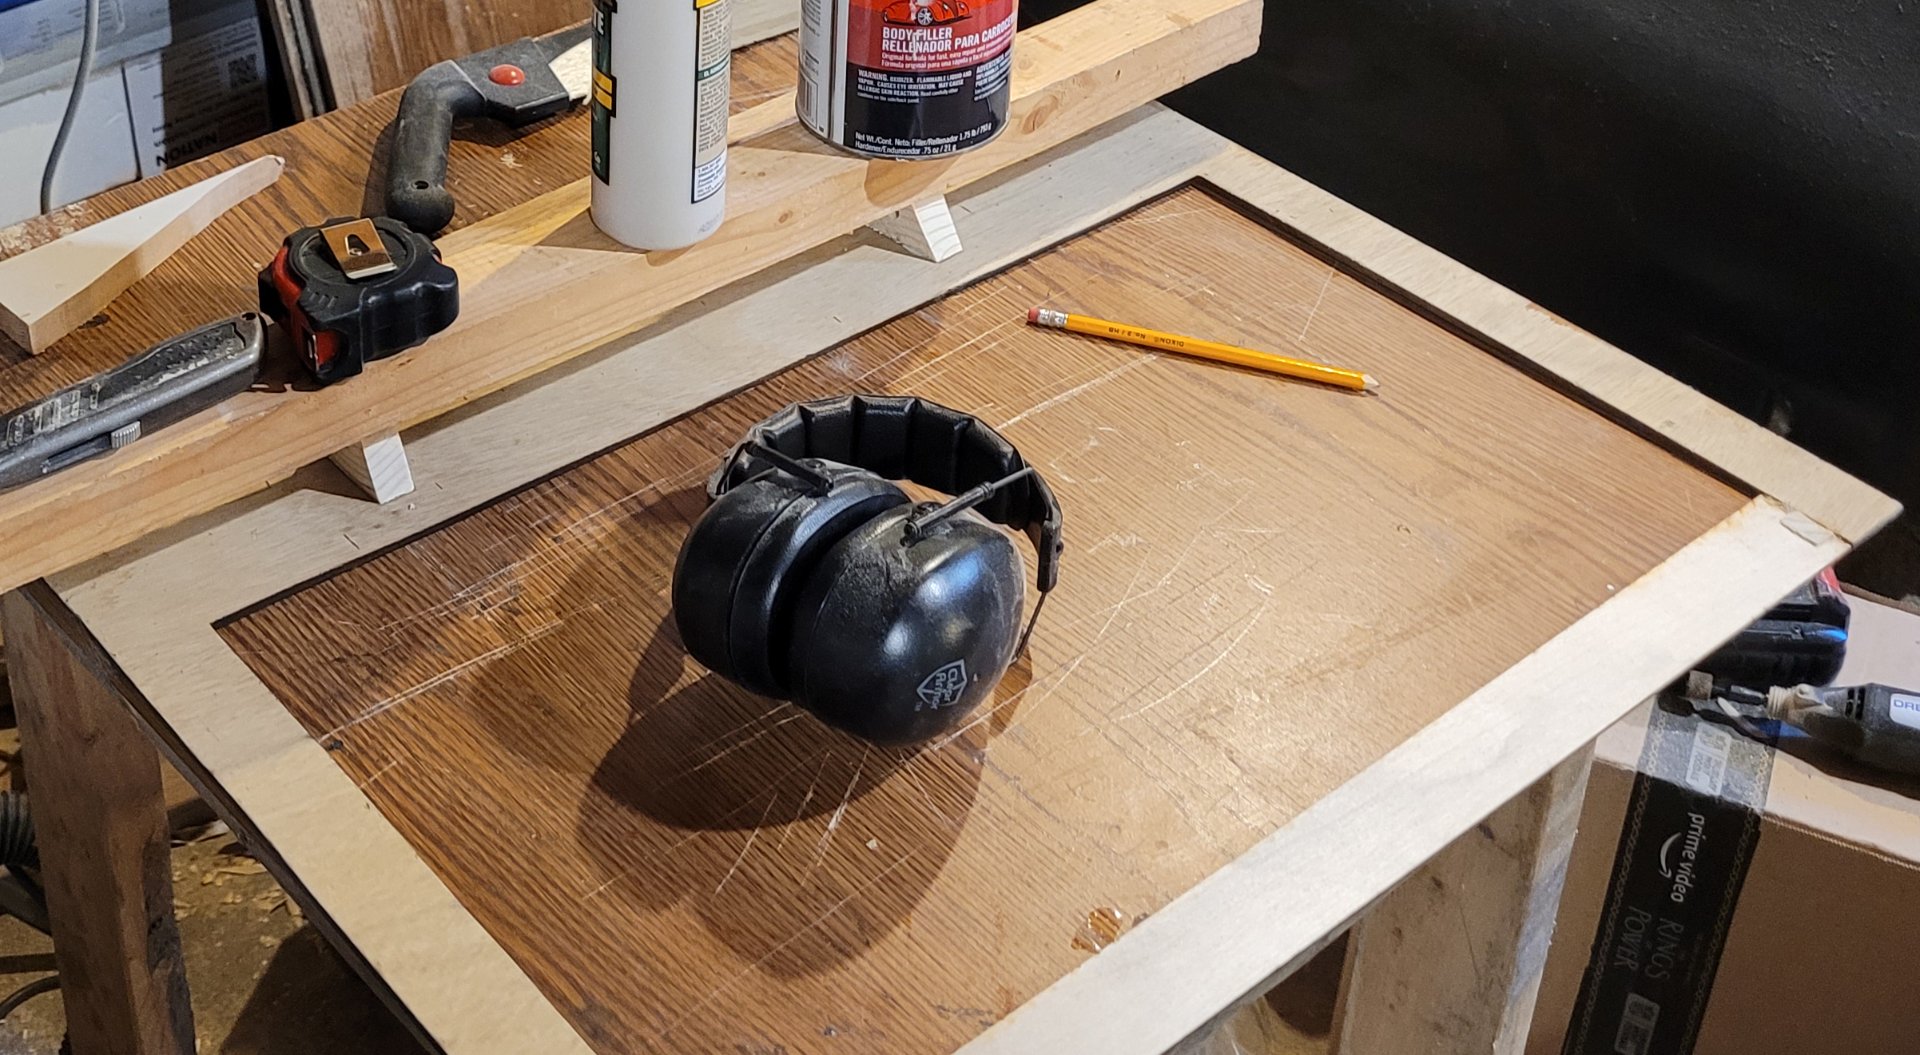
We made the control panel from a piece of 1"x14" composite pine I got from a disassembled ikea bookshelf I found on trash day. When I was working on the last arcade cab, I asked around on our Buy Nothing page and met a professional woodworker who had a large table router (this is before I got my little one). He helped me rout a round edge onto my control panel (plus a spare in case I messed up drilling the holes for the buttons) and to cut a slot I used for the marquee.
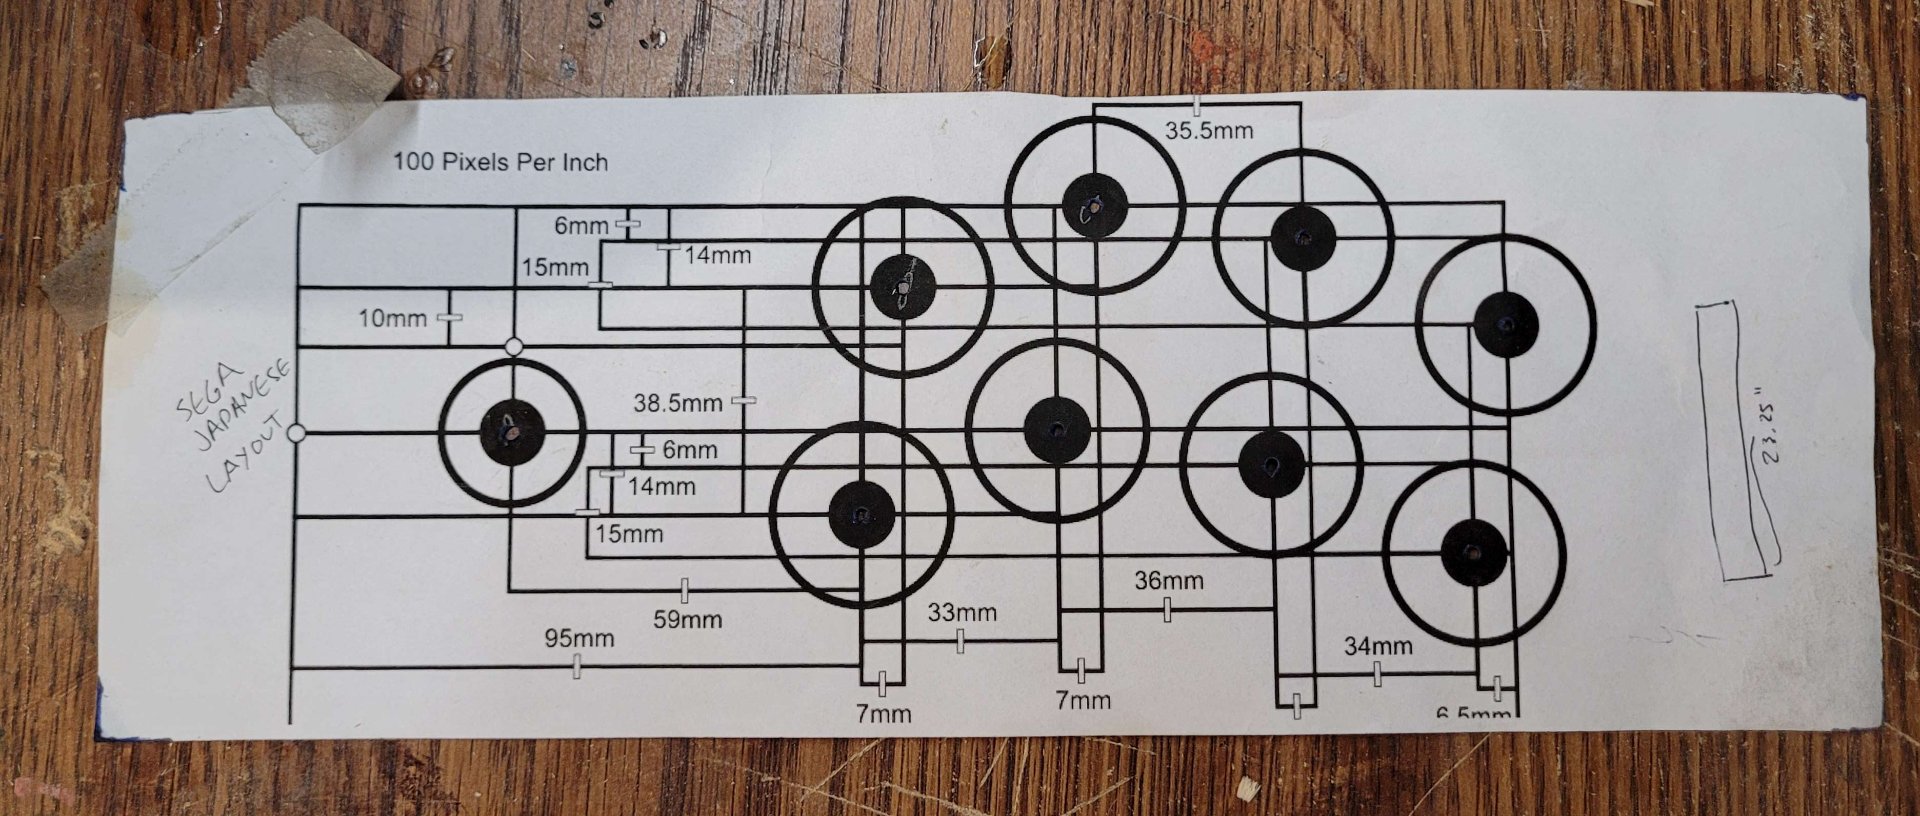
My friend and I used my spare to make their control panel. They picked the layout using some more lessons learned to improve on my first one, opted for the same sega layout I picked (found here) and we drilled the holes. They opted for a nicer set of authentic mechanical buttons and joysticks than the cheap kit I'd used the first time around, and I think that was a great call. Those buttons are also useful in other electronics projects.
We also filled in the front cut edge of the particleboard sides with bondo and sanded it smooth.
Once we had the basic structure and made sure the TV could fit, it was time to paint it (while the weather was good).
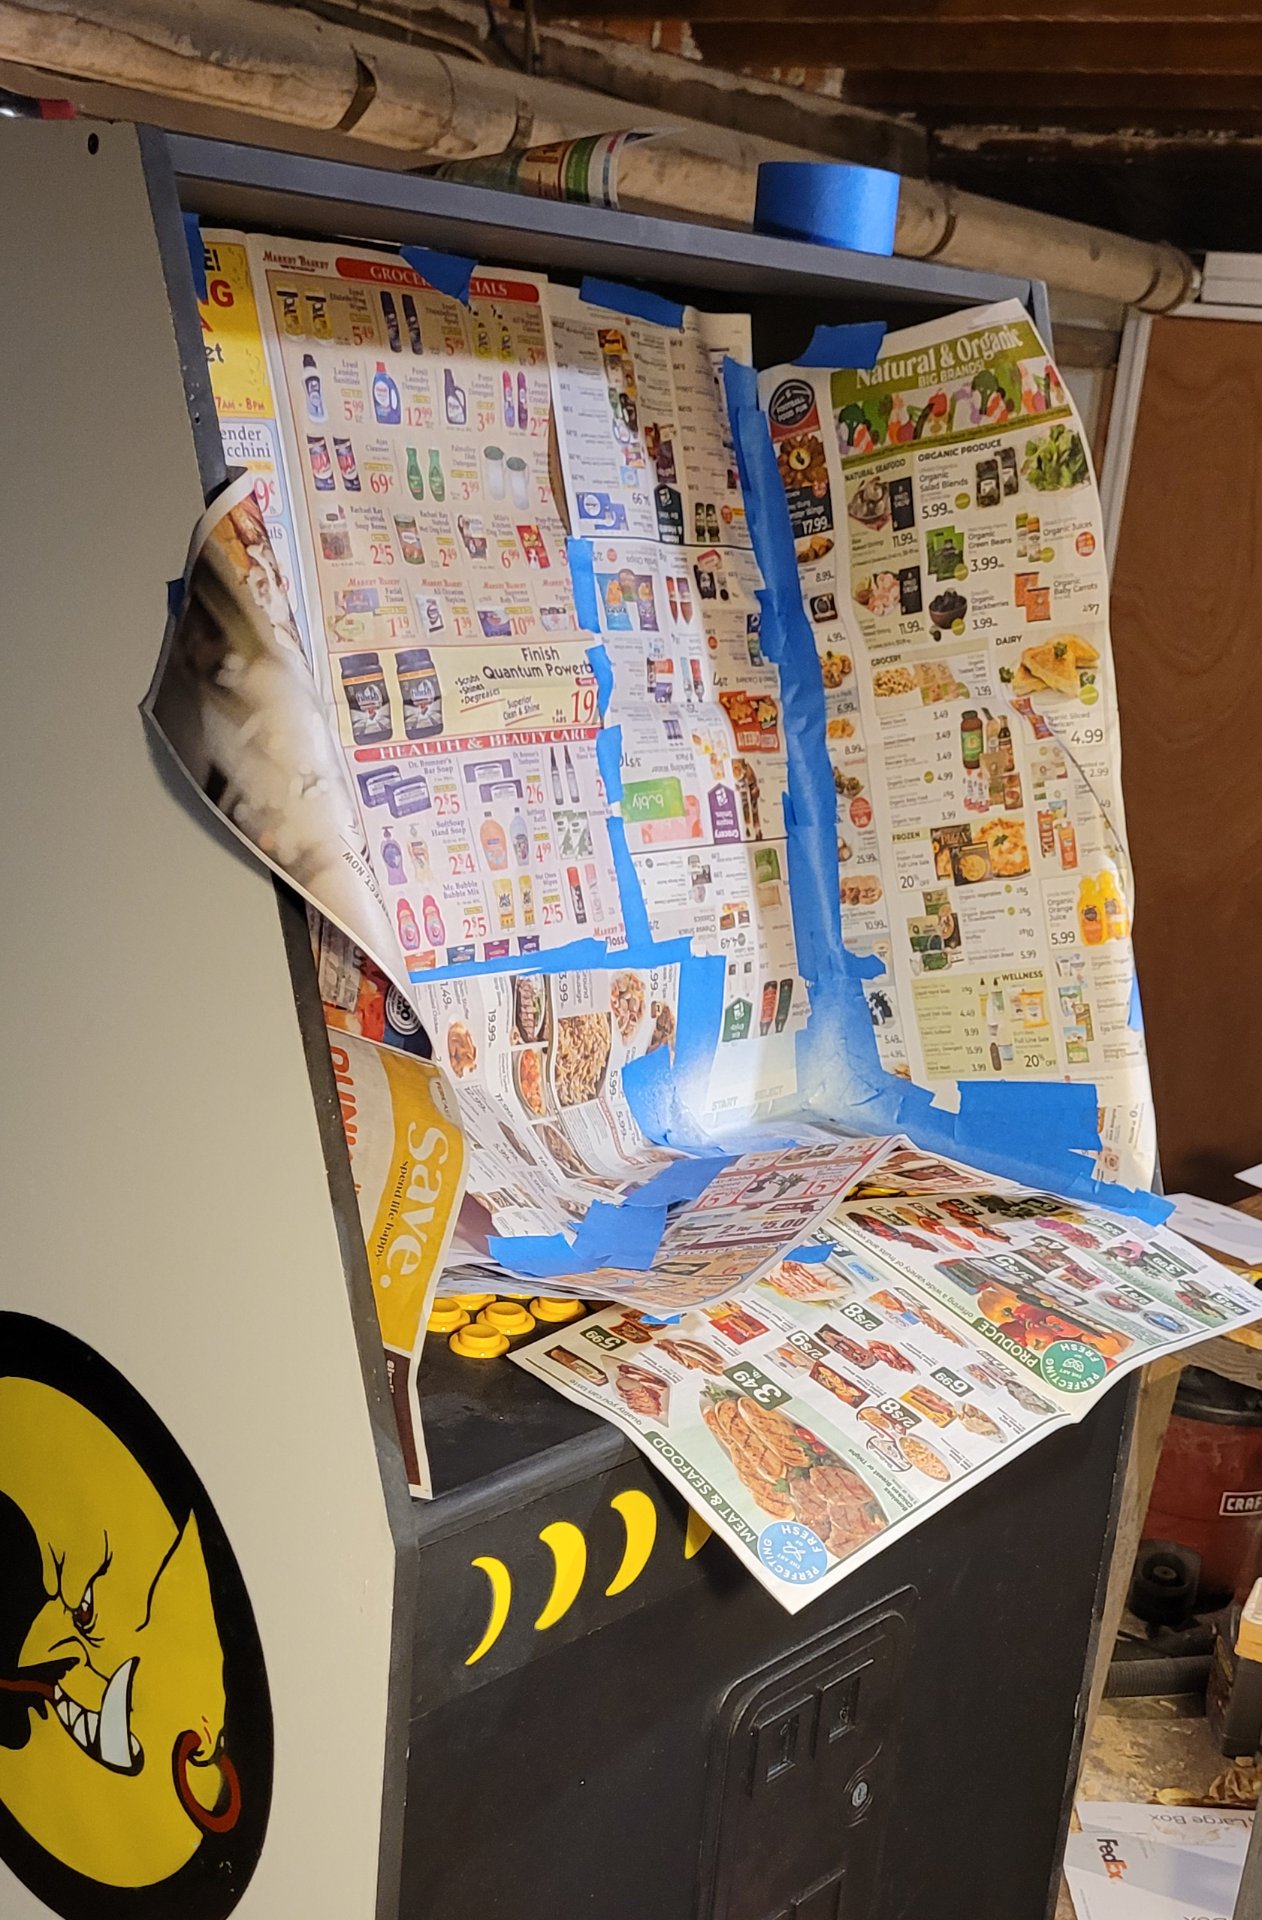
For this I printed out a large stencil at the local makerspace and cut it out by hand.
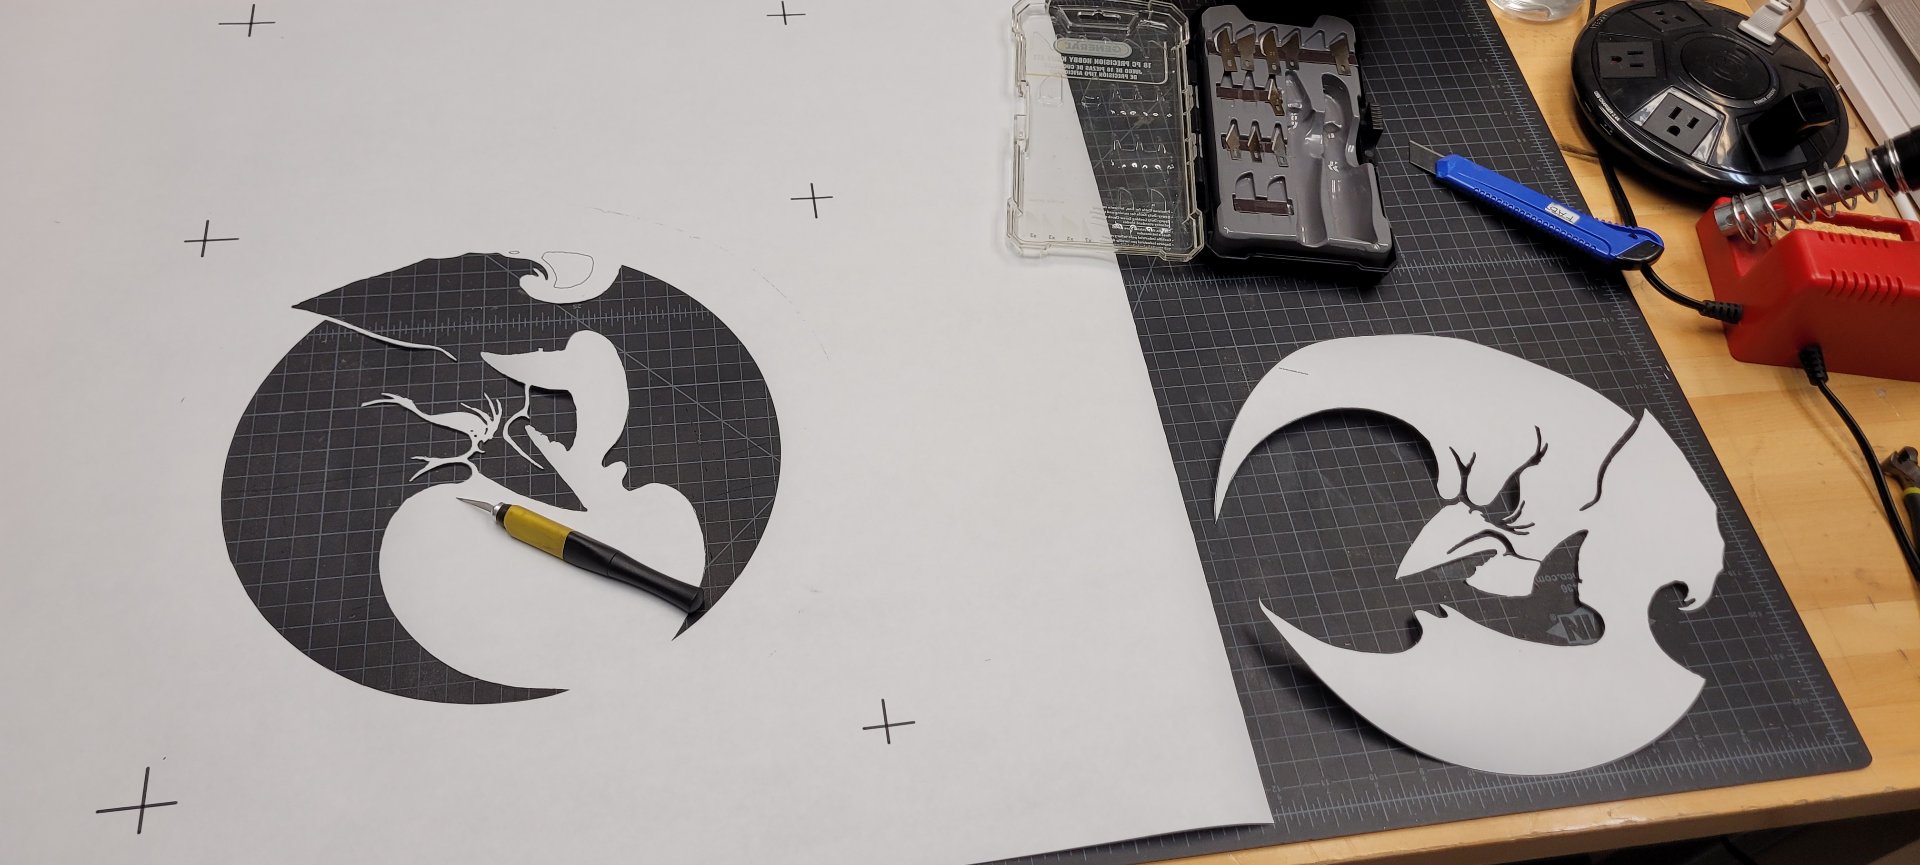
This was a large but simple four-layer stencil (black circle, yellow, red, white) so cutting it out took no time at all. Unfortunately, the only paper available for the plotter printer was super flimsy, and that would be a pain later on.
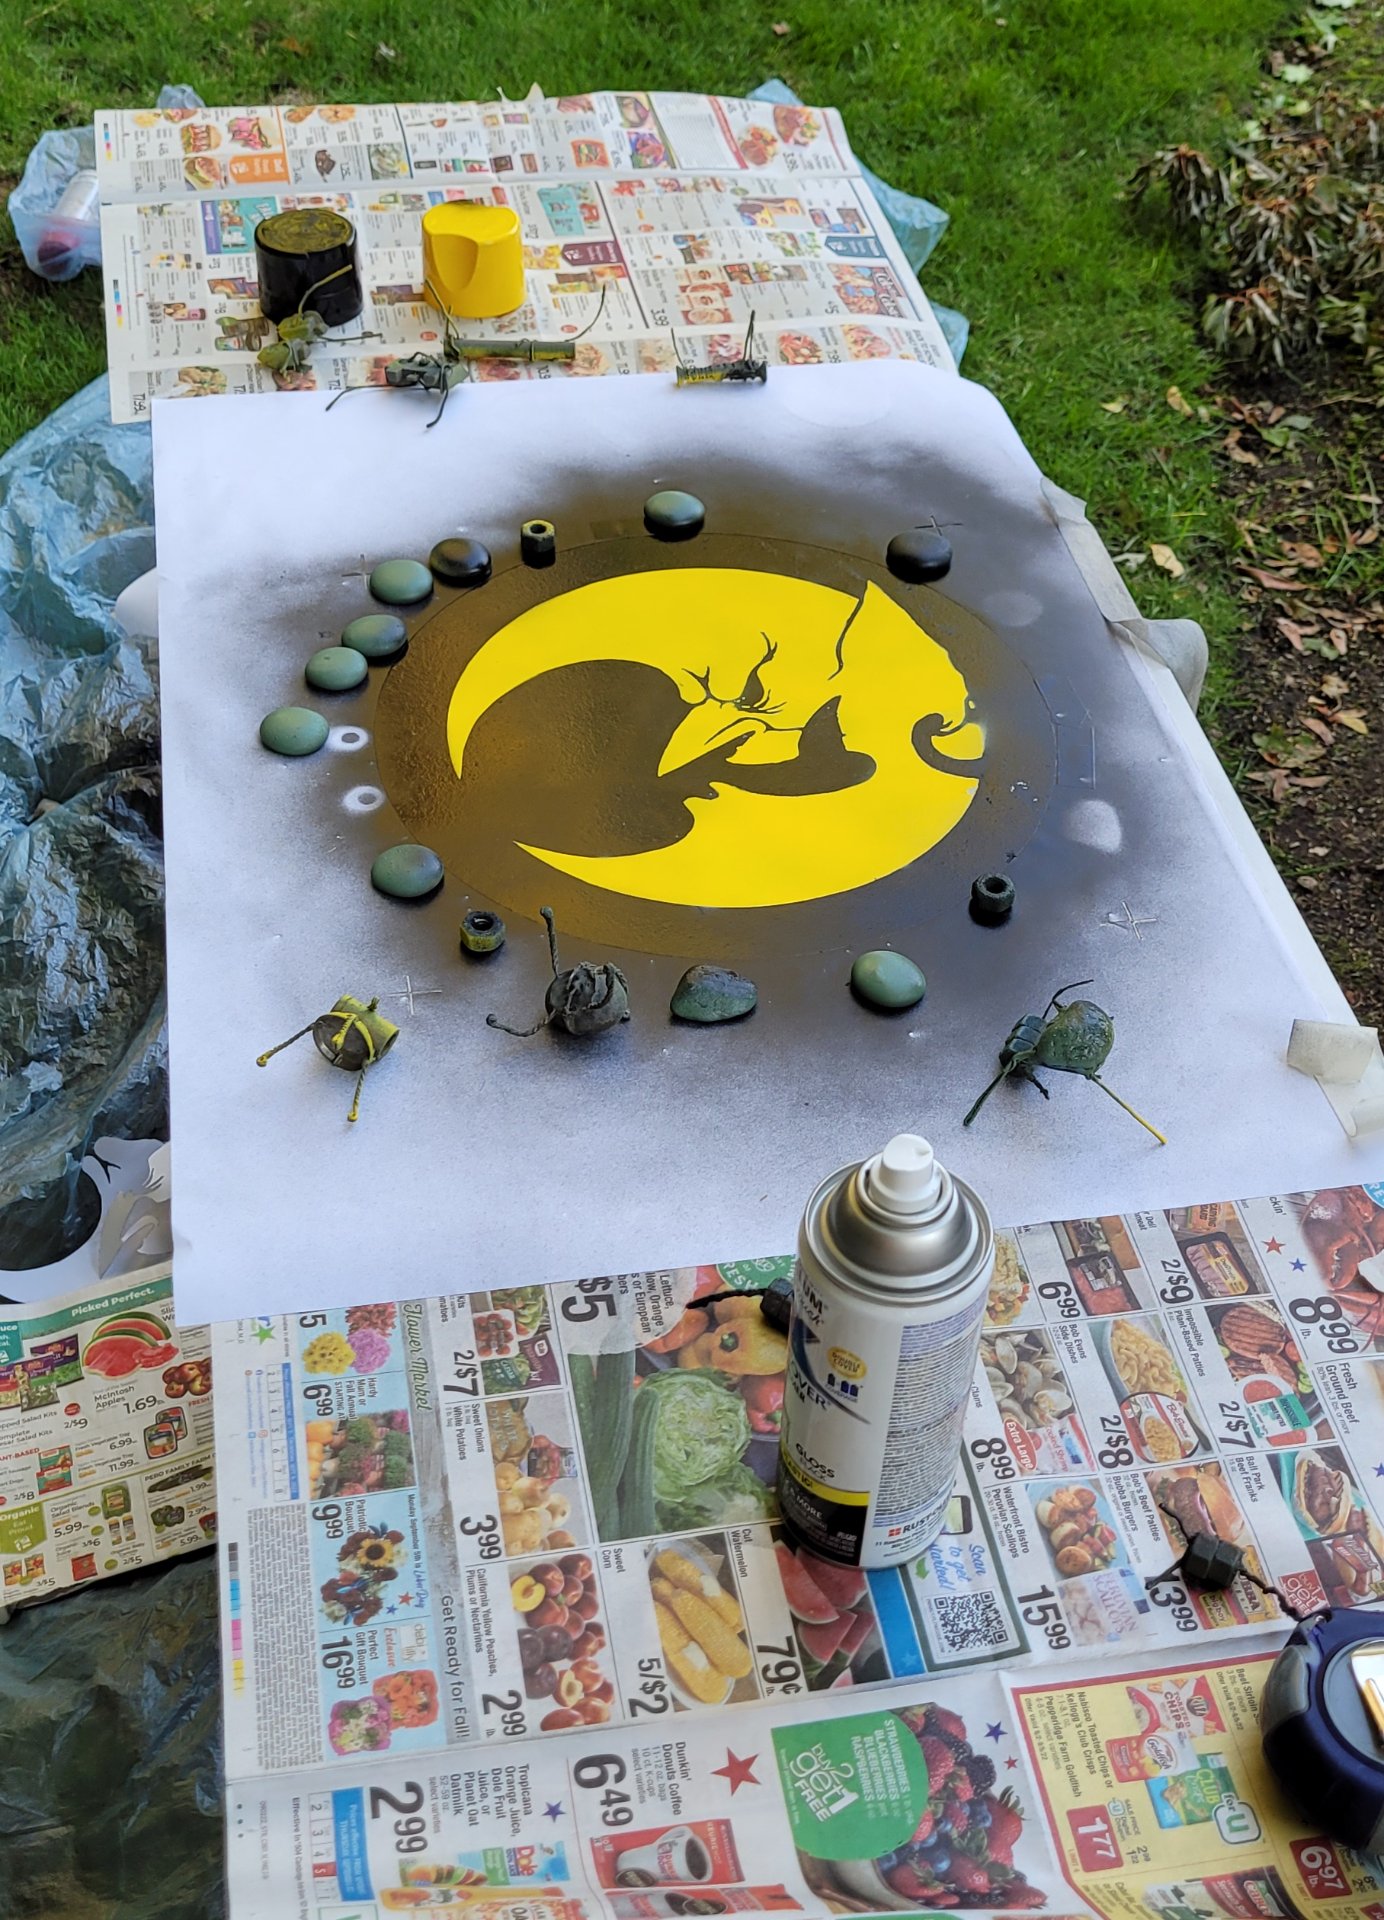
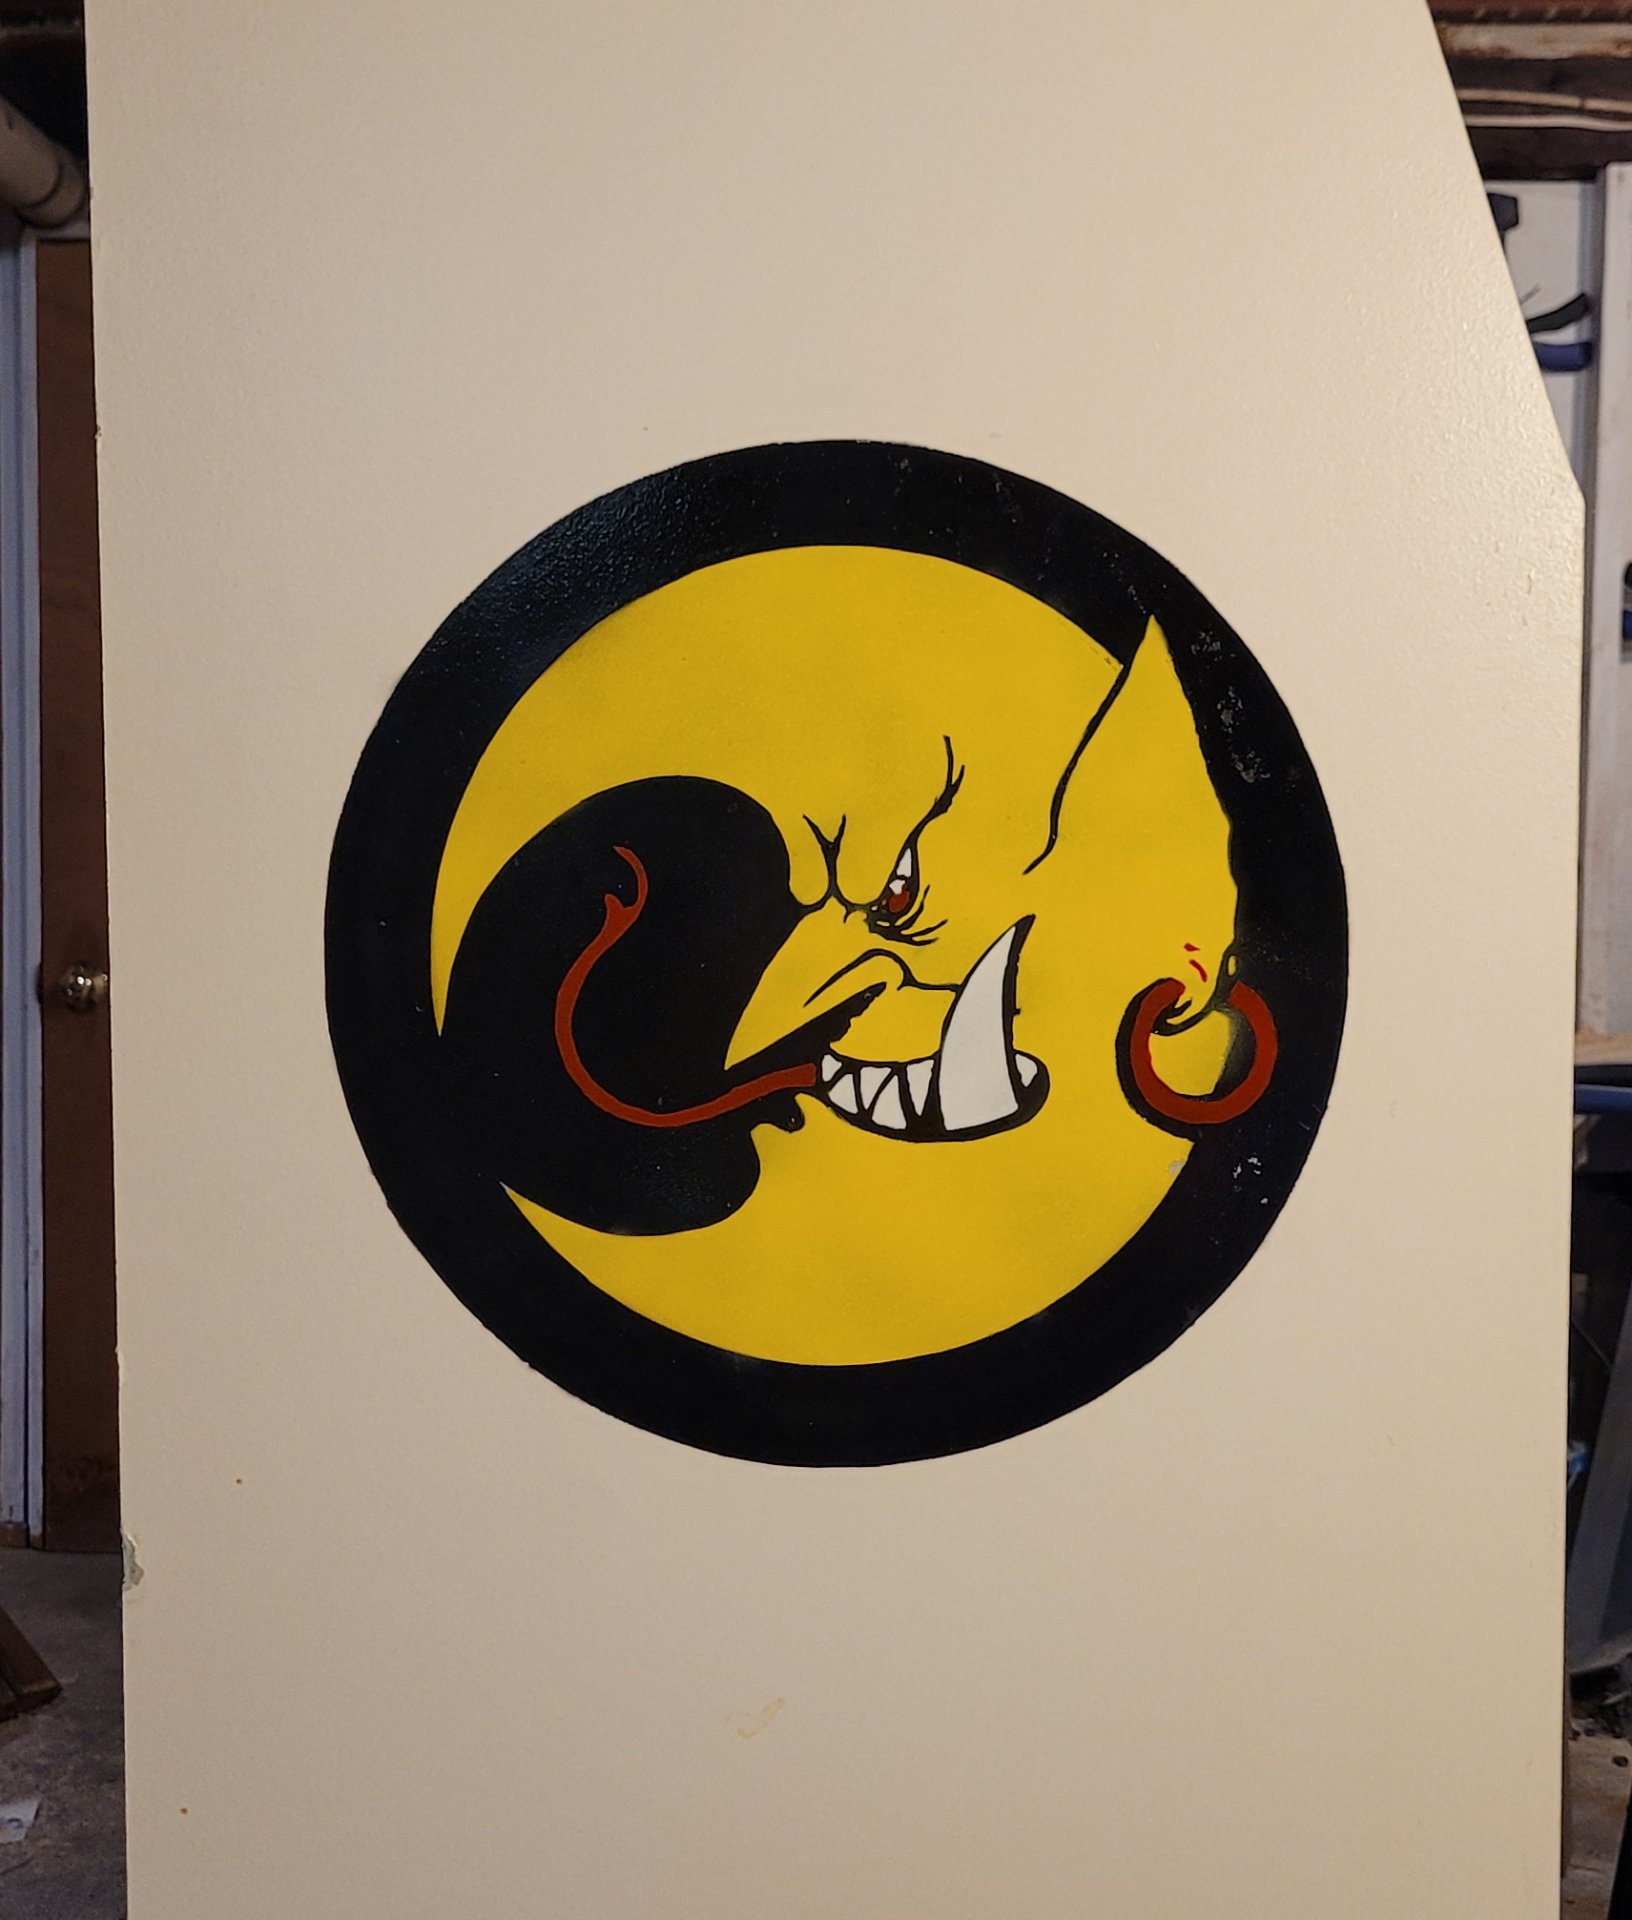
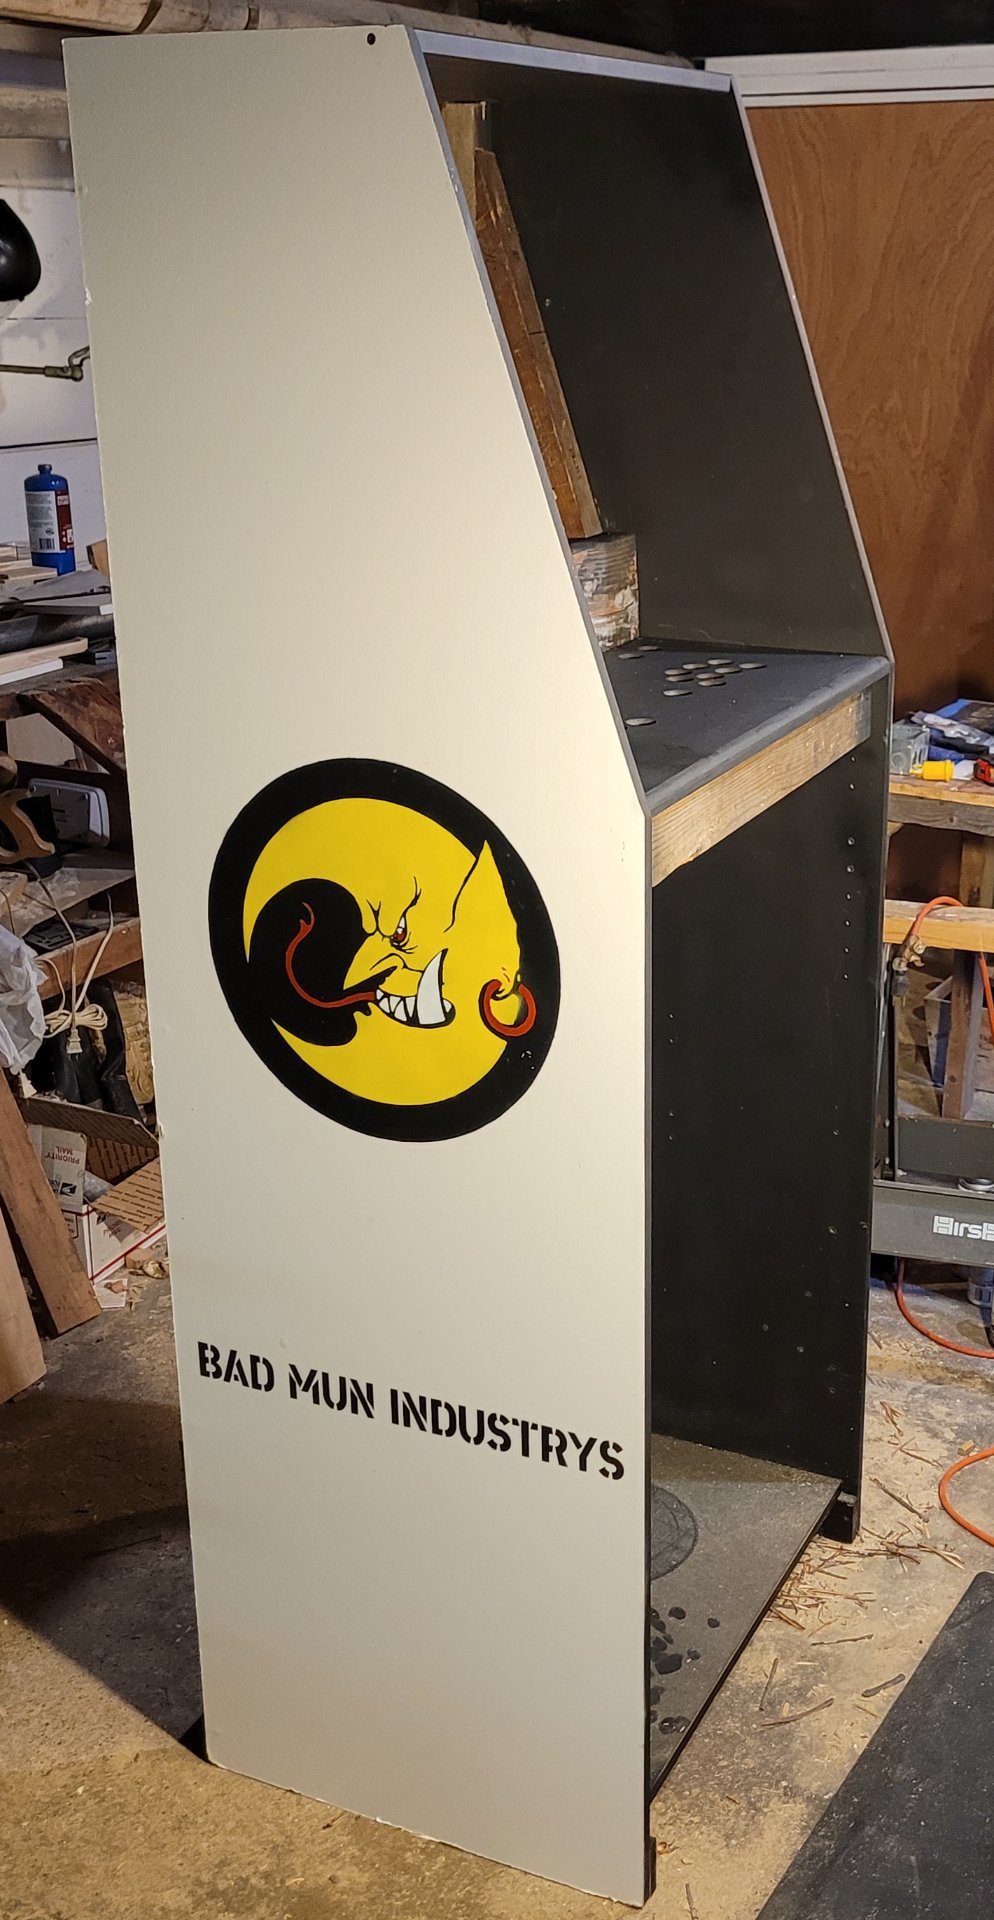
For the first paint session we only did the round logo. We weren't sure we'd be able to do both sides, so we started with the one which would face the room (this side also got the best particleboard). We had a bad combination of elements here - flimsy paper and because I couldn't find my good artist's yellow spray paint, we were stuck with some generic watery hardware-store-brand spray paint with the approximate thickness of kool-aid. We had to paint the black circle, paint the stencil of the moon with white, then use the yellow over that. By then the stencil had warped and in some places stuck, so the black layer was messed up with underspray and missing paint. Luckily we still had the 'negative' from the stencil, so I used that to protect the yellow while I fixed the black. Then we did the white and red.
All of that was a mess and I wouldn't recommend it as a strategy. It was one of the worst ways I've had a stencil project go, but the end result wasn't bad.
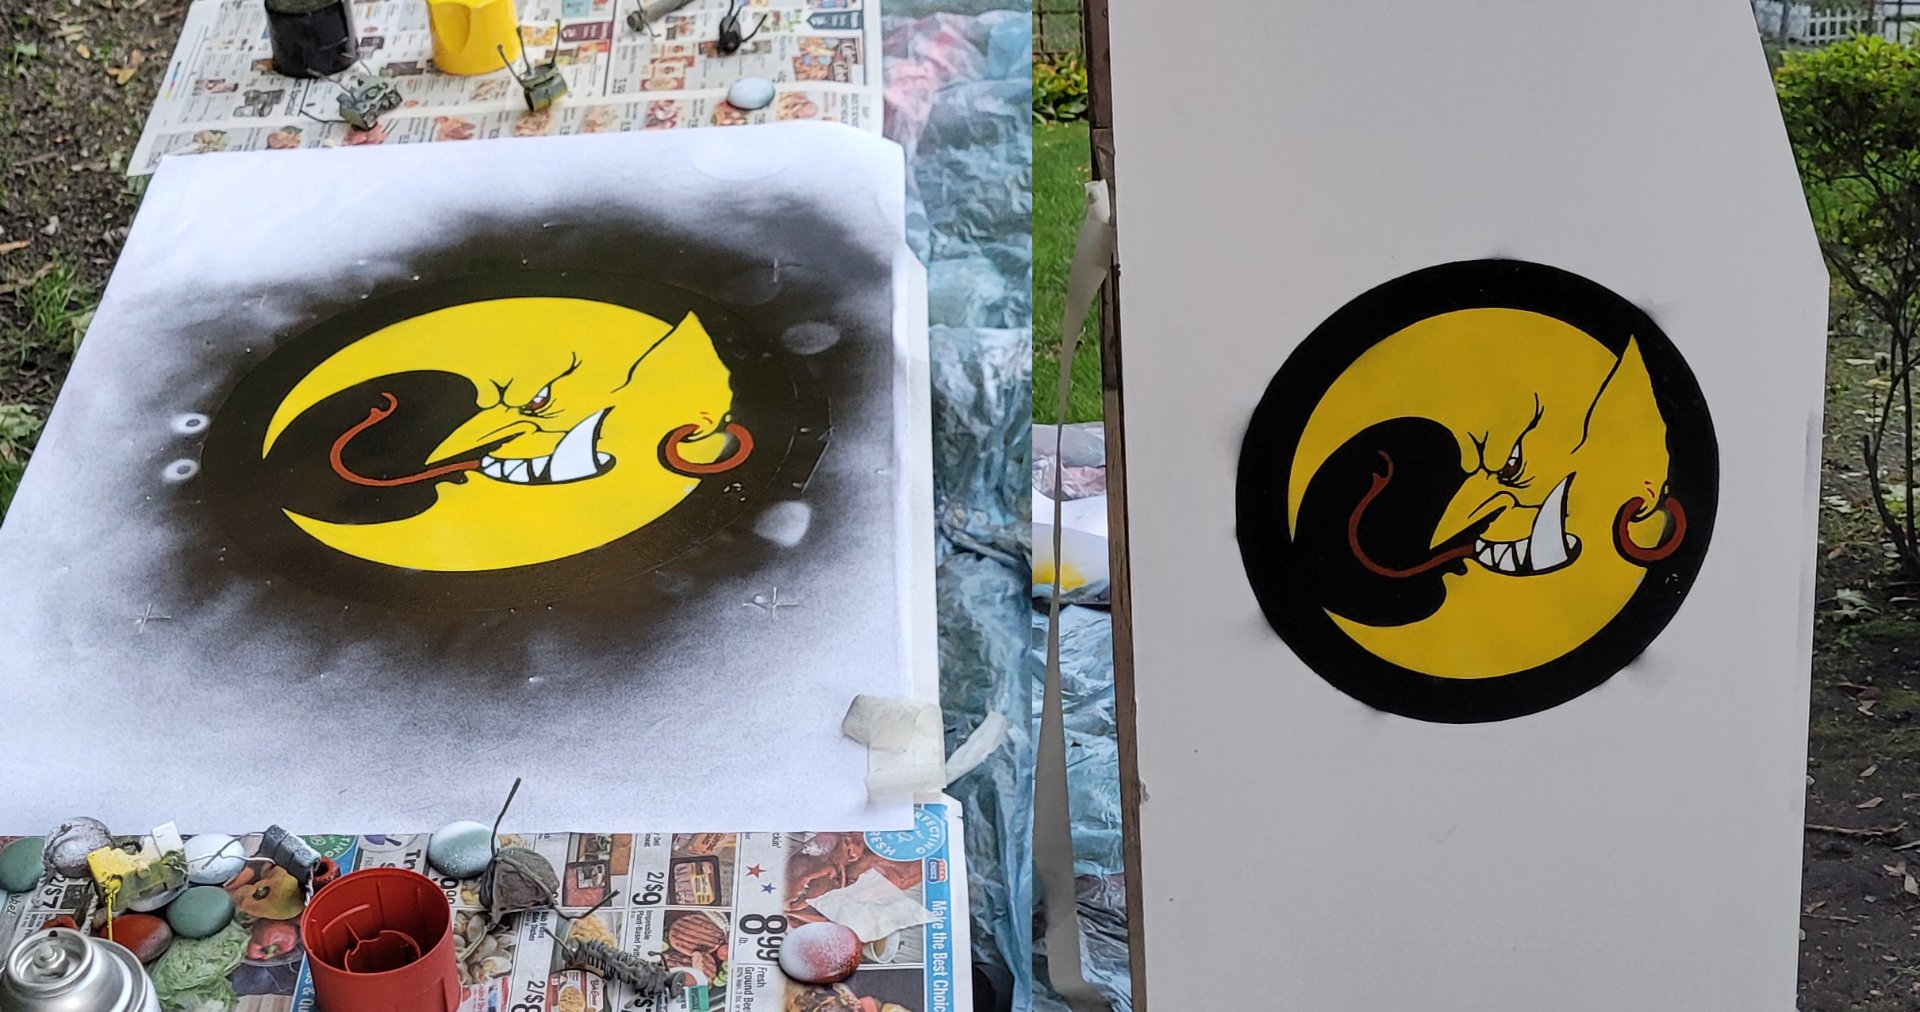
And in a second lucky break, because it was sprayed onto particleboard, it actually cleaned up pretty well with isopropyl alcohol.
The finishing touch for that side, the company name, was comparatively easy. dimensionally it just fit inside the laser cutter, so we used that to cut it out of cardstock.
I think we even painted this one on indoors (another bad idea but the cab was heavy).
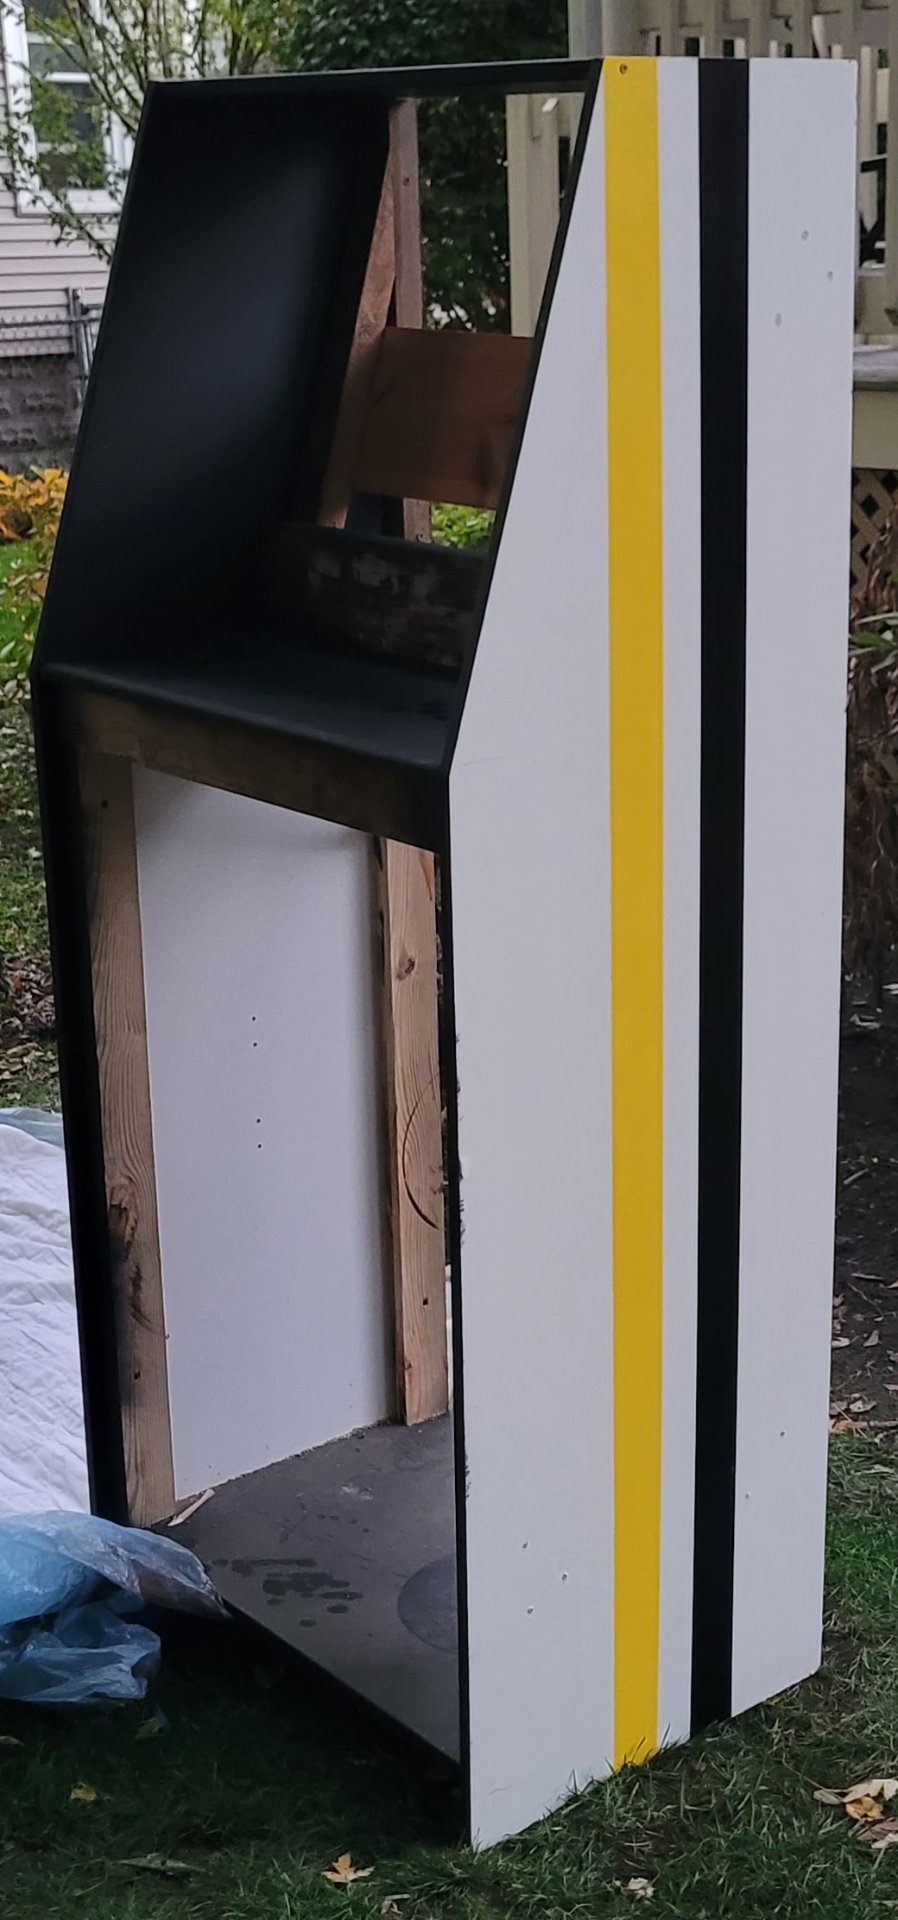
We definitely weren't going to repeat all that for the side facing a corner, so we did a simple two-color racing stripe instead.
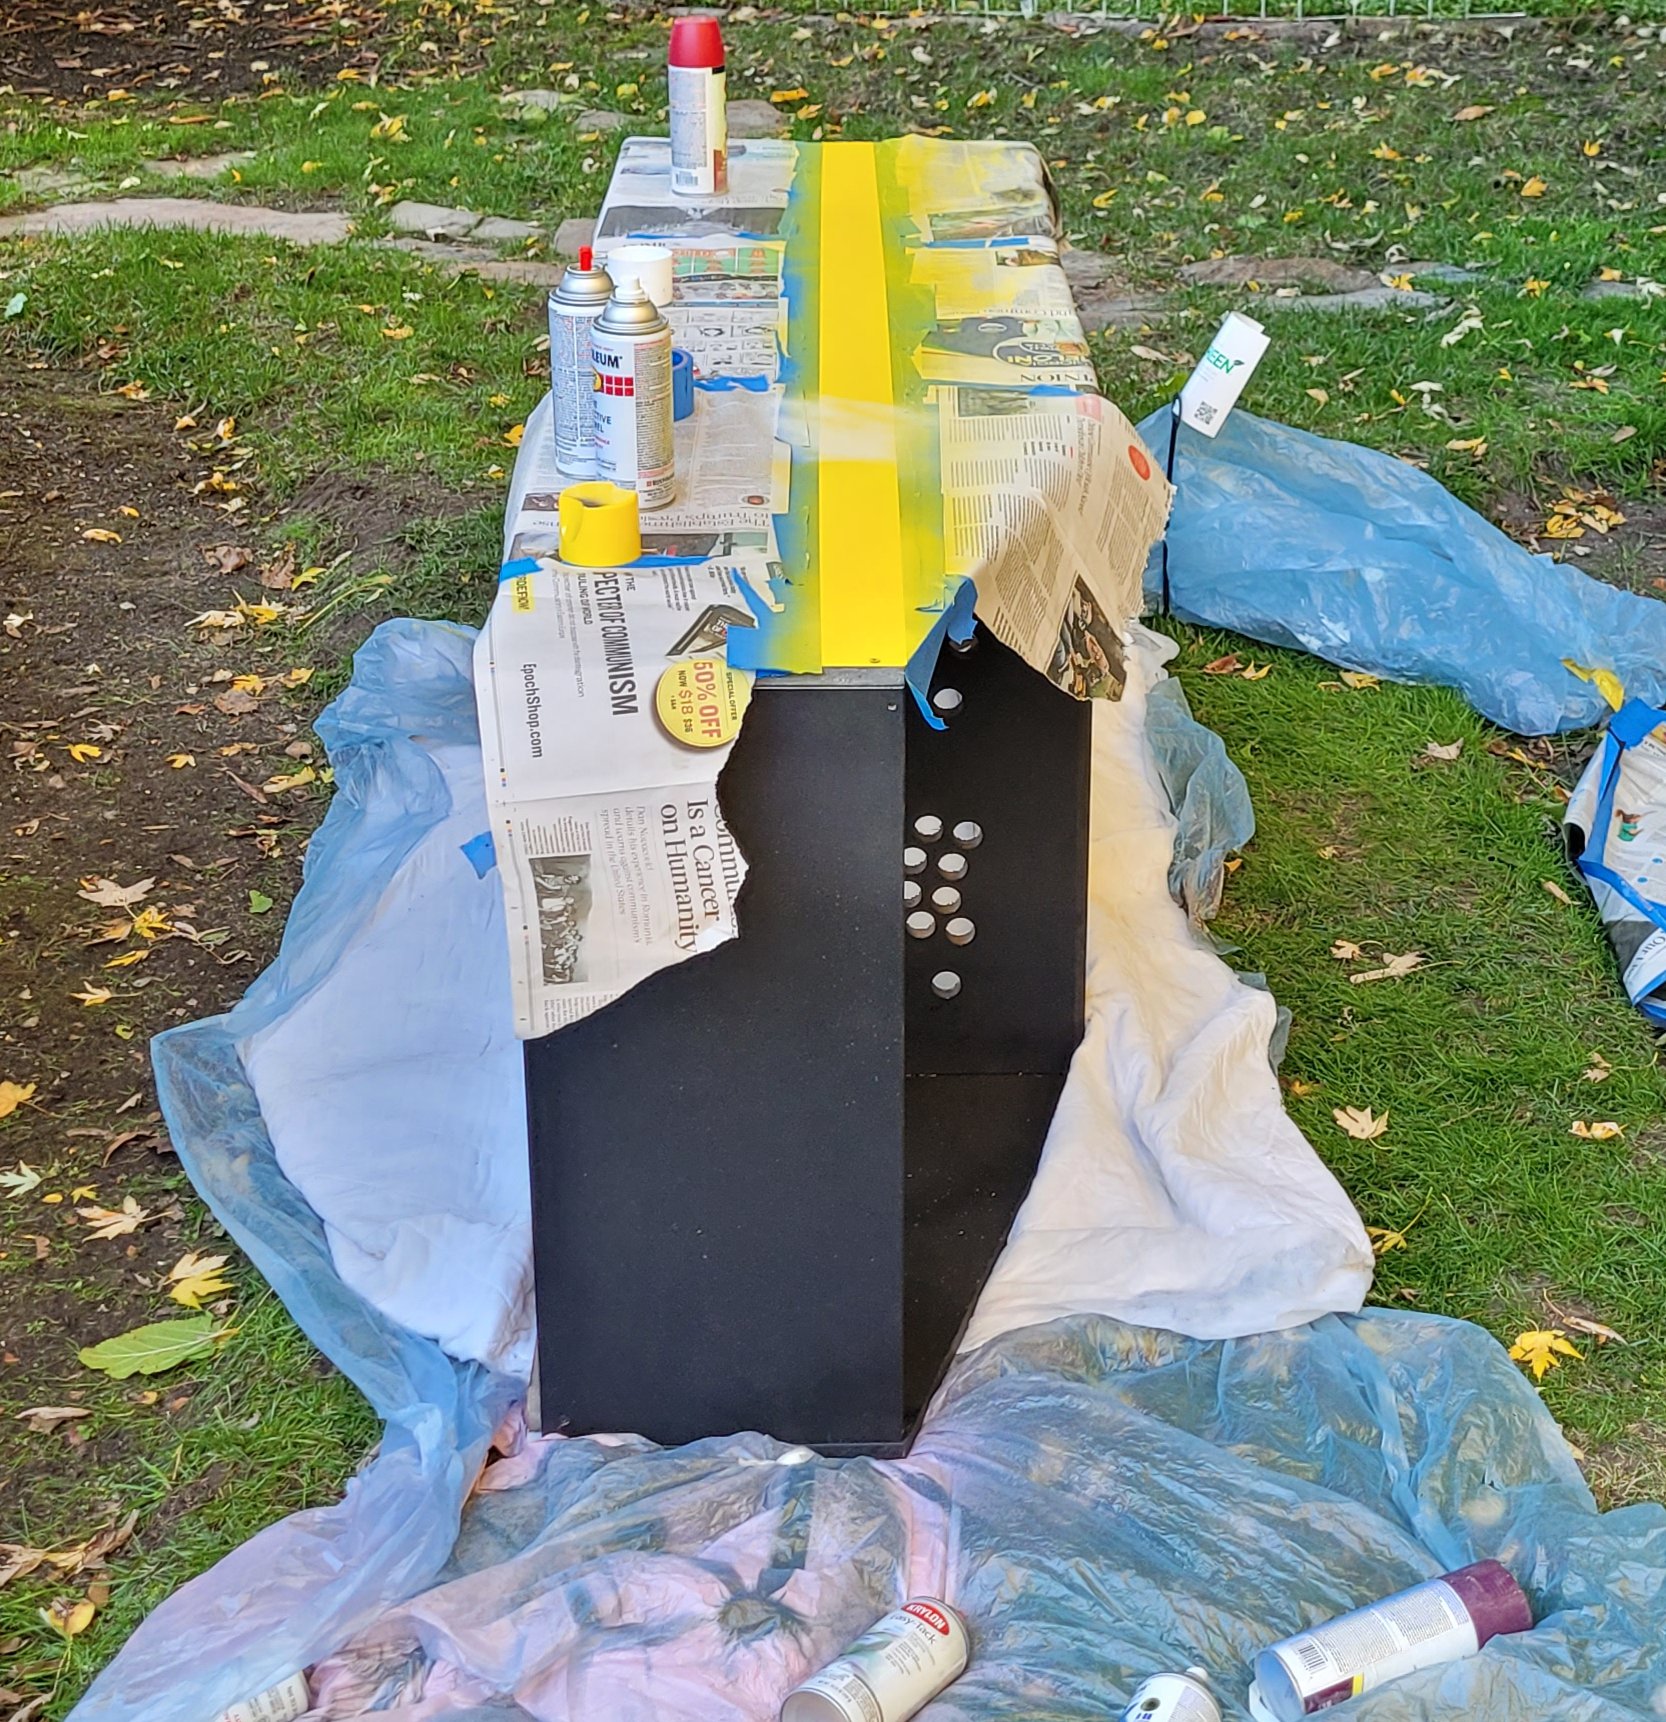
It's always nice when your stencil is just a length of painter's tape and some newspaper. Even that garbage yellow paint couldn't go too badly this time around.
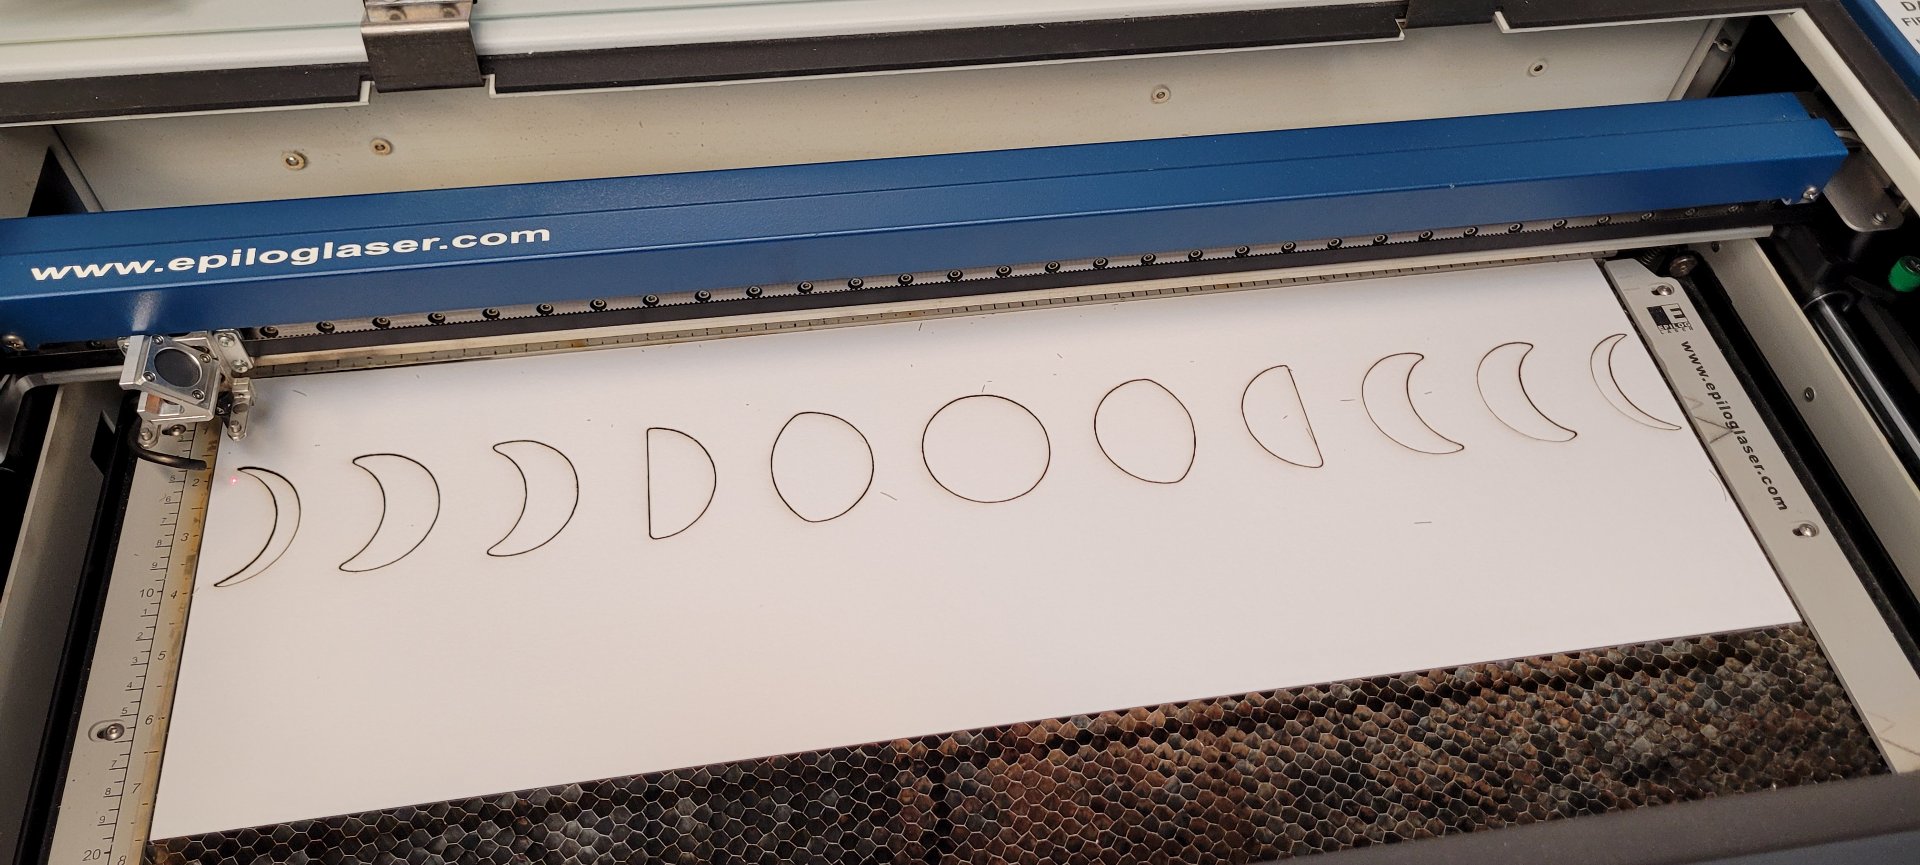
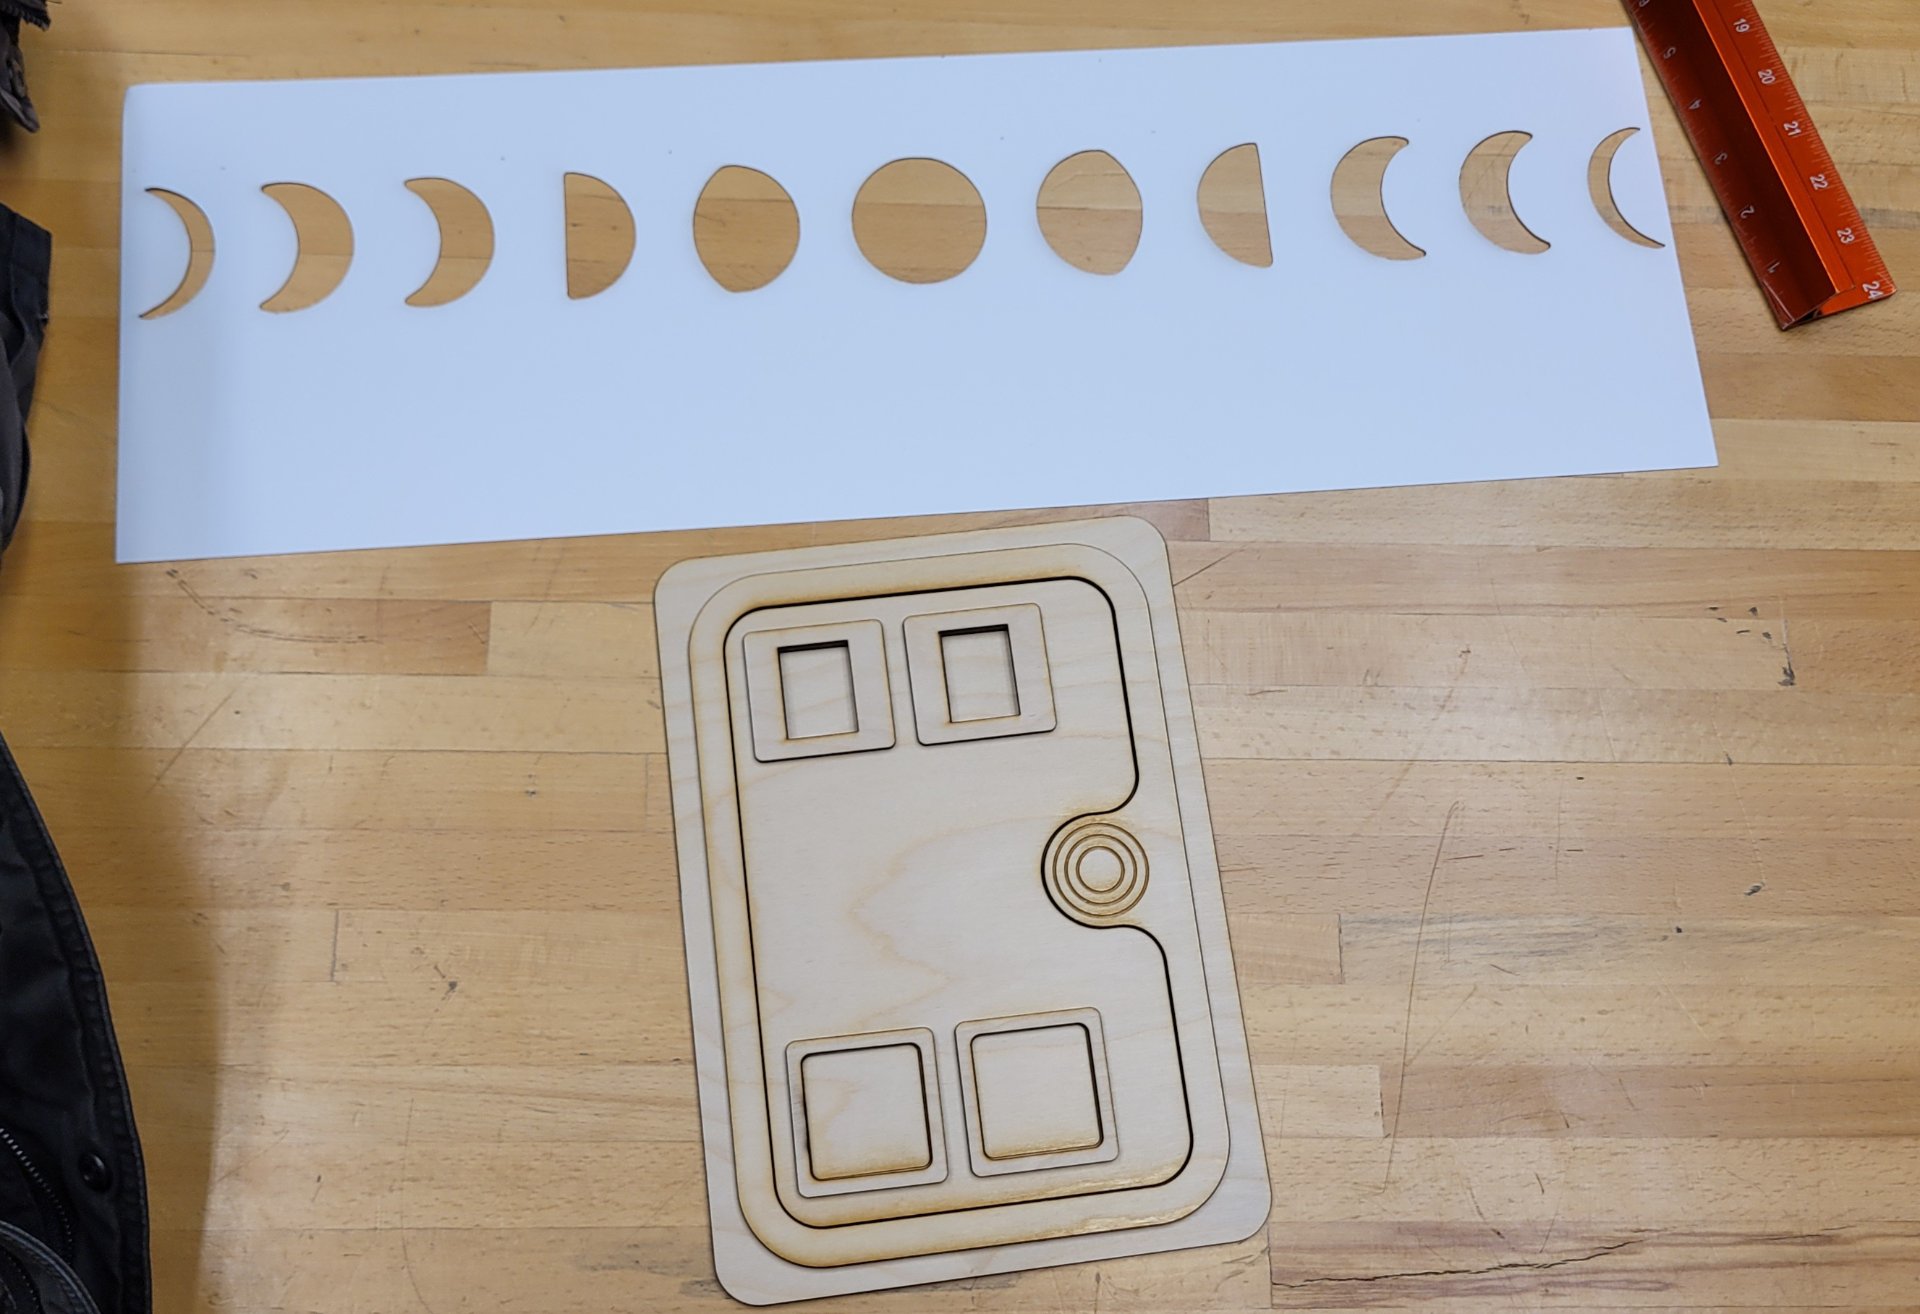
We made another trip to the makerspace and cut out a couple more things. The first was the very basic phases of the moon template I'd bashed together for the front marquee, the second was a fake coin door and buttons I found online.
We thought about doing something fancy like getting a real coin door, wiring up buttons so you had to push them for the 'coin' button in the emulator, but it seemed like a wiring hassle and our plan was for the lower part of the cabinet to be storage, so it'd be better if there wasn't wiring hanging around in there.
Painting the stencil on wasn't hard because we didn't have to haul the whole cabinet outside, we just painted a thin strip of particleboard with veneer black and stenciled it, then attached it to the front above where the door would go.
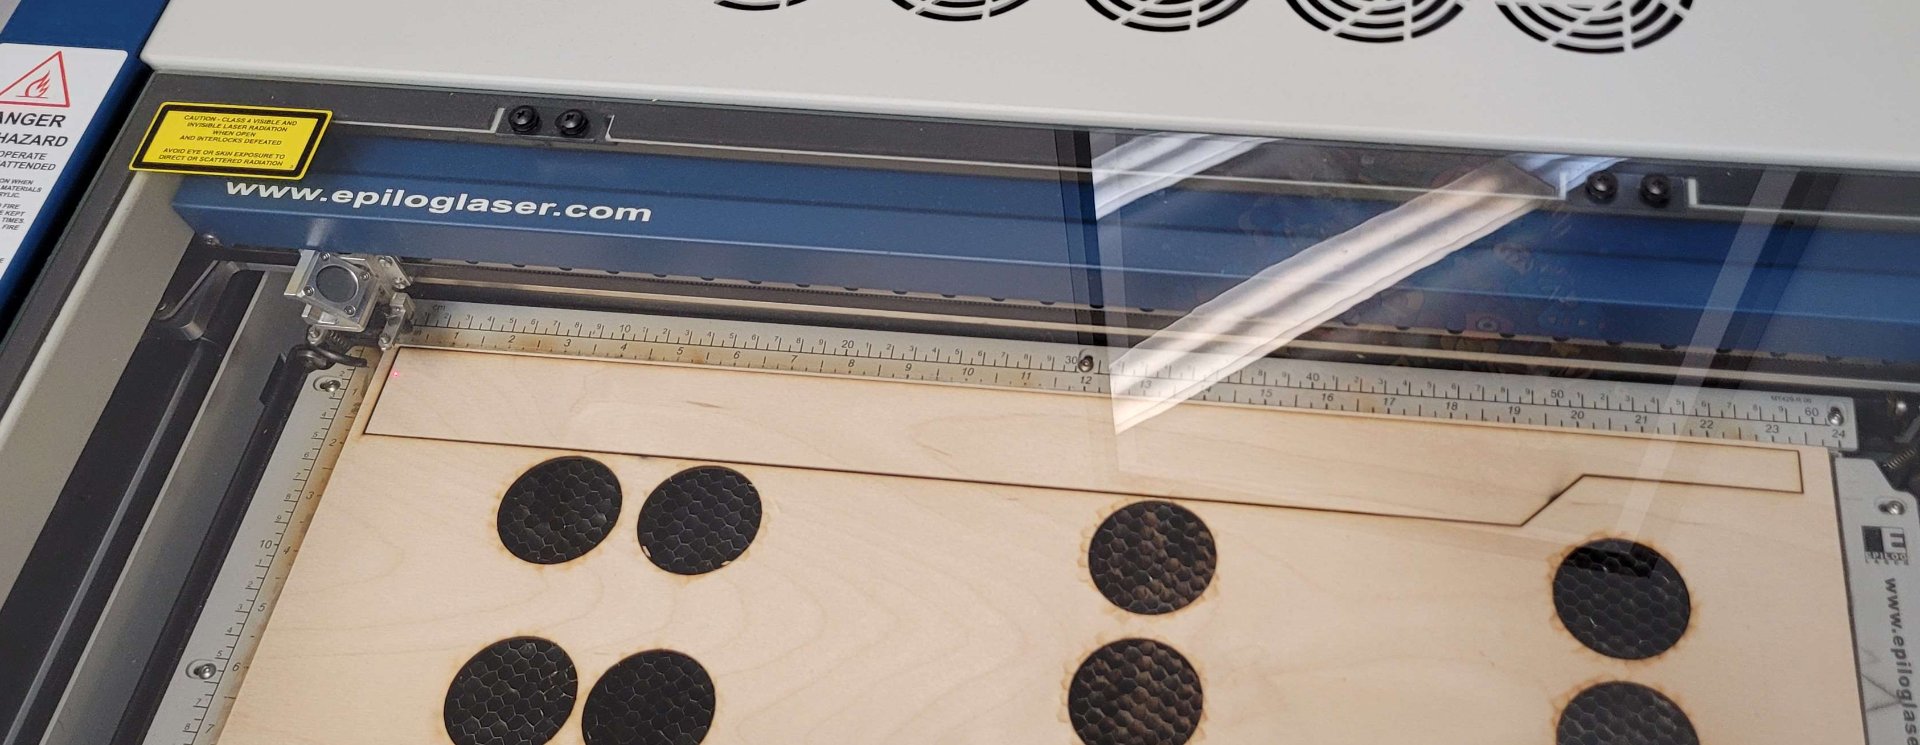
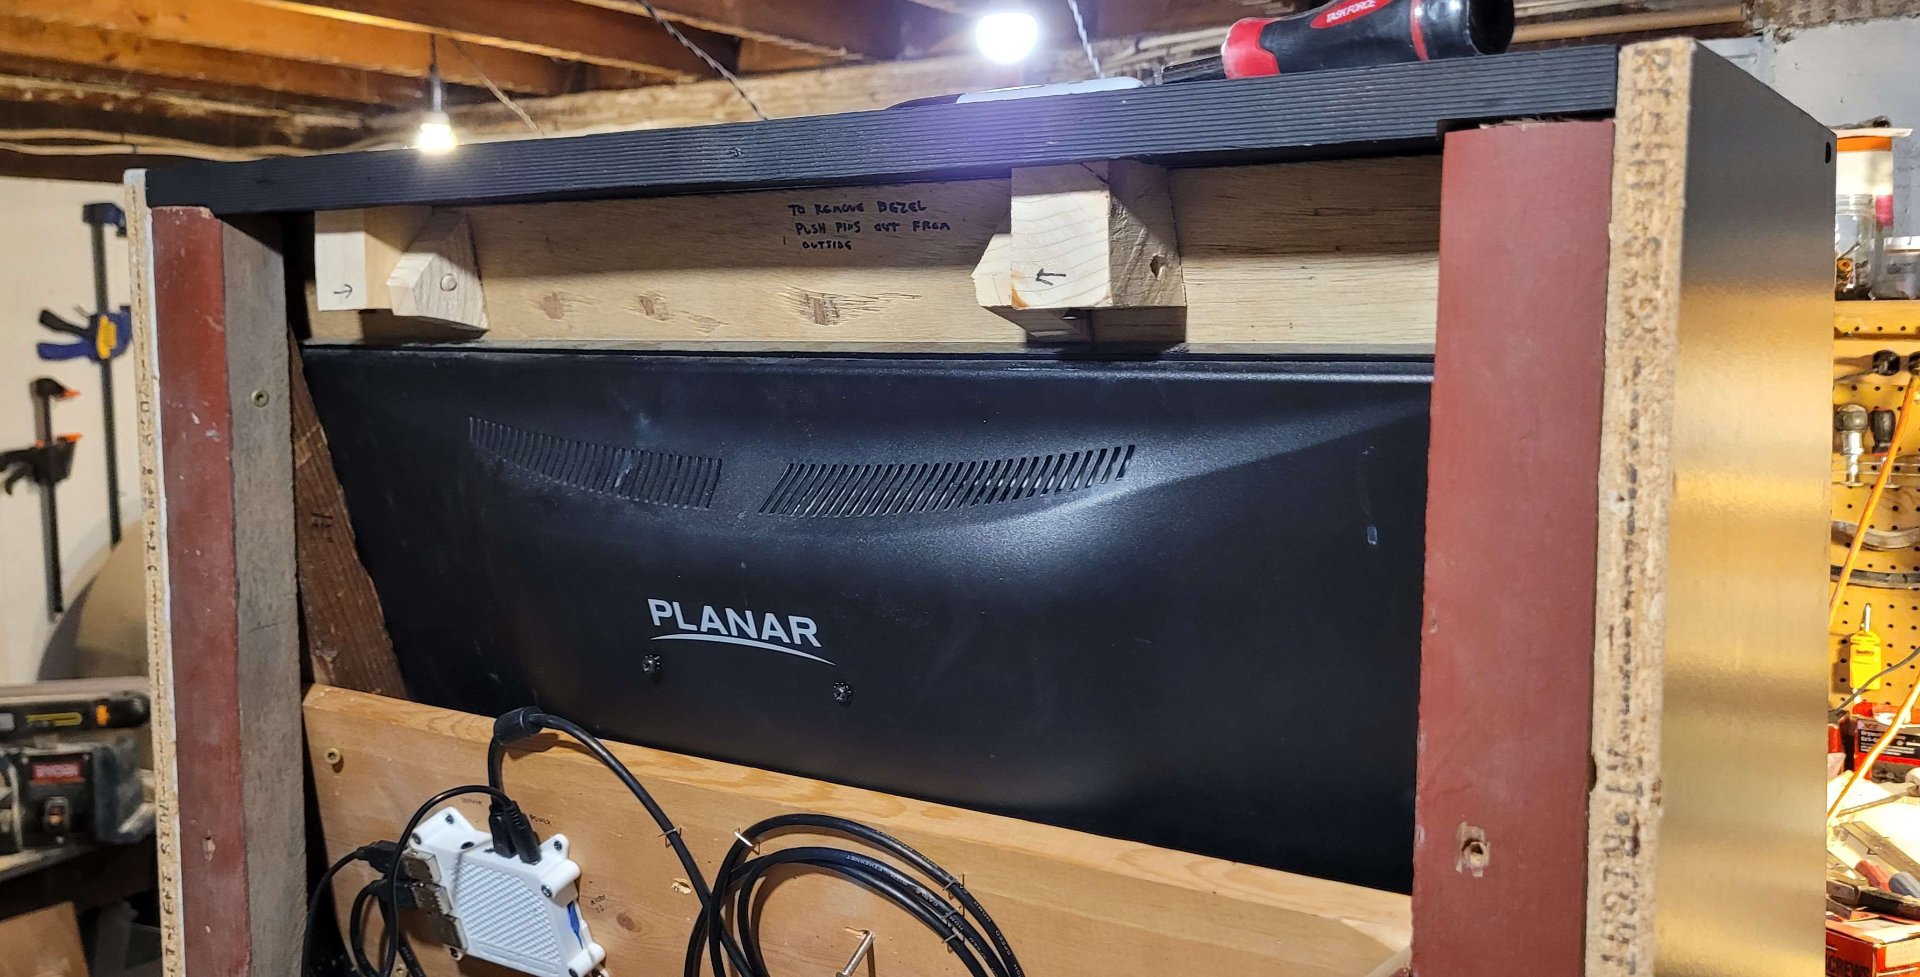
Now it was time for wiring. We got the TV in place and fabbed and test fit its bezel. (The bezel was too big for the laser cutter so we had to cut it by hand with a box cutter and a straight edge.)
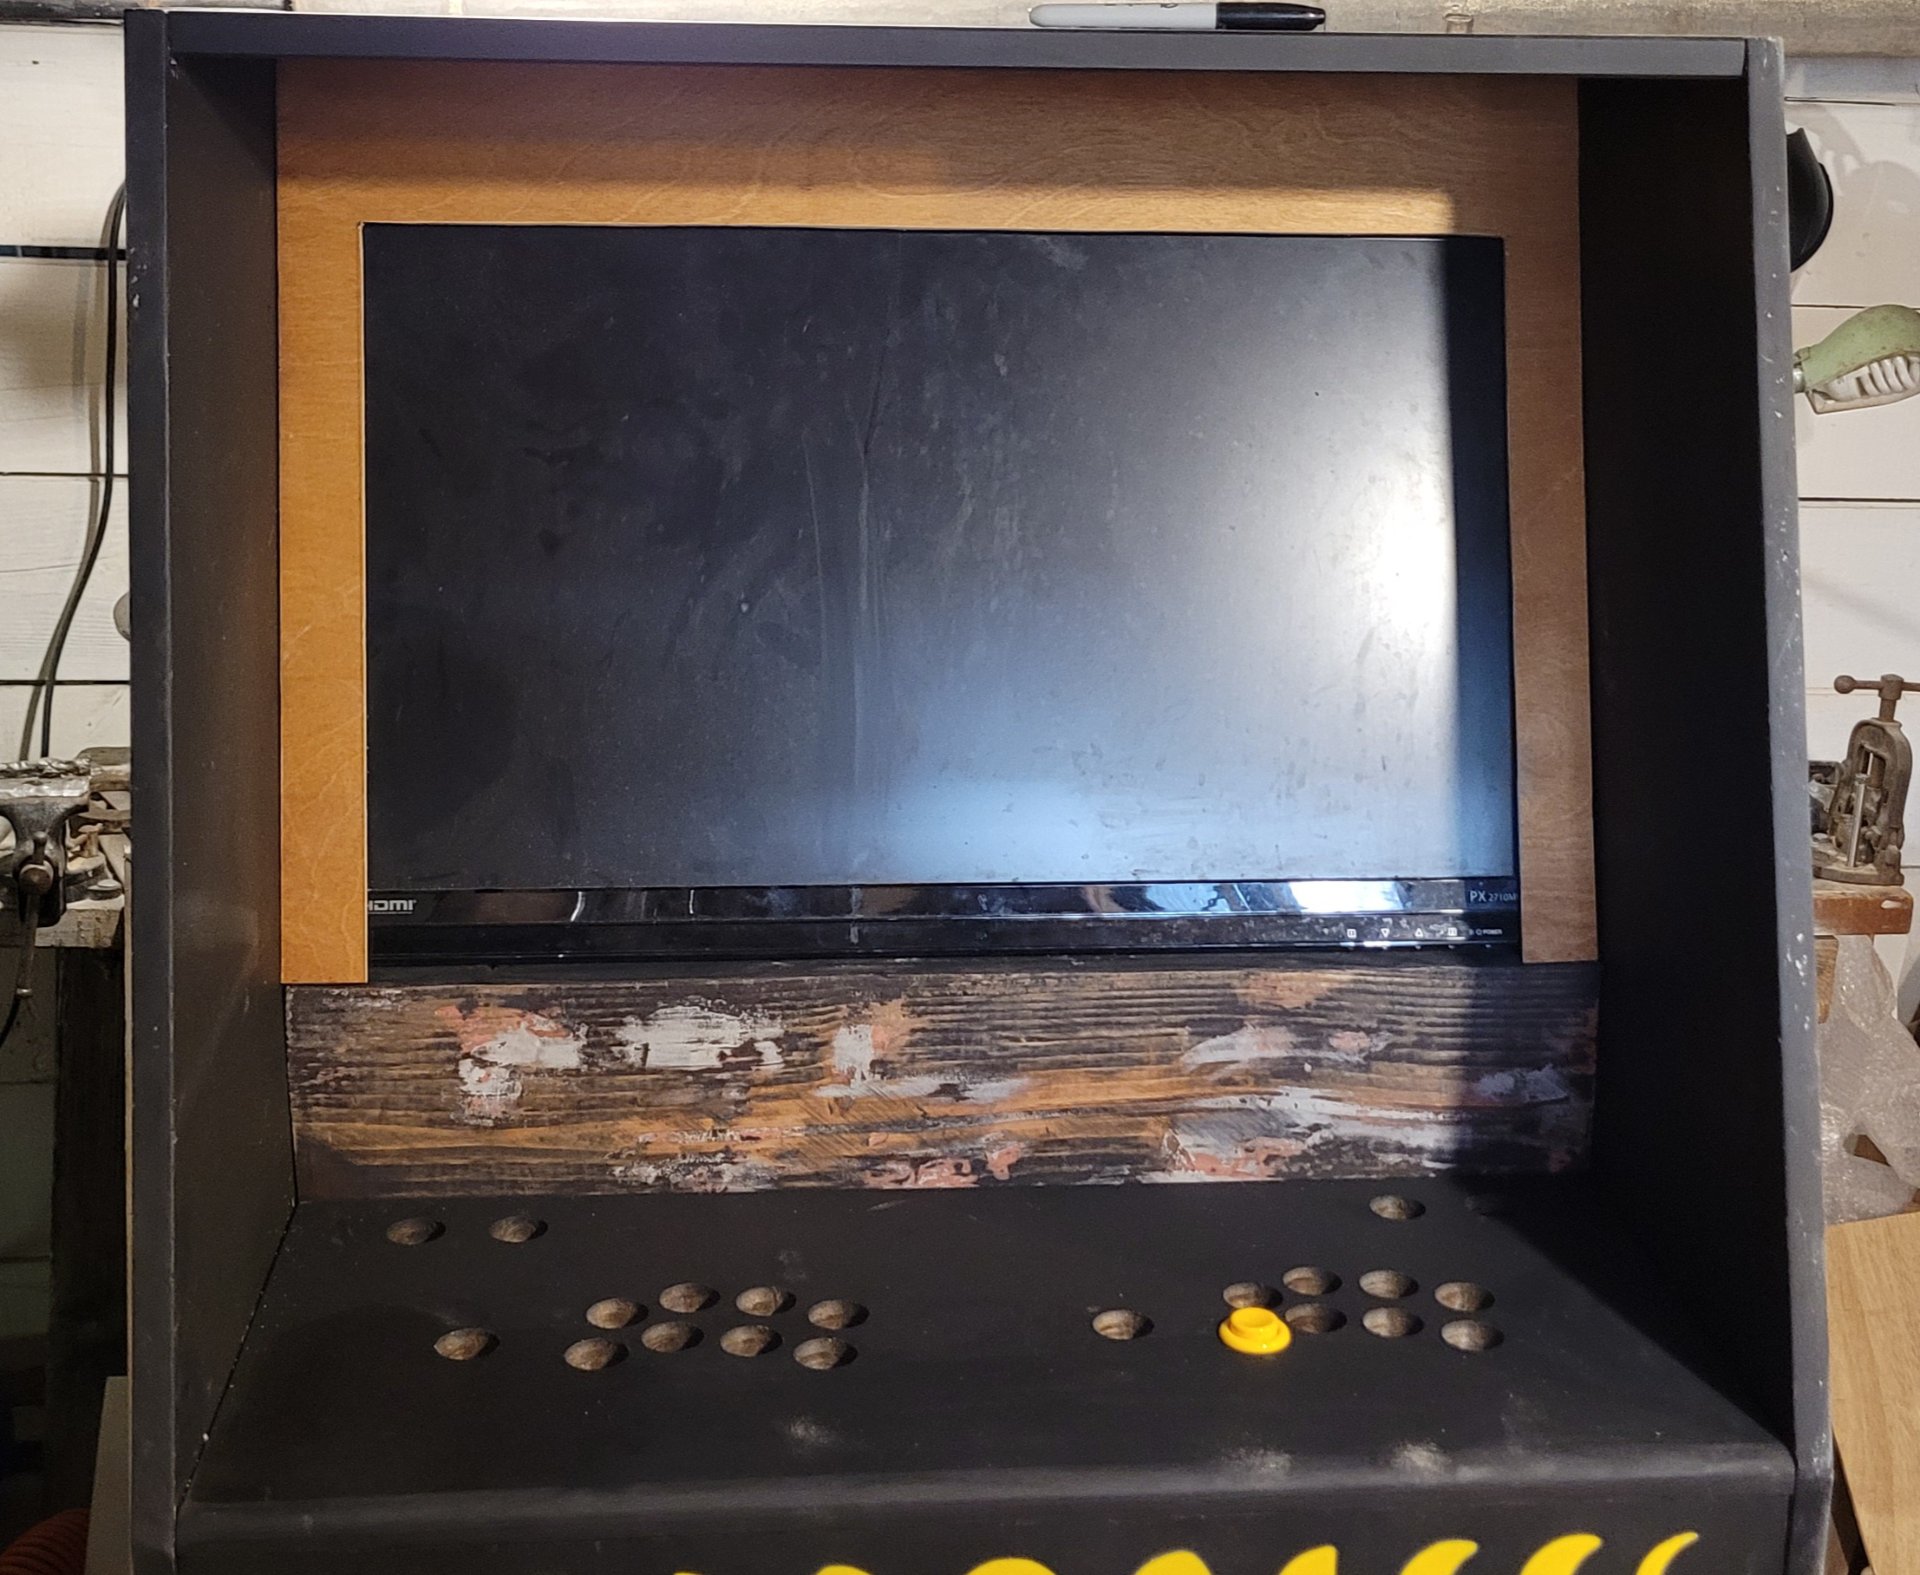
I marked the mounting holes for the screws in the back of the TV by putting in some screws, daubing black paint on the heads, and settling the TV in place against the back board. That got close enough, though it was always a pain screwing the screws in through crooked holes in a pine board. I don't think we usually had all four attached, but it didn't seem to make much difference, the weight was on the board underneath, the screws were just to keep it from falling out when it was moved.
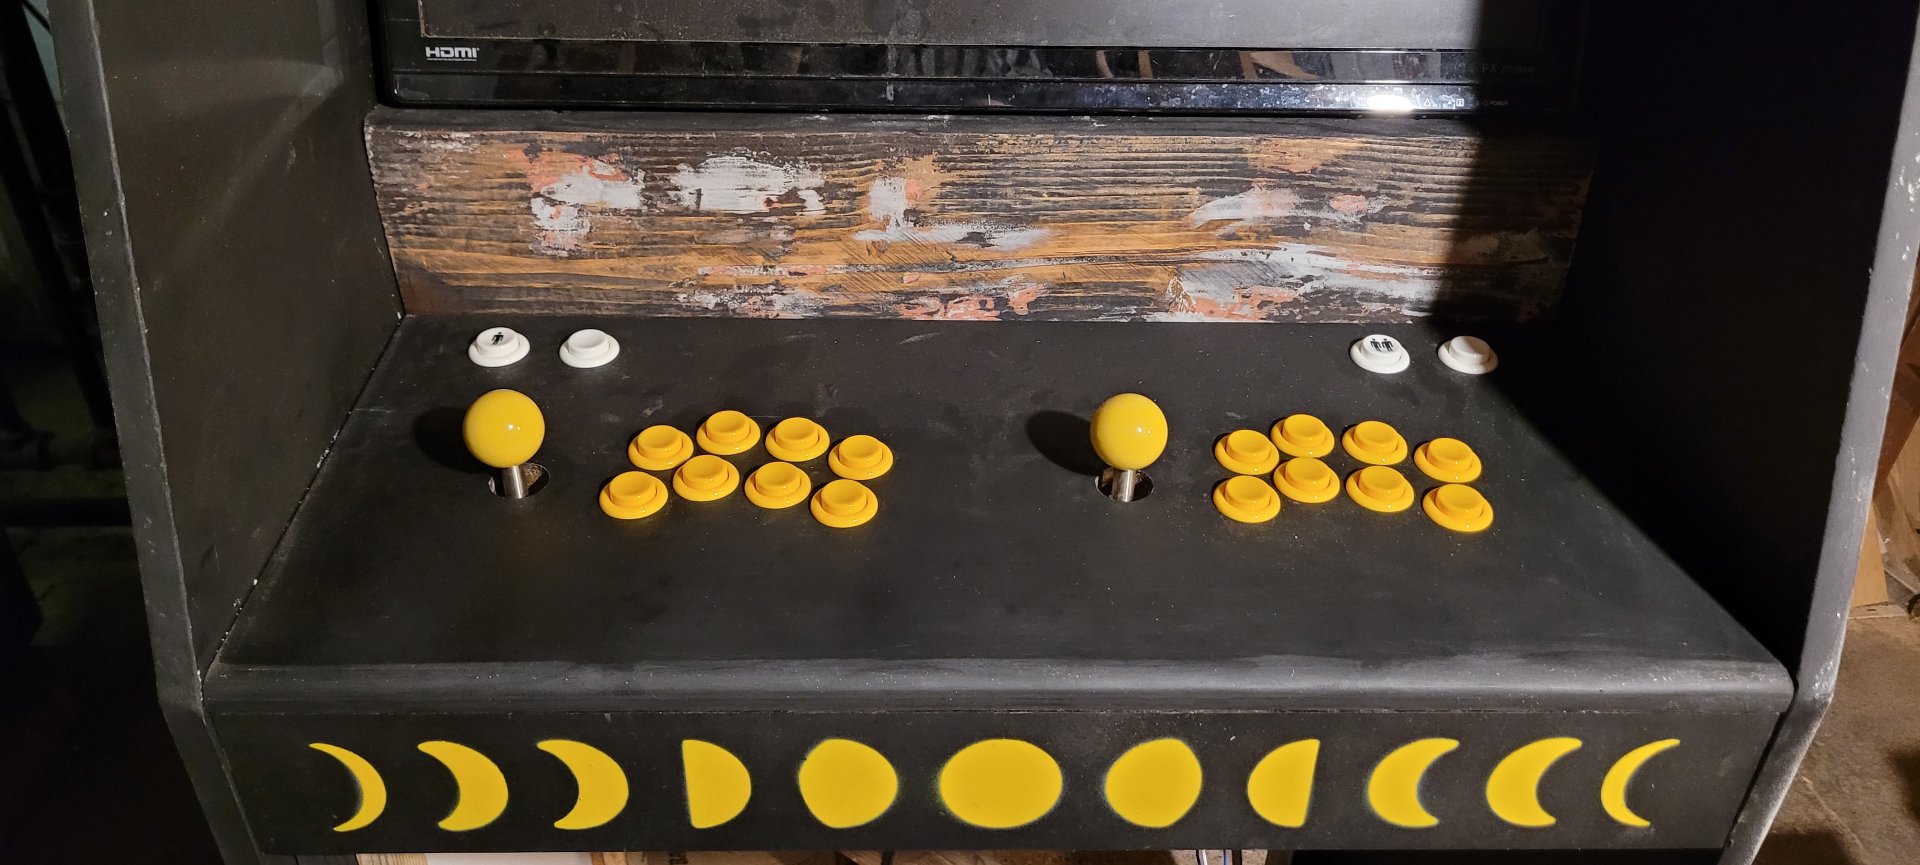
Then we added the buttons. Suddenly it was starting to look like something. I had to keep shooing my friend off the control panel (which wasn't currently doing anything) because they were so excited about trying out the joysticks and buttons. The verdict was good though, it was a comfortable height for them, even with shoes on. No carpel tunnel risk on this one.

Oh yeah, cable management is my passion. I think my friend eventually redid it so they looked nice.
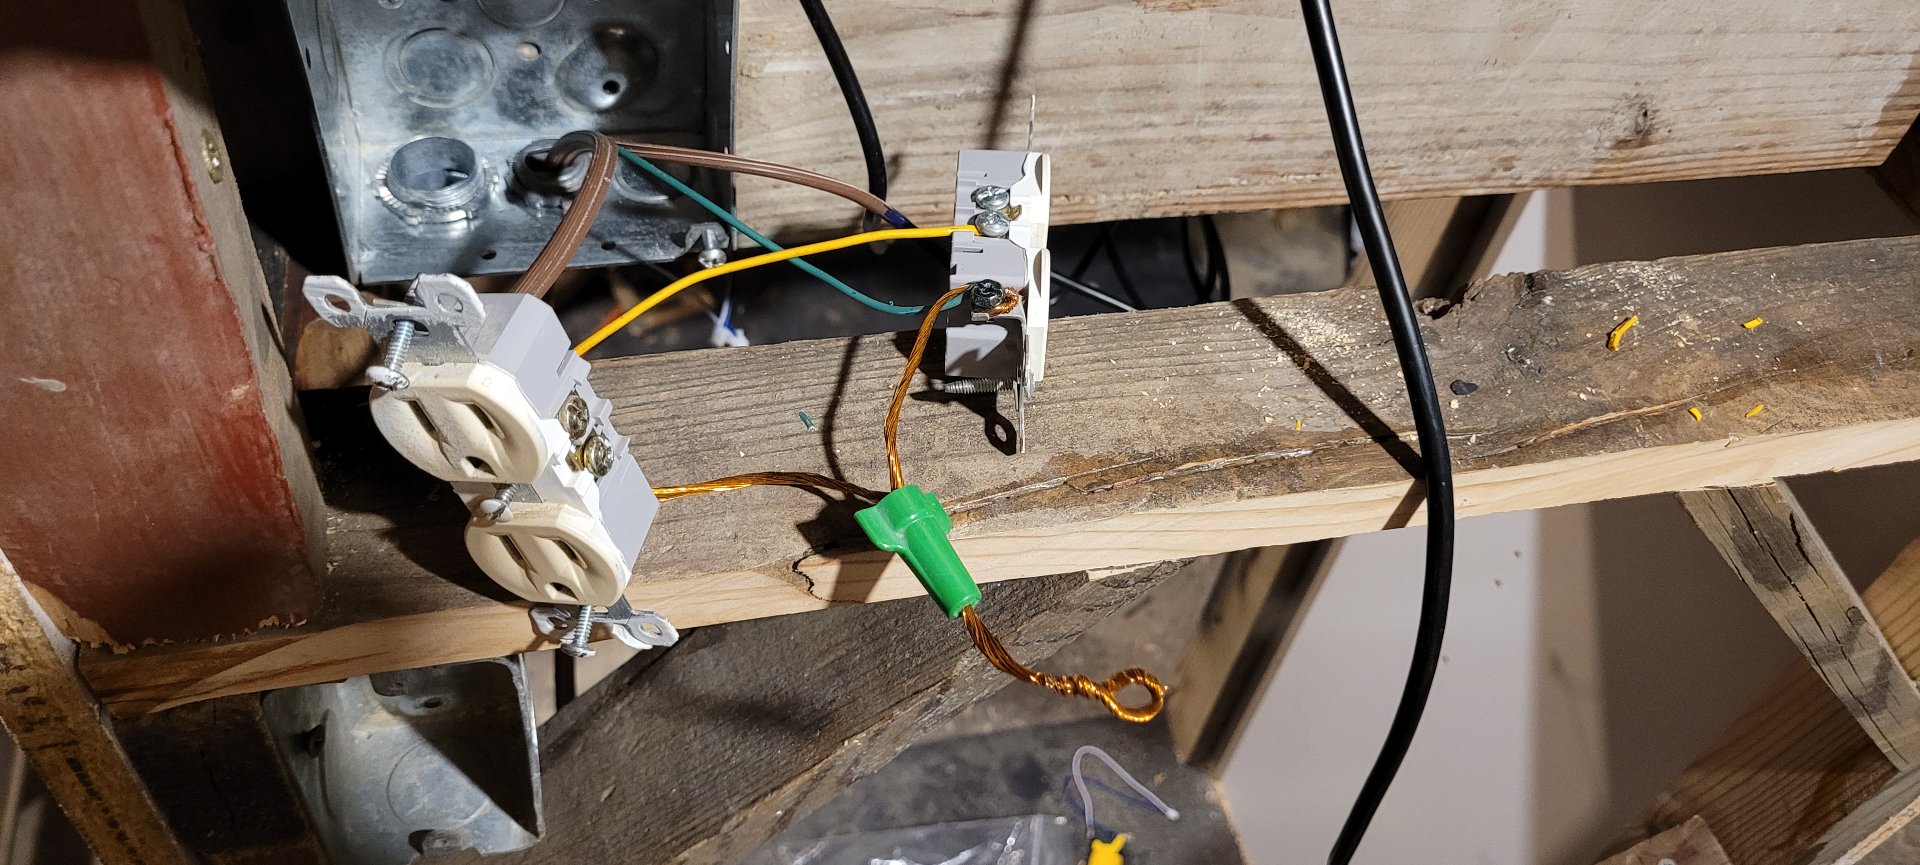
I wired the cab up for power using some outlets and a lightswitch I got from our Buy Nothing Group, some spare wire, and a power I cord I ripped off a refrigerator someone was throwing out. (Don't worry, they'd already taken the doors off and dumped it in a pile face down on the curb). Learning from last time, I set it up so two sockets were switched and two were on all the time (so the TV could be left on). It's a fairly simple circuit, but just in case I took a ton of pictures and ran it past an electrician I know, who said it looked fine, asked if it worked, asked if it caught fire, and gave me their blessing.
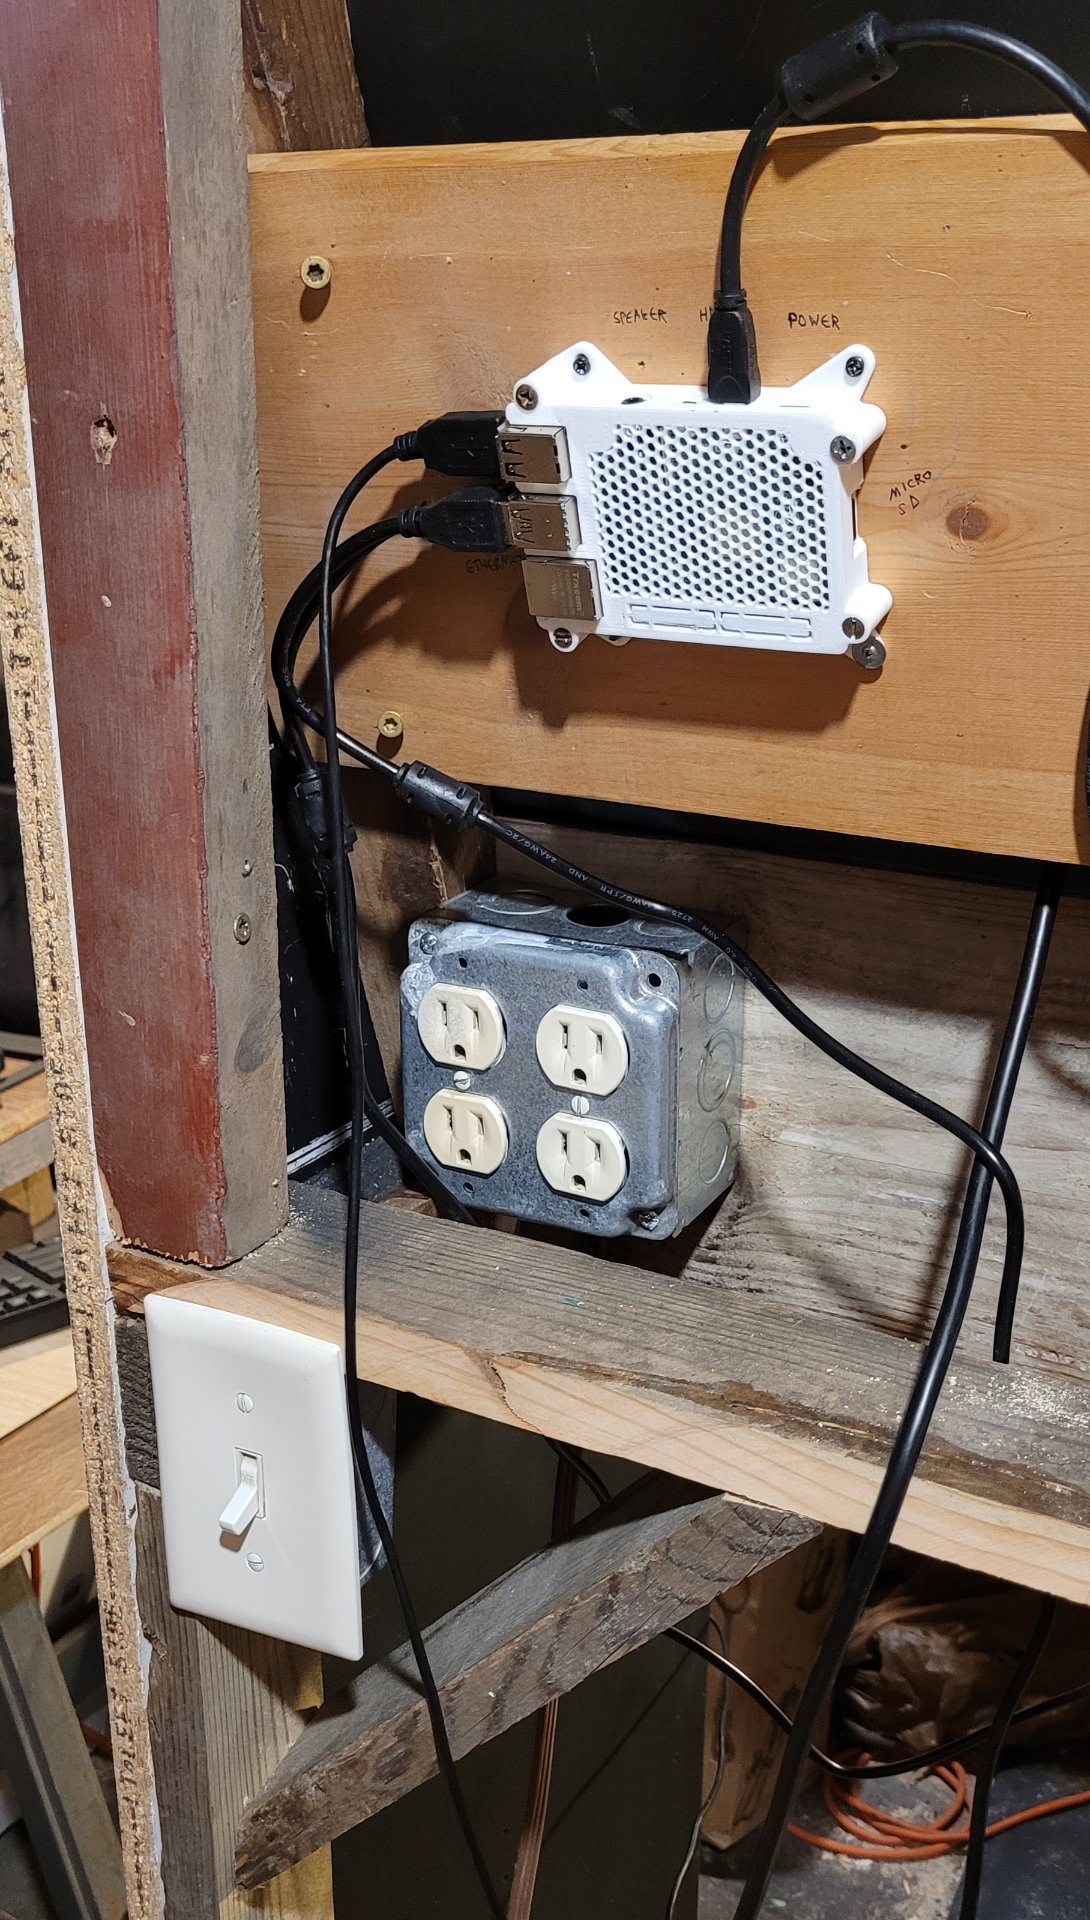
I printed the case for my friend's raspberry pi. I know we could have used a regular old junk PC and still even been able to run retropie if we wanted, but they were planning to leave it running most of the time, and the pi has comparatively low power requirements, so that seemed like a good long-term plan.
It lives!
You might have noticed that somewhere in here the design had changed. My friend was worried the 'shelf' area for your hands on the original design would be too crowded, and the screen was a bit close. Considering that it was a widescreen TV which would only be showing a square game in the center, the cabinet sides didn't actually hide much. And standing the TV here simplified construction even further.
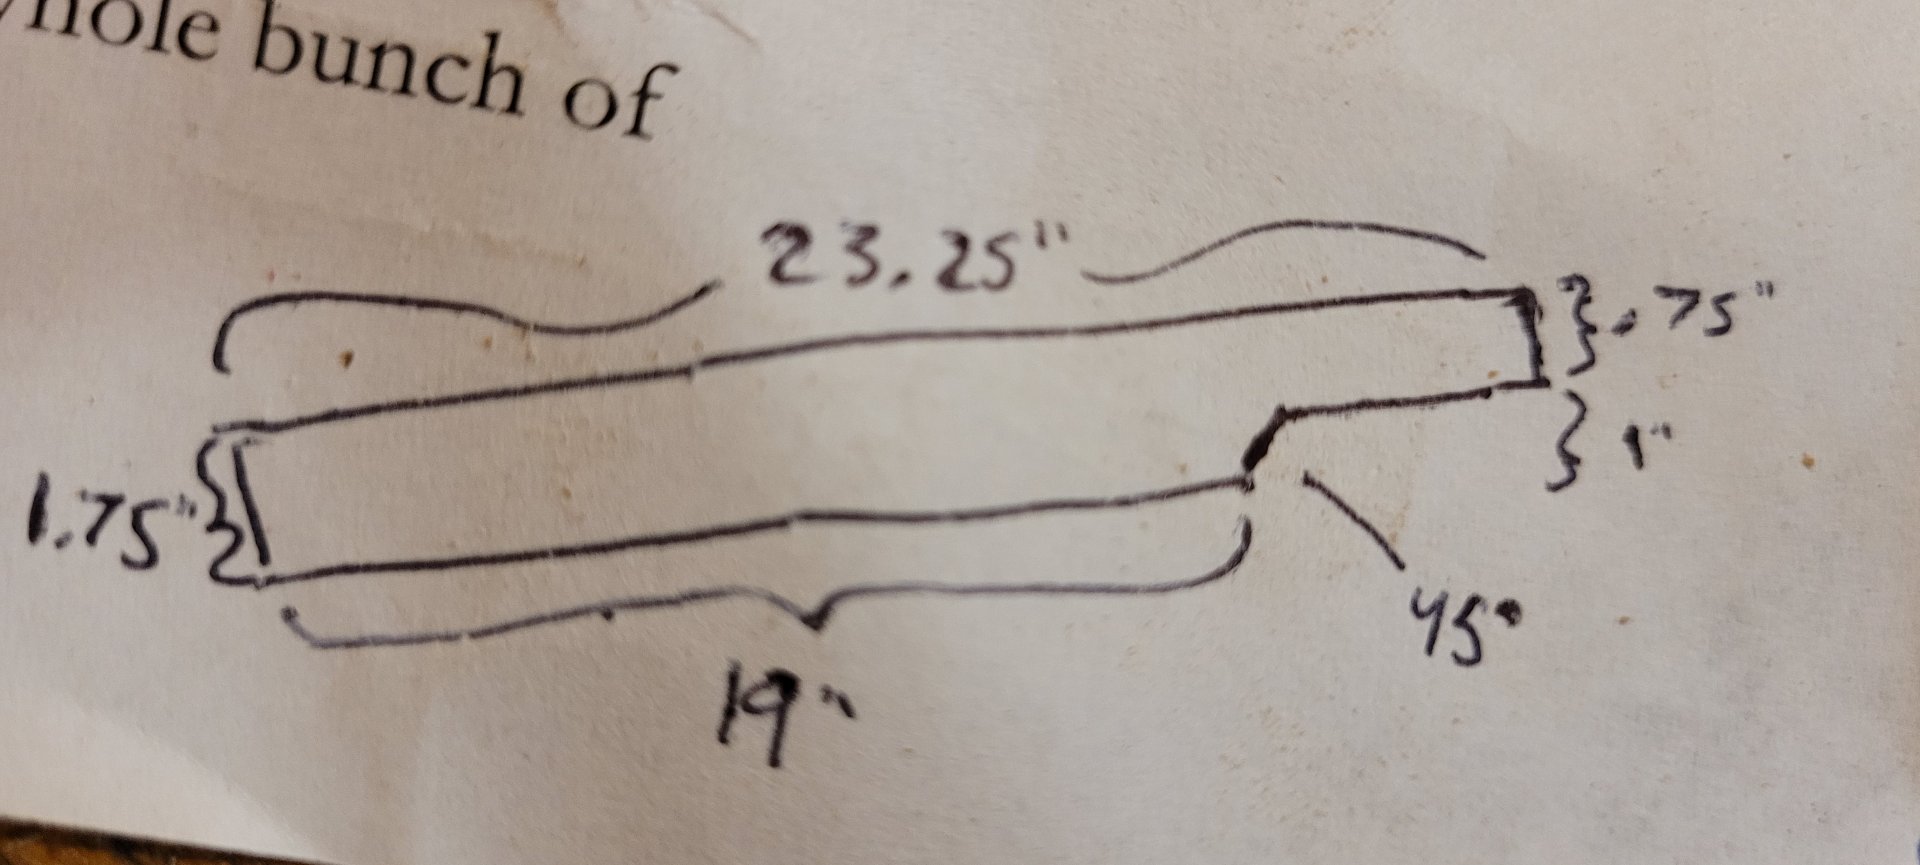
I cut a separate marquee piece for the bottom of the TV (I think because the design changed somewhere along the line?). It had a cutout at one end so the TV could see the IR light on the remote, and so the user could reach the buttons under the screen.
I glued the two pieces together, painted them, and worked out a way to attach it using hangers at the top. I remember it being difficult to attach it in a removable fashion, without anything showing on the front, and this is what I came up with.
The final design used wooden pegs to fasten it together for some reason, and I remember you could push them back out using a pencil which was handy during all the test fitting. There was probably a better way but this has held up fine.
The next step was finding enough flat, single panel material for the front panel/cabinet door. I watched our Buy Nothing and Everything is Free groups, and scouted around on trash days for months, looking for something big and flat enough (tabletops etc) and had no luck. A few house doors came up but they were like an inch too thick for how we wanted to do the hinges. Finally I gave up and bought a slab of particleboard. The home depot I got it from was able to use their fancy saw to cut straighter edges than I could have with my skillsaw, which was great. When he was done, the guy asked if I wanted the rest. I said they could keep it to resell, I was happy to pay for the whole thing to get the piece I needed, and he said they'd just throw it away. That's how I ended up with a (I think) four-foot by eight-foot piece of particleboard cut into two door panels and one long piece. The spare door eventually became the top of this table. The long piece hasn't found a use yet but it'll probably end up being a shelf. I haven't gone back to those stores since.
The last piece was a bit of cladding glued/screwed to the board under the TV. I honestly cannot remember why I did it this way, but I painted it black, glued it in place, and we only decided after to add labels to the buttons on that piece.
I took a bunch of measurements of the buttons, lasercut a couple very simple START SELECT stencils with various spacings, found one that fit well, stuck it in place (probably with easy-tac), masked the area with tape and newspaper, and gave it a couple quick hits with rusto white.
Considering the circumstances, I'm pleased with how they came out.
The last big task was moving the thing. That was a challenge as making it sturdy made it pretty heavy, though not as heavy as the real thing with the big CRTs would have been. We rented a moving truck, and used ratchet straps to fasten it to the back inside wall, standing upright, wrapped in blankets. As a bonus, we also delivered some speakers my neighbor wanted to give away.
My friend was planning to replace an armchair in their apartment with this cab. Their plan was just to throw it away, but first thing when we got to their apartment, I posted the chair to our local Buy Nothing page with the promise we'd deliver it. Then we set about hauling the cabinet inside, rearranging furniture, getting everything hooked up, cleaning off months of sawdust, and finally testing it out.
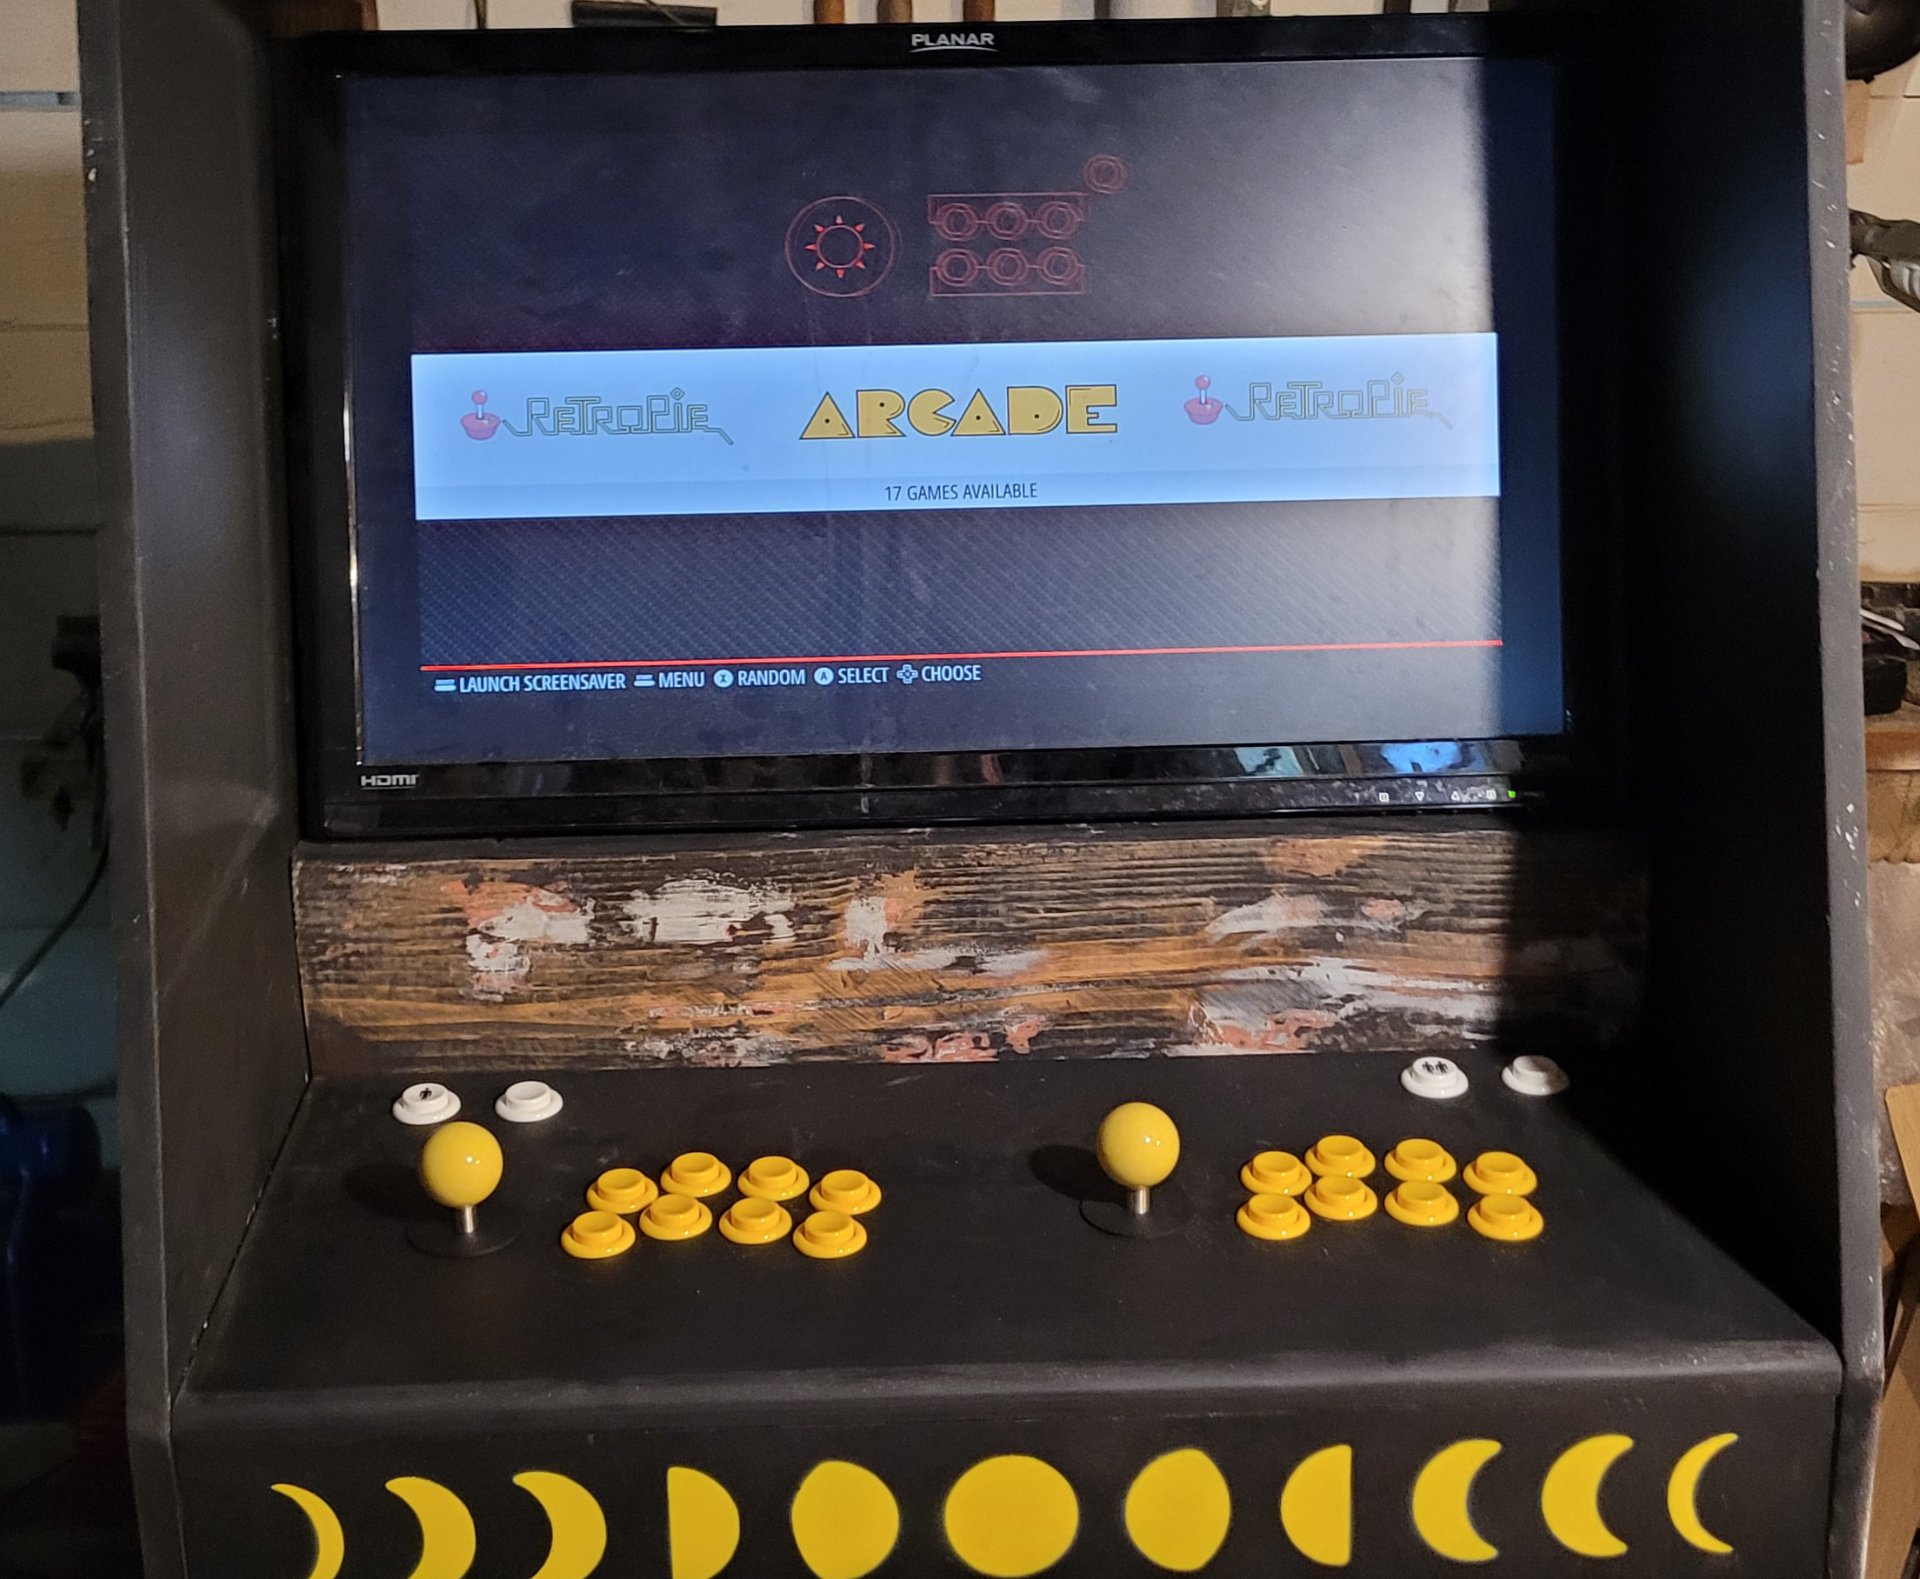
Hanging out, finally playing games on the arcade cab, in the place where it was supposed to be, was awesome. It's since seen a lot of use at parties, and it gets a lot of attention from newcomers to their apartment. We still haven't gotten around to stickerbombing it yet.
By the time we were done and the celebratory snacks had been eaten, we had a taker on the chair. We drove it to their apartment and carried it upstairs on the way back to the rental place.
42
43
44
45
46
47
48
49
50