this post was submitted on 24 Mar 2024
13 points (100.0% liked)

homeassistant

12066 readers
5 users here now

Home Assistant is open source home automation that puts local control and privacy first. Powered by a worldwide community of tinkerers and DIY enthusiasts. Perfect to run on a Raspberry Pi or a local server. Available for free at home-assistant.io

founded 1 year ago
MODERATORS
 

I am having issues flashing ESPhome on these ESP32 s2 minis. I have tons of esphome devices. This isnt nearly my first. However it feels like it today..

These are the units I purchased. https://www.aliexpress.us/item/3256805791099168.html

The purple board. S2 Mini 2MB PSRAM.

Anyone have experience with these boards? Thanks.

top 9 comments
sorted by: hot top controversial new old
[–] TCB13@lemmy.world 4 points 7 months ago* (last edited 7 months ago) (1 children)

Talking about this board: https://www.wemos.cc/en/latest/s2/s2_mini.html. High-res board pintout poster here. Details here.

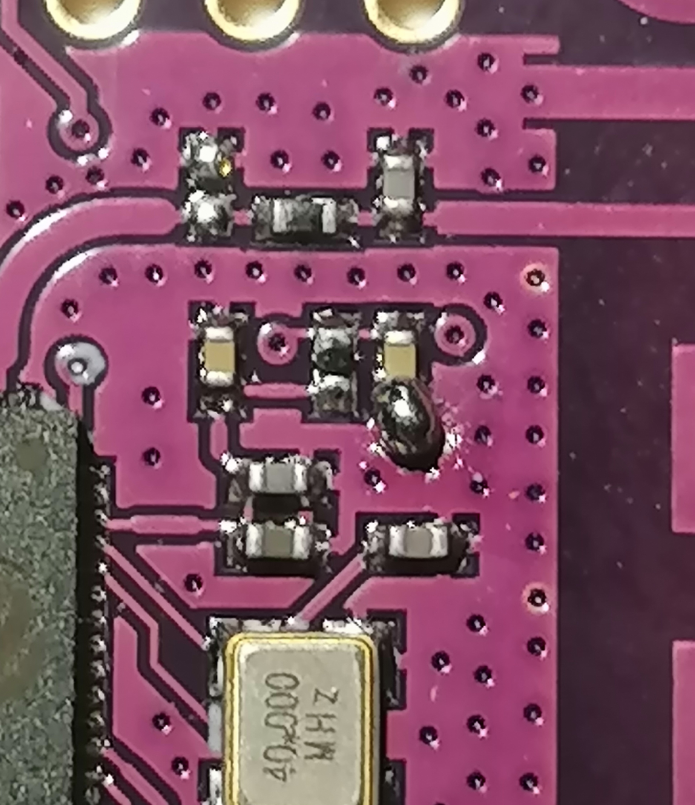
There are different versions of of the board on Aliexpress and some have a design issue that causes random reboots when the wifi is in use. Here is an analysis of the defective boards:

Those boards are tricky to flash the first time. You'll have to use the ESP32 Flash Tool + CP210x drivers in order to burn the first firmware, then you can upgrade as always via wifi.

web.esphome.io fails because of an issue with esptool-js described here. To get around this download the generic ESPHome firmware from https://github.com/esphome/firmware/actions/runs/7443385432 > esphome-web artifact > extract the esphome-web-esp32s2.bin and flash the board using the tool bellow with the address 0x0 and DoNotChgBin checked:

In order to get the the board into "download mode" you need to 1) connect the board to the computer; 2) press/hold the button labeled as 0; 3) press and release the RST button; 4) release the 0 button. After this sequence a new serial port should come up in your computer that you've to select on the bottom of the tool. After flashing remove the power and plug it back in and it will be done.

In your ESPHome yaml you'll want to use this:

esp32:
  board: lolin_s2_mini
  variant: ESP32S2
  framework:
    type: arduino

Those boards will run hot and disabling logging, web server etc. will help but won't fix the issue completely.

I've bought dozens of those boards from Aliexpress and the only reliable store seems to be this one. The others seem to ship mixes batches of good and poorly designed boards and you never know what you'll get.

I consider this to be a good ESP32 board when a lot of I/O and a fast chip is required. However, if you're looking for a small board to run a single sensor or a relay with ESPHome then the ESP32-C3 Super Mini (seller here) is most likely a better option as it can be flashed much faster with web.esphome.io from any browser.
[–] calmluck9349@infosec.pub 1 points 7 months ago (1 children)

This is great! I knew they were tricky to flash! But this is very detailed in the process. Looking forward to trying this when I get home from the office today!! Thank you!!

[–] TCB13@lemmy.world 2 points 7 months ago (1 children)

You're welcome. I just hope you get a board with working wifi.

[–] calmluck9349@infosec.pub 1 points 7 months ago (1 children)

Looks like I got the bad wifi ones.. trash can! Thank you for assistance! Very informative!

[–] TCB13@lemmy.world 2 points 7 months ago

Oh well, before you trash it there a couple of potencial solutions that may fix the issue.

Solution 1: routing problem on the C14 ground pad (...) the fix is straightforward. Scratch the ground plane a put a blob between the C14 cap and the ground plane.

I personally applied this fix to multiple boards and one of them actually became more stable.

Solution 2: add a 100uF (or more) capacitor between EN and GND. I personally applied this and I got some success, a few boards became stable, one of them never failed again, the others fail once a month or so.

Solution 3: Adding a small 22uF 6.3V cap along the edge of the reset switch is an easier place to tack on a cap as one side is ground and the other is the EN line.

Another person says:

I added a larger cap between EN and GND by the RST switch which did work. I verified that the EN line voltage was very choppy before this mod using a scope, afterwards it was smooth and no more random resets while using wifi.

Solution 4: Add a 10k resistor between 3.3v and EN pins to "increase" the EN signal voltage. Never used it, from the schematic it may make sense, there's a pull up there and the resistor will essentially force it up.

Here's a comment from another person that is also interesting:

After some experiments with my dad we came to the conclusion that this is a noise/interference problem, most likely related to the WIFI antenna, because covering it with fingers also fixed the issue. So we tried the next logical thing: lower the WIFI tx power, and amazingly it did fix all issues instantly! The funny part is that no additional caps are needed in this case at all!

I've read about this potencial wifi leaking into some GPIO / EN from multiple people but I'm not sure I'm convinced. By covering the antenna with a finger the person can be grounding the entire thing thus diverging the power that would've leaked into the EN/GPIO into their body.

[–] moritz@l.deltaa.xyz 4 points 7 months ago (1 children)

From the ESPHome documentation:

Support for ESP32 variants such as the S2, S3 and C3 is still in development and there could be issues.

[–] TCB13@lemmy.world 1 points 7 months ago

Yes, but there's a lot more about a board than the ESP chip itself. Read this: https://lemmy.world/comment/8814913

[–] v1605@lemmy.world 2 points 7 months ago (1 children)

It's possible these don't enter boot mode by default. Try grounding gpio pin 0.

[–] TCB13@lemmy.world 1 points 7 months ago

No need to ground it by wire. In order to get the the board into "download mode" you need to 1) connect the board to the computer; 2) press/hold the button labeled as 0; 3) press and release the RST button; 4) release the 0 button. After this sequence a new serial port should come up in your computer. After flashing the board just remove the power and plug it back and it will be done.